|
|
Post by emron on Oct 29, 2018 21:20:16 GMT 12
Flying Boat Update
It was the right decision to mend the strut fairings and re-attach them with the correct fasteners but it’s taking longer than I thought. On Wednesday, Peter helped me out and finished skin repairs to the right wing around the area of the float. The fairings are attached to the wing by 1/4” dzus fasteners and afterwards I checked out the condition of the dzus springs up inside the wing. Luckily most were still intact as they are very difficult to get at to replace. The one broken wire I could get access to, I had to climb up through an inspection hatch to reach it. I fitted a new spring up there and then I checked out if we had any new dzus studs of the right length but only found shorter ones. So I added some to the shopping list. On Sunday I repeated the process on the left wing but I found some of the original studs still in place. I freed them all off their springs and set them aside in case I can salvage them. Next week I’ll start the trial fit of the fairing set on the right wing.
|
|
|
|
Post by emron on Nov 6, 2018 19:25:13 GMT 12
Flying Boat Update
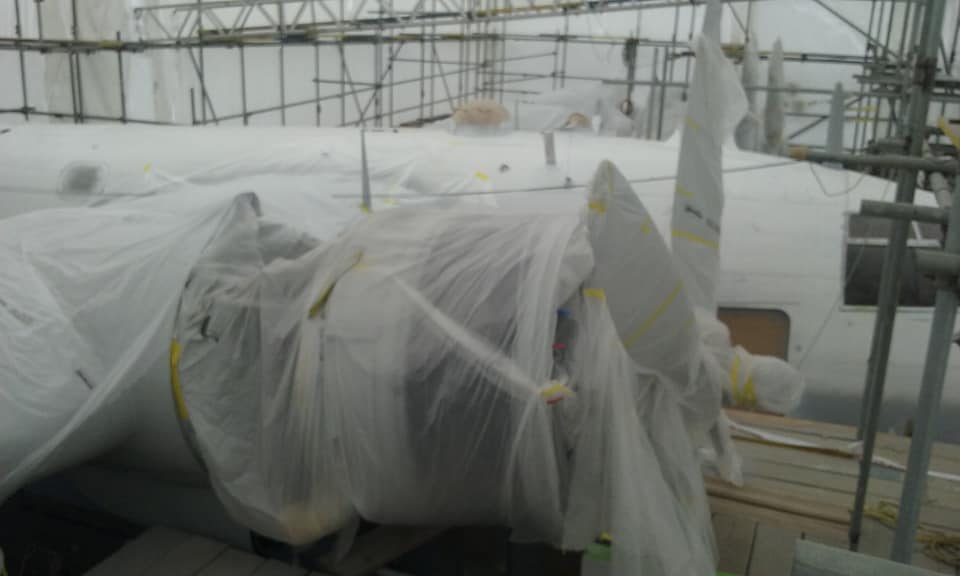
Last week the painters were back and by the weekend the underside of the left wing had finished coats applied and the right wing was being prepped. The next big batch of engine cowls were finished and stacked aside to dry. On Sunday I started out to craft up a couple of new top hatches for the right float but only got as far as cutting them out before the head painter brought a change of plan. He wanted us to finish off the left float in the workshop first. There were still some repairs to be done down on the keel and step before painting could start there so Richard started on drilling off one old patch and I joined him to drill out the rows of rivets that had sheared. The float is laid over on it’s side while we do these repairs and after lunch I crawled inside and held the bucking bars so Frank could drive the replacement rivets down the keel strip. There was only a few left for next time. Afterwards I tidied up the corroded area that the patch had hidden, punched out the remnants of rivets, wire brushed and sanded back to clean metal and ready for etch primer. If I’m lucky the Wednesday team might finish this all off for me. Later I got back to the hatches and cut out the bung holes on one and drilled the rivet holes to re-attach the rings that the bung locks onto. I should be able to complete these two hatches and repair the third next weekend.
|
|
|
|
Post by emron on Nov 11, 2018 19:53:06 GMT 12
Flying Boat Update
The weekday team did lend a hand with the repairs to the left float and in time for the planiing surfaces to be painted. It‘s looking real neat under there now and ready for the close up scrutiny that it will get once on display. That let me carry on with the top hatches today. Once I had cut out the second set of bung holes and drilled the perimeter screw holes I was able to test fit these new panels. I got the first one filed up and seated into the opening and took it back to the workshop. The process from there was to: debur the holes, put through the roller to form a curve, dimple the holes for the 4BA countersunk screws, dimple the 1/8” rivet holes, turn down the edges using the wheeling machine, rivet on inspection hole support rings, attach safety chain with bung. So that one’s near ready for paint. I just need to recycle the sealing gasket strips and retap the anchor nuts and it can be screwed back on. I’ll do the same to the second one next time and rivet on the patch that’s made to repair the third one. In the meantime I’m hoping that the weekday team can turn their attention next to the step and keel area of the right float which needs the same treatment as was given to the left one. Other painting finished during the week included all nose sections of the engine cowling rings and all four spinners.
|
|
|
|
Post by emron on Nov 18, 2018 21:39:27 GMT 12
Flying Boat Update
The weekday team started on the repairs to the right float, Steve formed and fitted a new angle section that capped over the joint between the step and the keel. That just leaves 2 or 3 small areas of corrosion that need to be ground back to sound metal.
It was a Live Day at MOTAT today too but not seriously in competition with all the treats on display at the Ardmore show. Steve, Mark and Rob were eager to continue with the rivetting on the main keel, meanwhile I searched out 2 sets of stainless steel float drain plugs out of the store. Then I cleared paint out of the 5 drain holes on the left float and screwed in the plugs. The other set is ready once the right float is repaired. Afterwards I got back to cleaning the right float of old paint residue left behind after the water blasting. A thin coat of stripper followed by brass brush and scotchbrite was sufficient. That leaves a light sanding and degrease before that float is ready for etch prime all over.
|
|
|
|
Post by emron on Nov 25, 2018 19:12:34 GMT 12
Flying Boat Update
The Wednesday team finished the last of the patches on the right float of the Solent and that left me to replace the odd missing rivet and seal up gaps to give the same watertight appearance just like when it was last out on the harbour. I got interrupted by the forecast torrential rain that blew through in the afternoon and I dived into the workshop to finish off repairs to one of the hatches. The rain soon passed and I could finish my sanding job on the float before returning to rivet the patch on the hatch, then polish out corrosion on the top surface ready for paint. Other work in progress: On the main hull, Rob shaped up a section of channel with an outside curve, one of the last pieces needed to complete the keel capping strip; final sanding of the four oil cooler intakes; repairs to remaining engine cowls. Still to do: complete the rebuild of last two carb air intake ducts; one more float hatch to finish.
|
|
hughw
Flying Officer

Posts: 58 
|
Post by hughw on Nov 29, 2018 18:14:31 GMT 12
Your doing a great job, I went to MOTAT yesterday and got a guided tour of the Solent and Restoration Hangar. Looking foward to seeing the end result.
|
|
|
|
Post by johnnyfalcon on Nov 29, 2018 20:16:10 GMT 12
...and the regular updates are reassuring to say the least! Cheers
|
|
|
|
MOTAT
Nov 30, 2018 11:27:06 GMT 12
Post by ZacYates on Nov 30, 2018 11:27:06 GMT 12
Hear hear. I don't reply but I read and enjoy each update post.
|
|
|
|
Post by emron on Dec 2, 2018 17:52:56 GMT 12
Flying Boat Update
If all the Solent wants for Christmas is it’s two wing floats then we’ve got that sussed. The left float is now painted all over, wrapped in a dust sheet and ready to be hung on. The right float has one layer of undercoat applied and I spent the day doing the final clean up, replaced missing rivets, a light sand and then fitted the drain plugs. That was left ready for final paint which I expect will be done before I’m back there. I finished off the third and last of the top hatches, fitted the rubber plugs and secured their safety chains, degreased them and left them on the paint bench too. I’ve still got the strut fairings to complete but they need trial fitting and only done after the left float is installed. The last of the engine cowls to be repaired are now on the work benches and they too should be finished before the holidays.
|
|
|
|
MOTAT
Dec 2, 2018 20:28:37 GMT 12
Post by johnnyfalcon on Dec 2, 2018 20:28:37 GMT 12
Great stuff! Keep up the good work
|
|
|
|
Post by emron on Dec 9, 2018 18:37:48 GMT 12
Flying Boat Update
If you’ve found previous episodes no better than watching paint dry then don’t read on.
The weather was rotten earlier in the week so I wasn’t expecting much progress, but there was good news for me when I turned up this morning. The right float, it’s struts and the five loose hatch covers were all painted. More crucially though, the top and bottom surfaces of both wings have finish coats on as well. I spent the morning sorting and cleaning the 90-odd 2BA countersunk screws that secure the 8 covers that fair over where the struts attach to the floats. I then mounted them all on a card ready for painting. Next I had to sort through the jumbled lengths of sealing strips for the hatches. I finally figured out the two sets for the left float, cleaned them and glued them back in place. That allowed me to test fit the hatches and put the dust sheet back over. Next week I’ll do the same for the right float then we’ll need to clean and paint the hundreds of 4BA screws that secure the hatches down. Before we close them up for the final time the interiors will get a good vacuum clean and a spray of preservative. I’d like to leave them at least bird and dust proof before the holidays.
|
|
|
|
Post by kiwi285 on Dec 17, 2018 15:54:47 GMT 12
You people are doing a fantastic job on that big beast. The Avenger is big enough but the Solent is massive and getting up to work on some of those areas must be a bit daunting. Keep up the great work and the news items.
|
|
|
|
Post by corsairarm on Dec 17, 2018 19:55:27 GMT 12
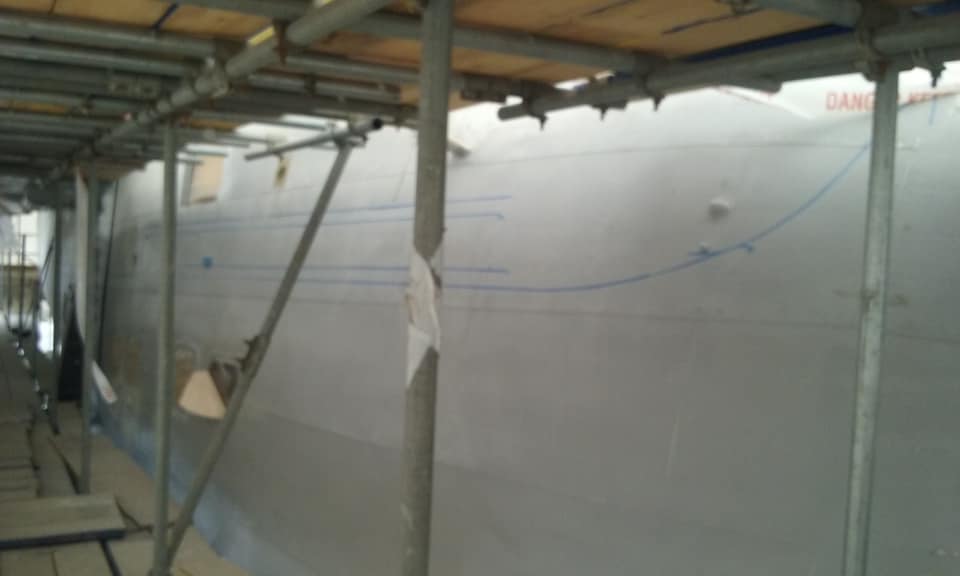
Yeah nothing like standing on the wing in bare feet whilst covering it in plastic to stop it getting dirty again before we put it in the ADH which is scheduled for early March. Both wings are now covered. Getting there:)
|
|
|
|
Post by emron on Dec 23, 2018 19:35:43 GMT 12
Flying Boat Update
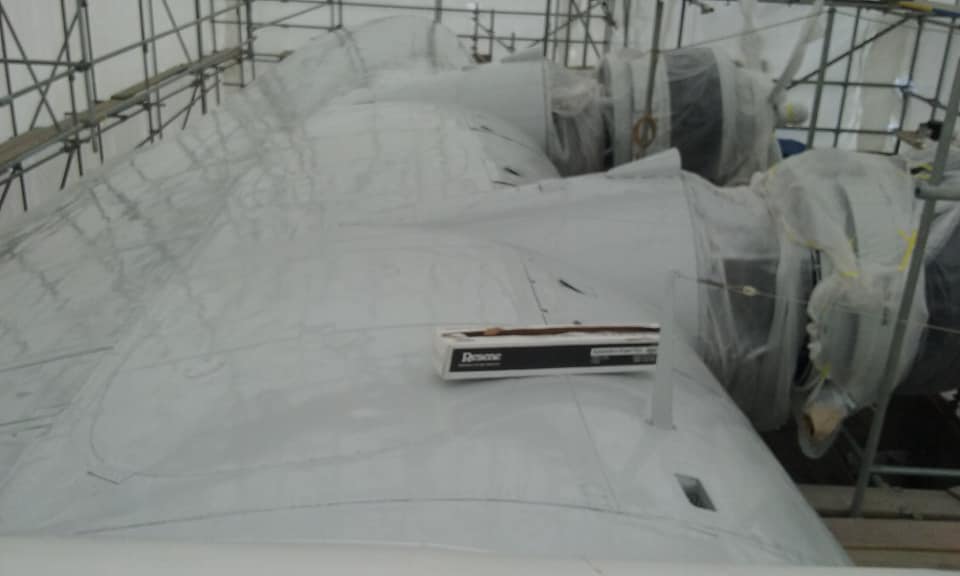
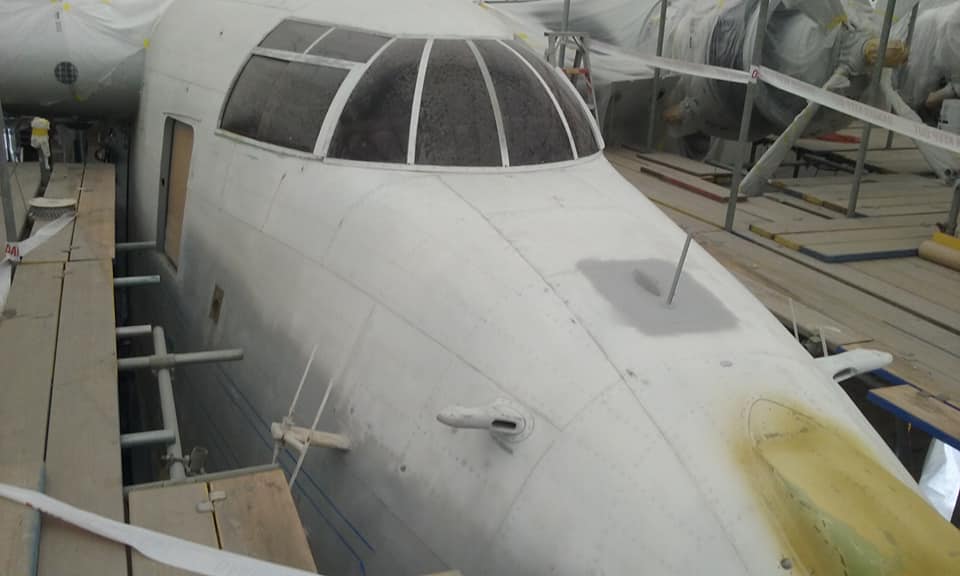
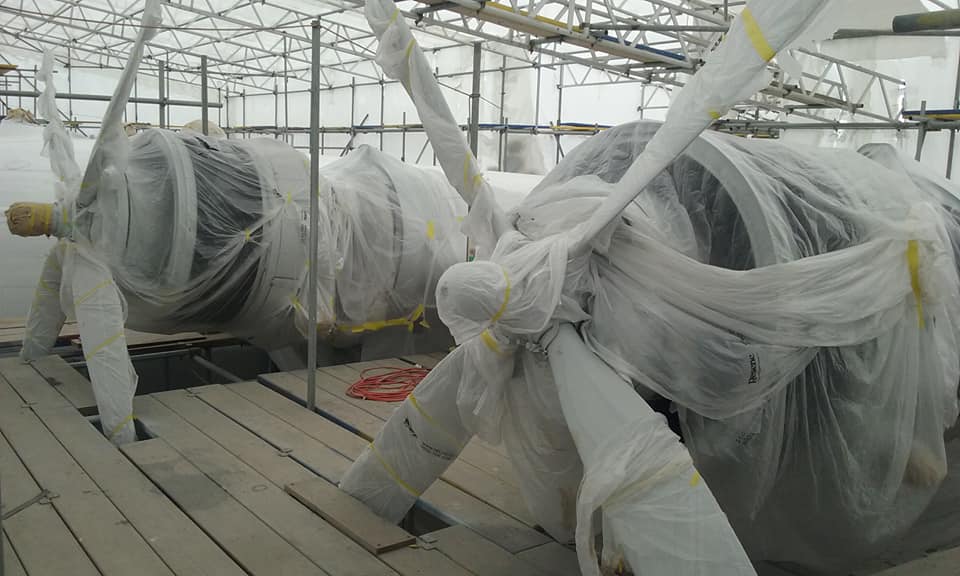
Today was the last workday for the year and we spent the morning tidying away the last of the equipment. I stowed away the surplus parts for the floats now that we’ve used the best of them, then laid out the last of the screws and fittings for when the painters return next month. All that was left on the workbenches were the engine cowling parts, repairs still in progress. Out under the shelter the wings, stabilisers, elevators, engines and props have been wrapped leaving only the fuselage and underside of the ailerons for final paint. The many loose parts in the workshop that are finished, waiting for fitting, are also covered.
Great progress made by Santa’s elves in 2018.
It’s probably bad form to ask the cost of a Christmas present so maybe we should instead discuss the value of the gift. I’m not sure of the cost of materials and resources used in the restoration so far but over the last 8 months I’ve spent about 200 hours on the Solent project, literally a month of Sundays. At least 20 other volunteers have dedicated similar time or more. What value do you place on your spare time? Even calculated at a modest charge-out rate that must be near $500,000 of free labour to supplement the effort of the full time staff and contractors.
So the first phase of the restoration will soon be done, the exterior repaired and a long lasting, accurate paint finish achieved.
Merry Christmas from the Flying Boat team.
|
|
|
|
MOTAT
Dec 24, 2018 14:45:16 GMT 12
Post by johnnyfalcon on Dec 24, 2018 14:45:16 GMT 12
Great effort team. Well done! The end result will be a testament and tribute to your selfless efforts.
|
|
|
|
Post by Dave Homewood on Dec 24, 2018 22:25:57 GMT 12
|
|
|
|
Post by emron on Jan 14, 2019 16:46:07 GMT 12
Flying Boat Update
The Sunday team hoisted the right aileron back up to wing level and began to attach its onto the trailing edge. Before afternoon tea we managed to align all the hinges and fit and tighten their attachment bolts. That just leaves the control rods to be connected so that it’s locked in position. The painters had finished the remainder of the float components and the Wednesday team had already fitted the last strut on the right float. When I was on site today I checked that the rigging was all tight and then enclosed the fairing covers over the base of the struts. Preservative oil is being sprayed into the middle compartments of the float and once the excess has been mopped up the three hatches can be screwed down for the final time. That wing will then be pretty much complete.
|
|
|
|
Post by corsairarm on Jan 14, 2019 20:26:26 GMT 12
Just a quick note to say that the December issue of Flypast magazine has a feature on the MoTaT aviation collection. Well worth a read.
|
|
|
|
Post by Bruce on Jan 15, 2019 7:28:01 GMT 12
Just a quick note to say that the December issue of Flypast magazine has a feature on the MoTaT aviation collection. Well worth a read. Cool! I'll look out for that in April...  |
|
|
|
Post by emron on Jan 16, 2019 17:54:16 GMT 12
Flying Boat Update Not to be outdone by the Sunday Team, the Wednesday boys got the Solent’s left aiileron hoisted up and bolted on before they went home for the day. So I was spared to carry on with the float. First up was the exciting task of swabbing out the extra preservative fluid which had pooled in the bilges. Once that was out of the way I was able to close up the 2 hatches for the final time. Because they are held on by hundreds of tiny 4BA screws and both hatches were new made I had to be careful to align all the holes, so I started by fastening one screw in the middle of each side and then worked towards the corners using a podger spike to centralise the dimple through the hole in the gasket and in line with anchor nut below. I followed through with the 4BA tap to clear the thread and afterwards eased each screw in with CRC. I’ll give the third compartment the same treatment on the weekend. Once that’s done one float will be complete, looking just as good as it came out of the last refit at Mechanics Bay and ready for the next 60 years. We’ve kept some of the dents and scrapes that it collected in service but if anything it’s now too shiny. I’m not sure how pristine the Waitemata was back in the 1950’s but it was never long before the floats gathered a scummy bath-ring around the waterline. I wonder what goo I could daub back on there for authenticity.  |
|