|
|
Post by agalbraith on Feb 2, 2019 22:30:19 GMT 12
That's fantastic Denys! Now I know why the box was so heavy....
You amaze me with the detail you are going to with 2035, truly epic to see!
|
|
|
|
Post by davidd on Feb 3, 2019 8:26:15 GMT 12
ABK units fitted to RNZAF Catalinas, Venturas, Hudsons, and probably Avengers and Dautlesses as used in forward areas, probably also on C-47s and C-63s, and of course F4Us/FGs. Pretty well compulsory if operating in an operational area, including transit flights. Incidentally, our NZ Vampires for most of the 1950s sported British manufactured IFF Mk. 3 units, these were equivalent to the US Navy ABK so far as I know. This was the type of IFF which became compulsory for all Allied aircraft leading up to D-Day, and remained standard all around the world by Western air forces post-war until superseded.
David D
|
|
|
|
Post by denysjones on Feb 3, 2019 19:35:37 GMT 12
You're such a flatterer Ants!
Getting those two bits in place was easy having the historical mounts but now it gets tricky.
The rest of the installation consists of two individual switches of the normal electrical type (one with a guard flap over it), a two button (must press both at once) switch for the destructor system (and of course you got said item for us), the inertia/impact switch for the automatic same function, and an indicator unit related to system status, not to forget that as yet I don't have the aerial.
Finding where these bits go is a problem. The Lockheed manuals don't show this stuff as it is what they call GFE (Government Furnished Equipment) which means "nothing to do with us". I've got a US set of pilot's notes for the RA-28/29 and in there is a shot of the w/o's position and it calls out a box for the "destructor circuit" but my copy is a hazy old photocopy from yonks ago and I've not found said publication online anywhere. The RAF pilots notes don't show said stuff as (typically pom) they draw a line on it not being pilot operable.
For info for folks....this destructor stuff is that the IFF was super hush-hush and so the units have a thermite charge in them. This was so that after a crash it was to be triggered either manually (by the two button press switch) or by the impact one switch. The charge incinerated/melted the contents of the T/R but the action was contained in the case with no danger to the crew or the a/c.
On the photo from last night you'll see a red letter D on the ABK which I guess indicates "destructor charge fitted" but that's my guess.
ttfn
|
|
|
|
Post by emron on Feb 3, 2019 22:09:09 GMT 12
Wow this is a real win for your project. Thanks for posting the photos. Next time I’m at MOTAT I’ll have to check out NZ2031 to see if anything of an IFF is fitted aboard, now that I know where it was located. I think I’ve seen a partial control unit and impact switch in the instrument store but nothing of the transponder. Mike from Tauranga is sure to be interested to see what’s required to outfit TBF NZ2359 as well. The system of yours looks almost ready to go so I hope the D really stands for disabled and disarmed  |
|
|
|
Post by Dave Homewood on Feb 3, 2019 23:22:40 GMT 12
That is fantastic!
|
|
|
|
Post by agile on Feb 5, 2019 7:54:01 GMT 12
Another Tony Agar/Ants Galbraith awesomeness! Thanks chaps.
On a related note, if anyone knows where we can get a Mk III IFF transponder (the box is an R3090, the Pom version of the ABK above) or even better a Mk IIIGR ( R3121 box) or SCR-595/695 (the 'murrican army/airforce equivalents thereof) for the Mossie any leads would be greatly appreciated. We are also after the aerial for this system.
Cheers
A
|
|
|
|
Post by kiwi285 on Feb 16, 2019 10:58:24 GMT 12
Will have to look at the rear compartment of the Avenger and see what we can find. I know we have been given some items to be fitted in there but I haven't seen them all yet and other are working on those items so will ask some questions.
Really great work Denys and the team. It is a real credit to your perserverance with that project - a real labour of love.
|
|
|
|
Post by denysjones on Mar 9, 2019 21:11:17 GMT 12
Things are a bit quiet on the normal fronts at the moment in terms of those bits I can take home for the "week's project". However recently Mike and the boys at TRG have been looking for accessories for a Wright Cyclone and of course we've some items left over from outfitting the ones for the Hudson.So the suggestion came up about swappsies for Goblin bits which led to the question of what had you got to offer and what do you want. Our Vampire Goblin came to a halt some years back due to lack of accessories and the folks involved then have moved on so the time came for me to do Goblin 101 and digest the appropriate NZAP on said items. Quickly I had another one of those flashback moments, as per the Friendship nose gear ram as reported here a while ago, when I saw several items that I recalled in our Nissen store shed. These turned out to be a pair of the upper accessory cases and several accessories to fit to them. So now we have a clear idea of what we're looking for Mike's team to come up with in terms of bits to swap but as a result of this week's off-site works we now have one of the two upper accessory boxes transformed and outfitted, subject to acquiring a generator which goes on the obviously devoid studs, and ready to enhance the Goblin. We need the corresponding lower box as we already hold the starter and pump that mount on that. 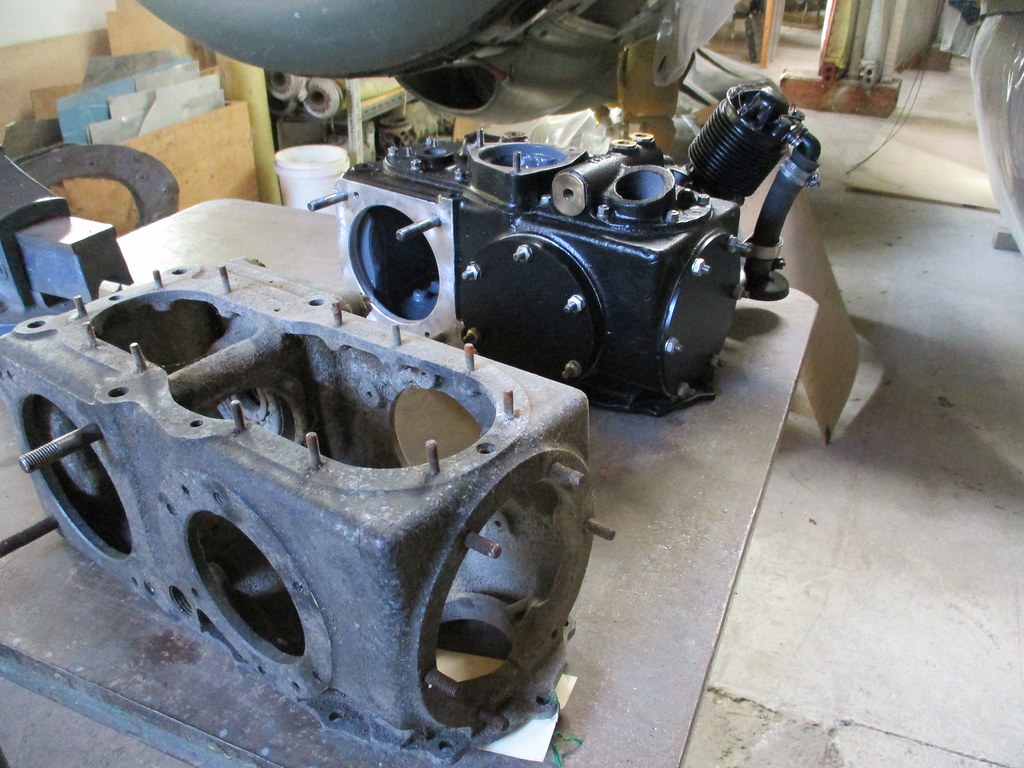 |
|
|
|
Post by agile on Mar 24, 2019 13:28:47 GMT 12
It's a quiet Sunday after Nitro Circus last night, so here's a Mossie mega-update for the sensible few not on Facebook. Last weekend we more or less finished the cockpit floor structure after about a year's work (amongst other tasks of course). It's hard to get a good idea of how bad it was, particularly as my photos tend to be more about capturing details for later reinstatement than the big picture, but here is a bit of a timeline: Where we started - several holes in the floor where parts had been ripped out and a loot of rotten structure. This is between the pilot's footboards, just in front of the control column bracket:  This is looking forward and to starboard across the floor through the hole that existed in the port side of the fuselage at that stage. Note the hole in the floor in the foreground: 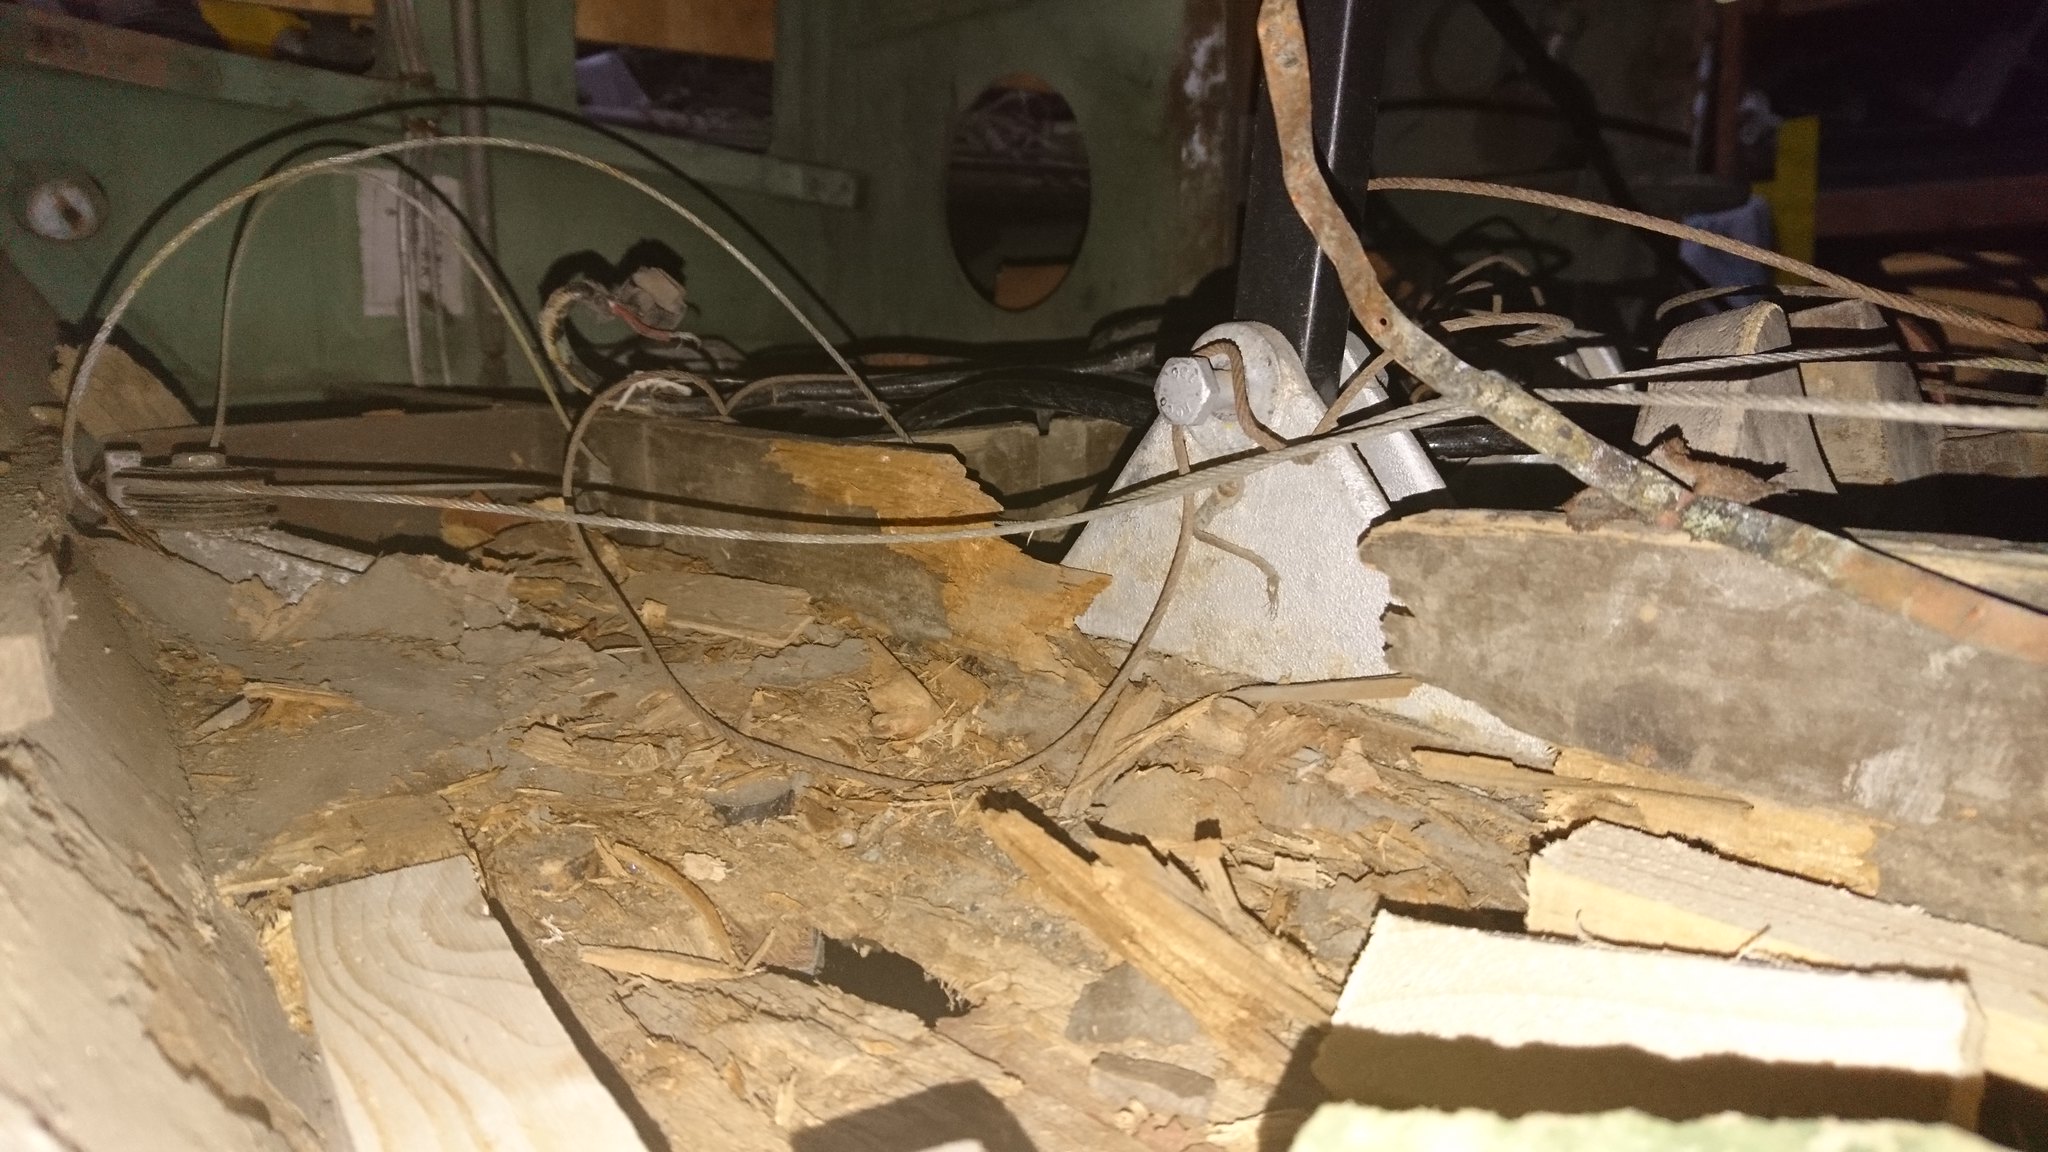 Rotten floor material removed, holes patched and doubled for strength: 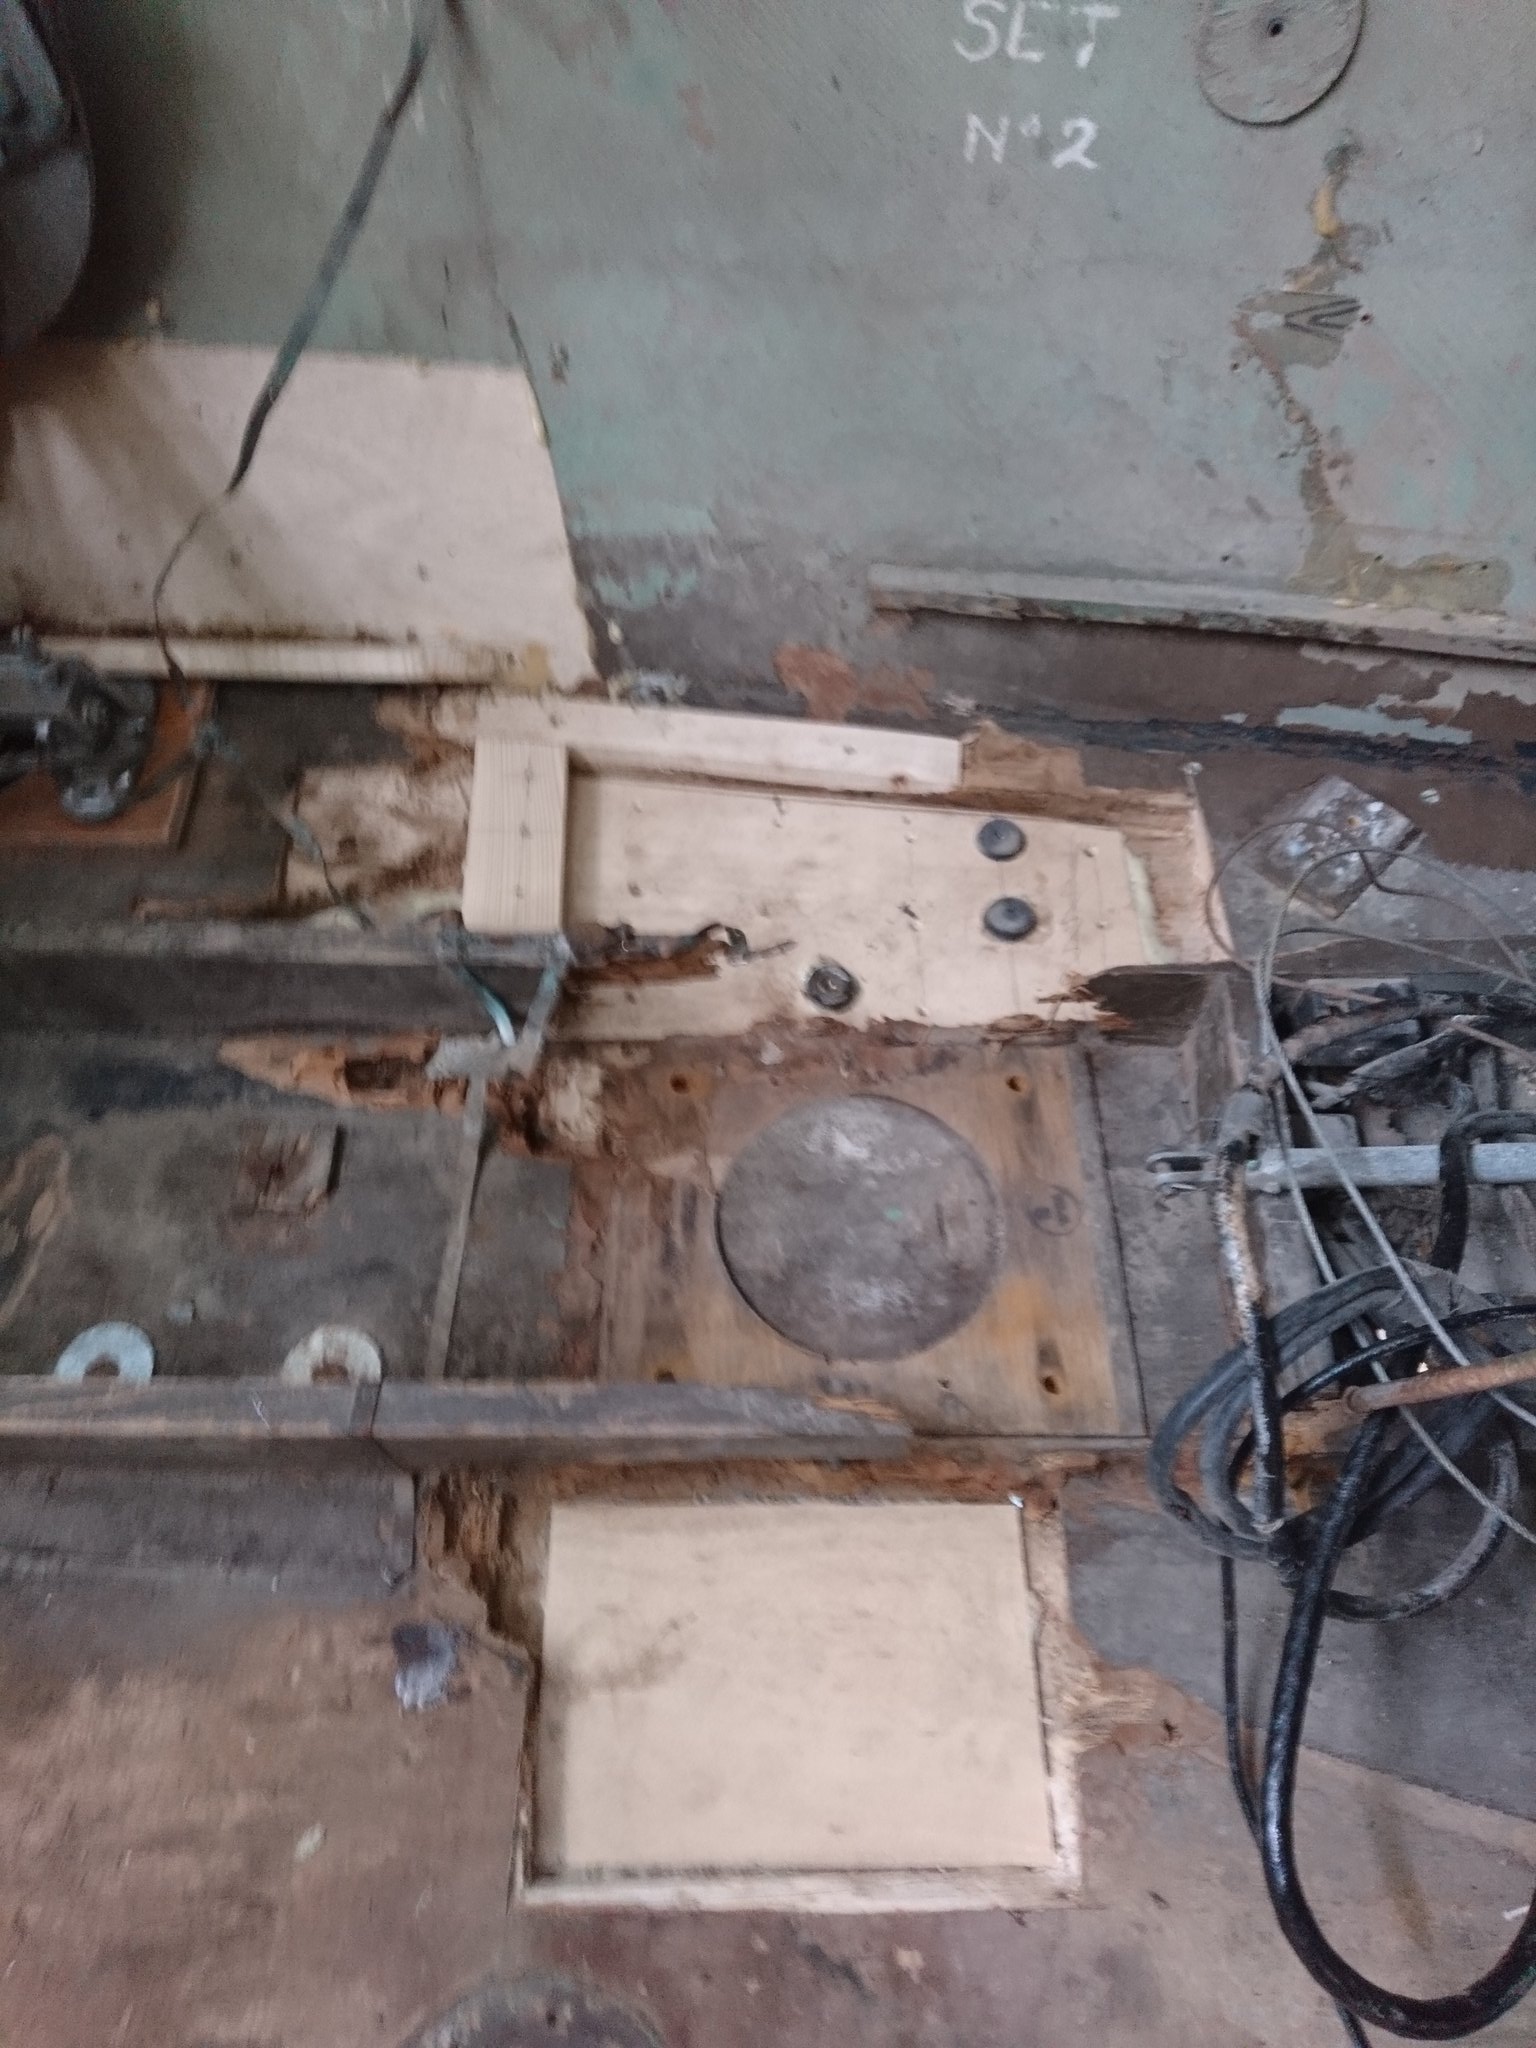 Mid way through replacing rotten spruce members in floor - note feathering out of good wood where new members will be cut to fit. CC bracket temporarily back in for positioning: 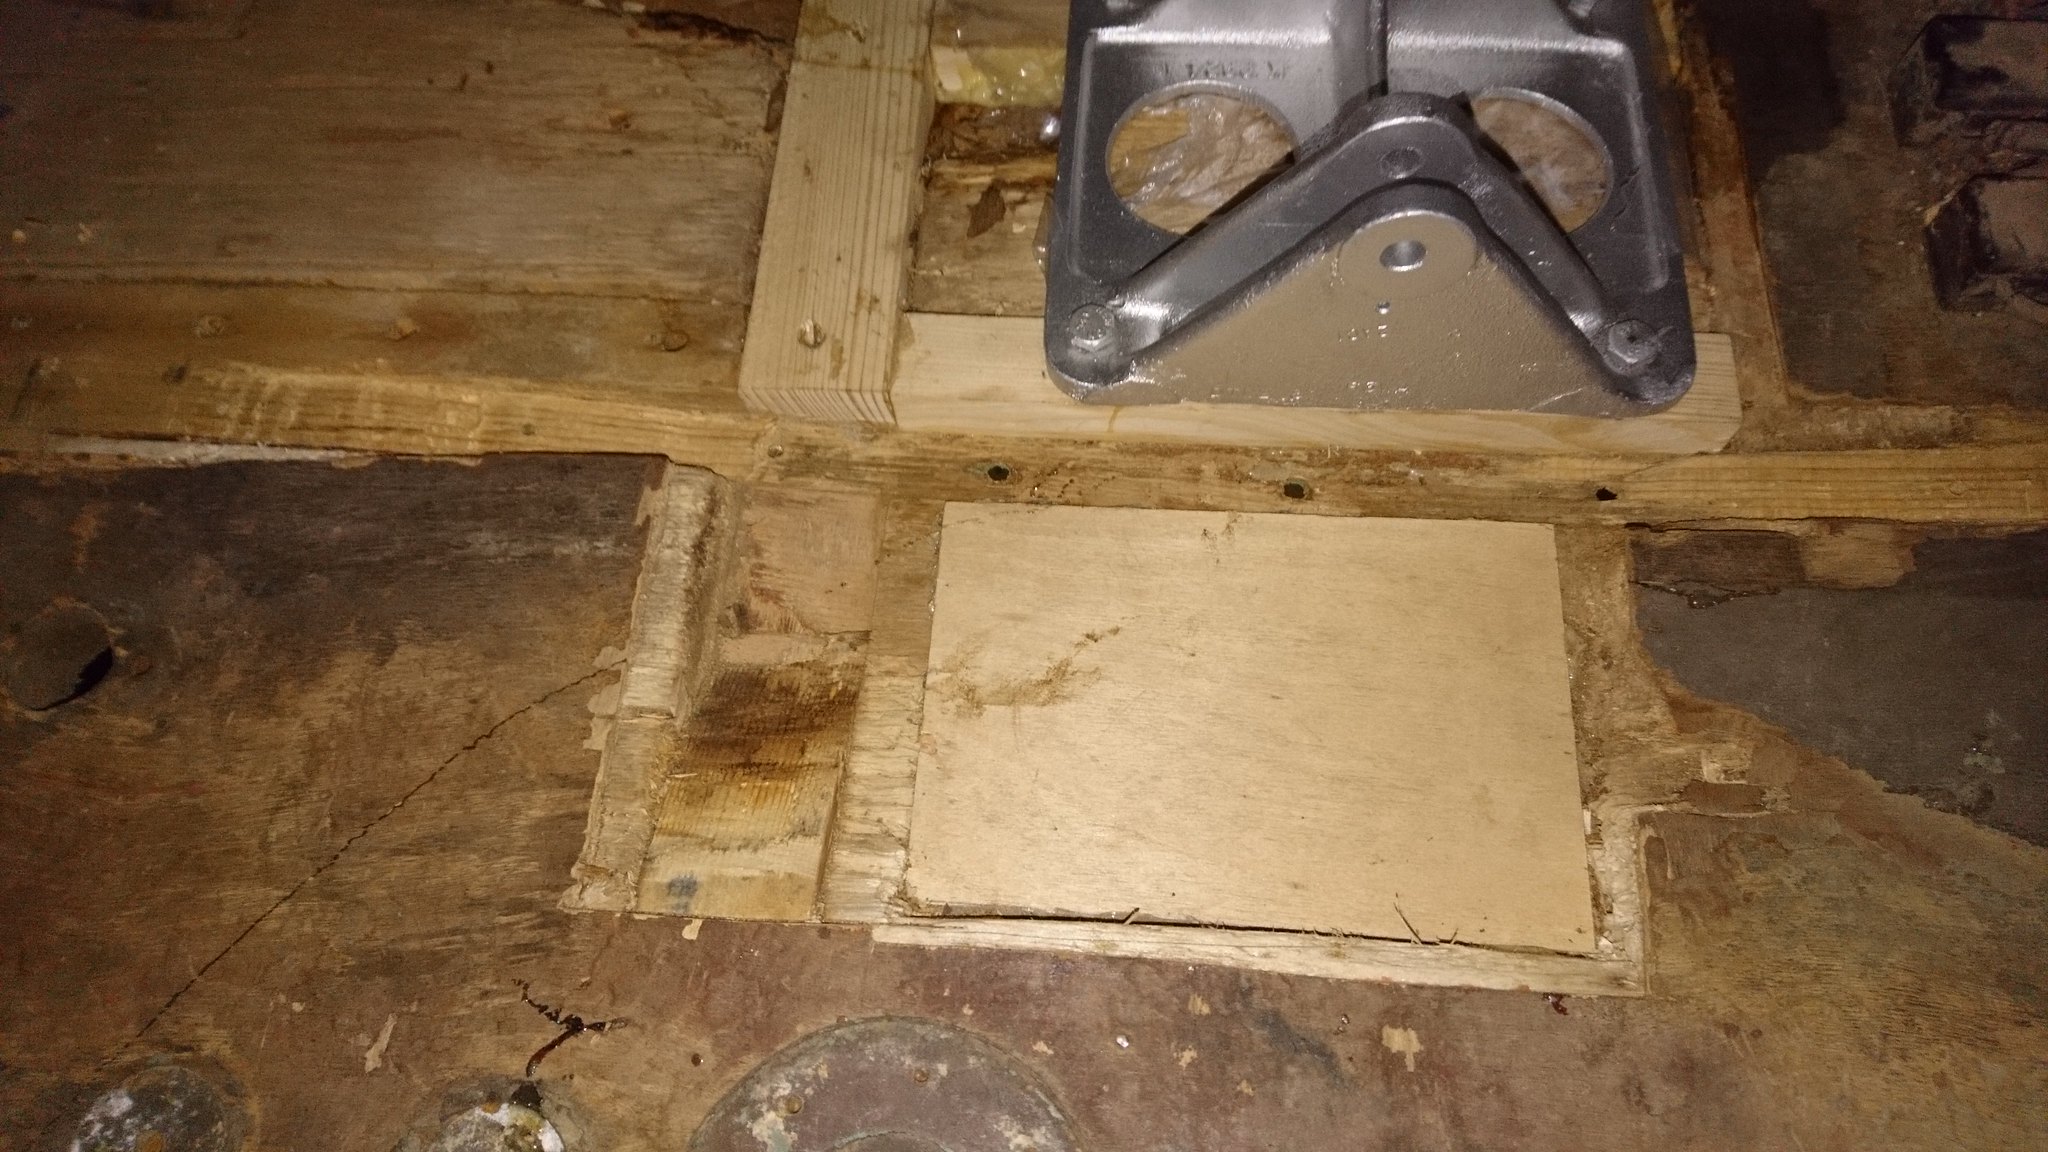 Rear 2/3rds of floor re-skinned (covering up all my hard work): 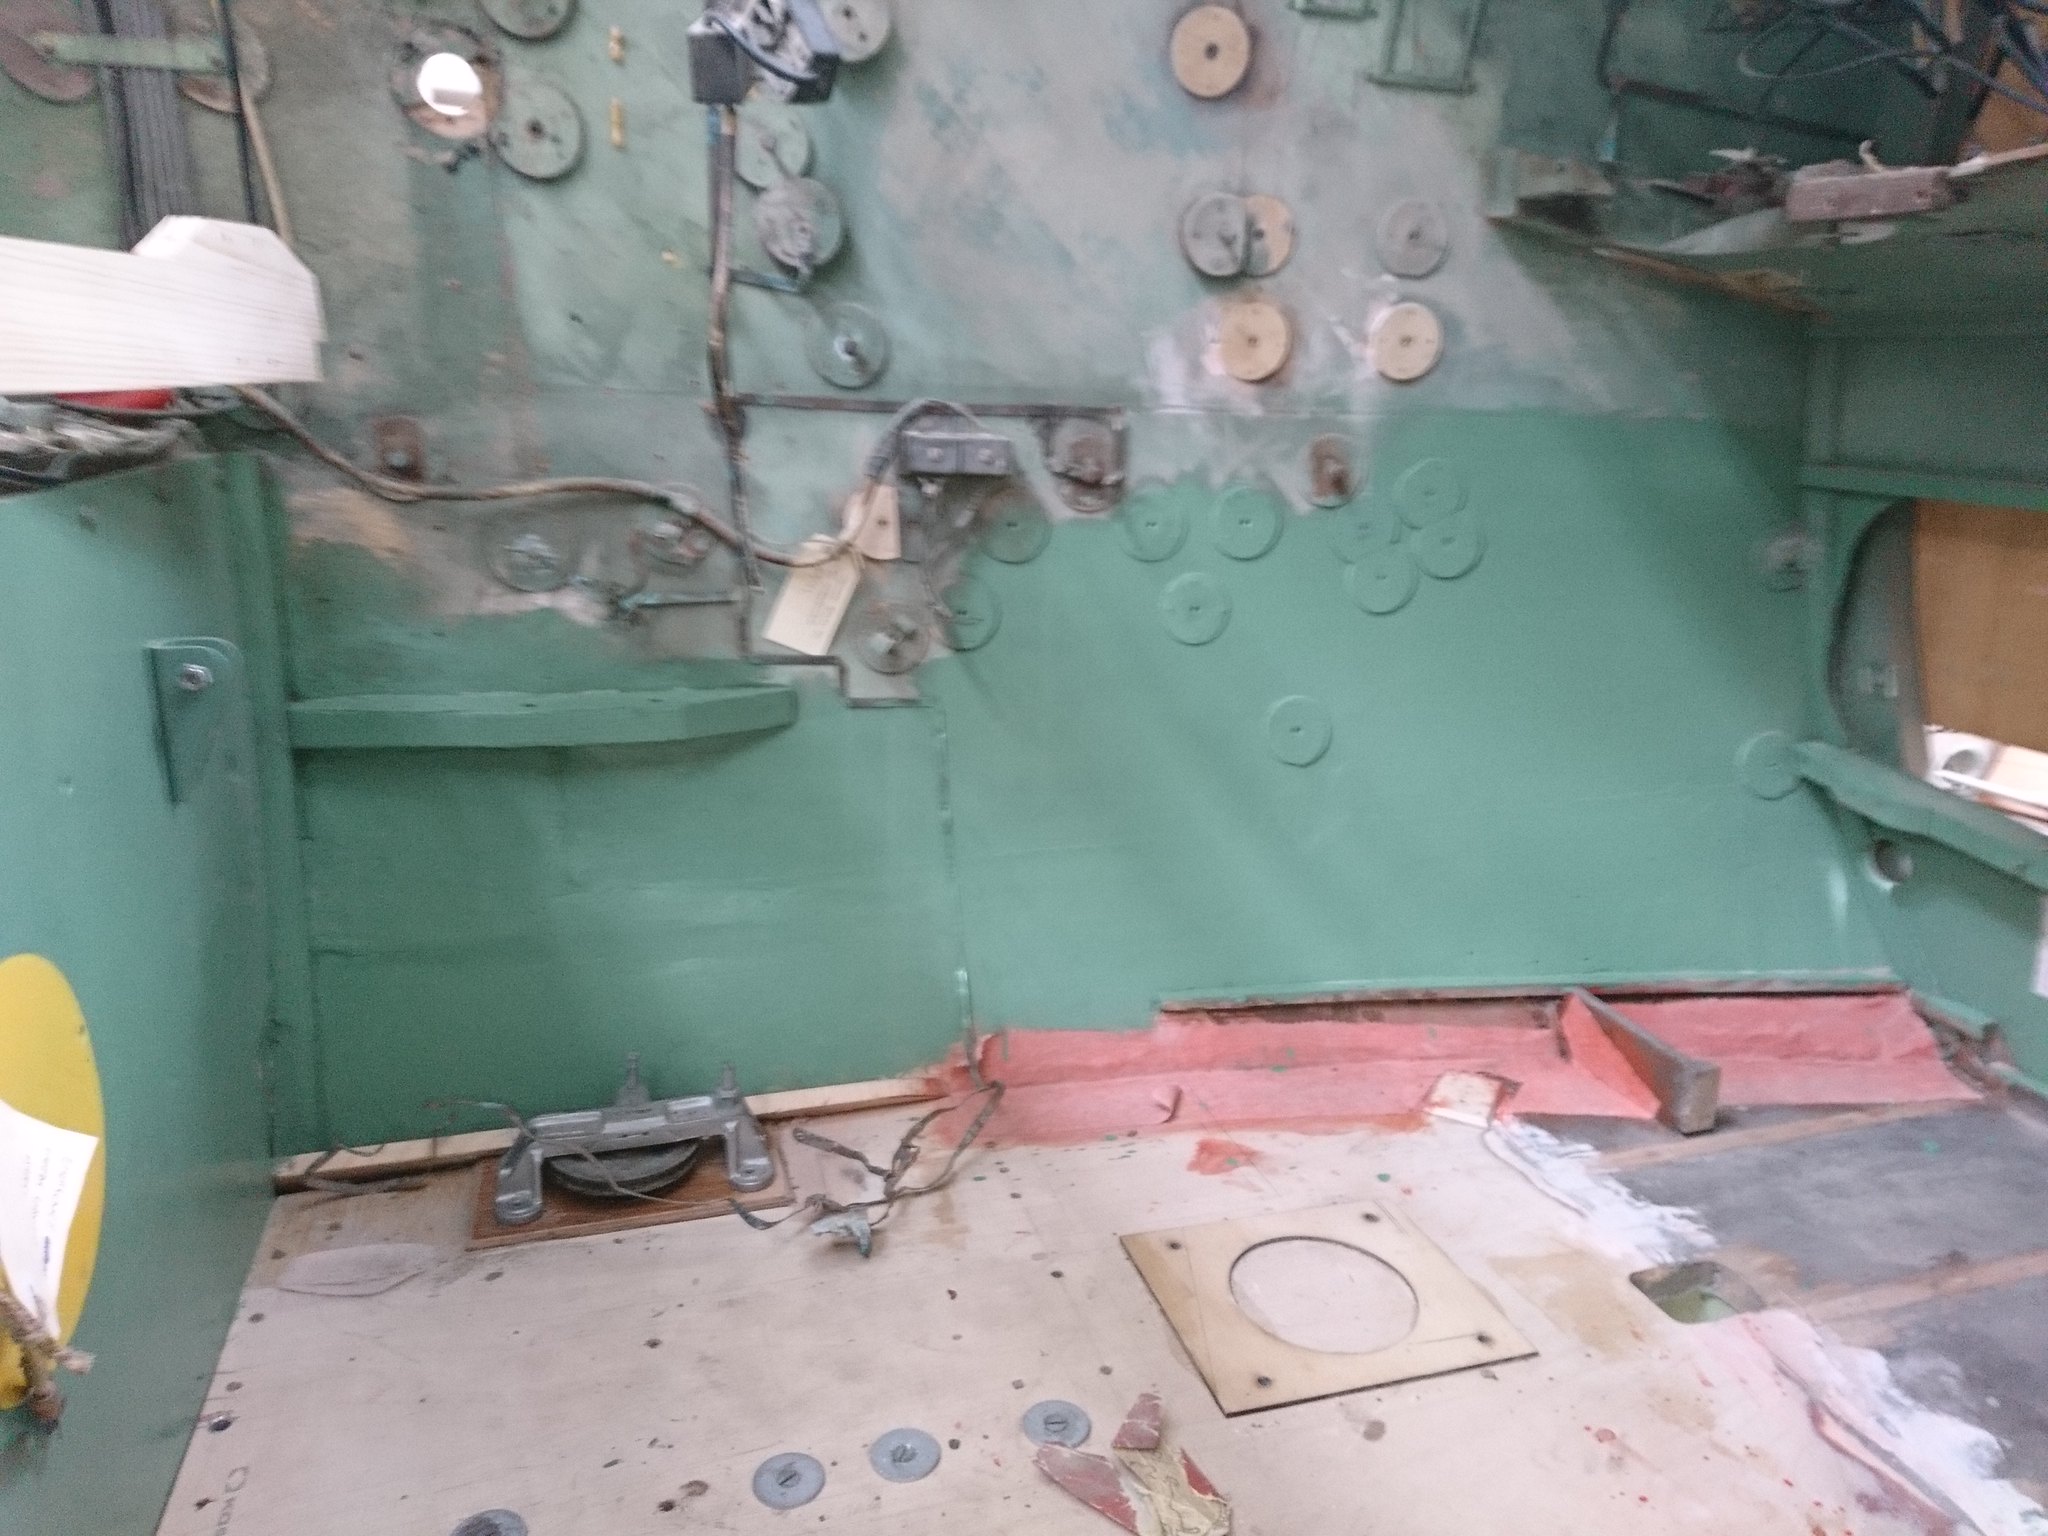 New footboard rails and other members made- note doubler for CC bracket, our first experiment with laser cutting thanks to our tame high school student volunteer:  Footboard rails etc installed: 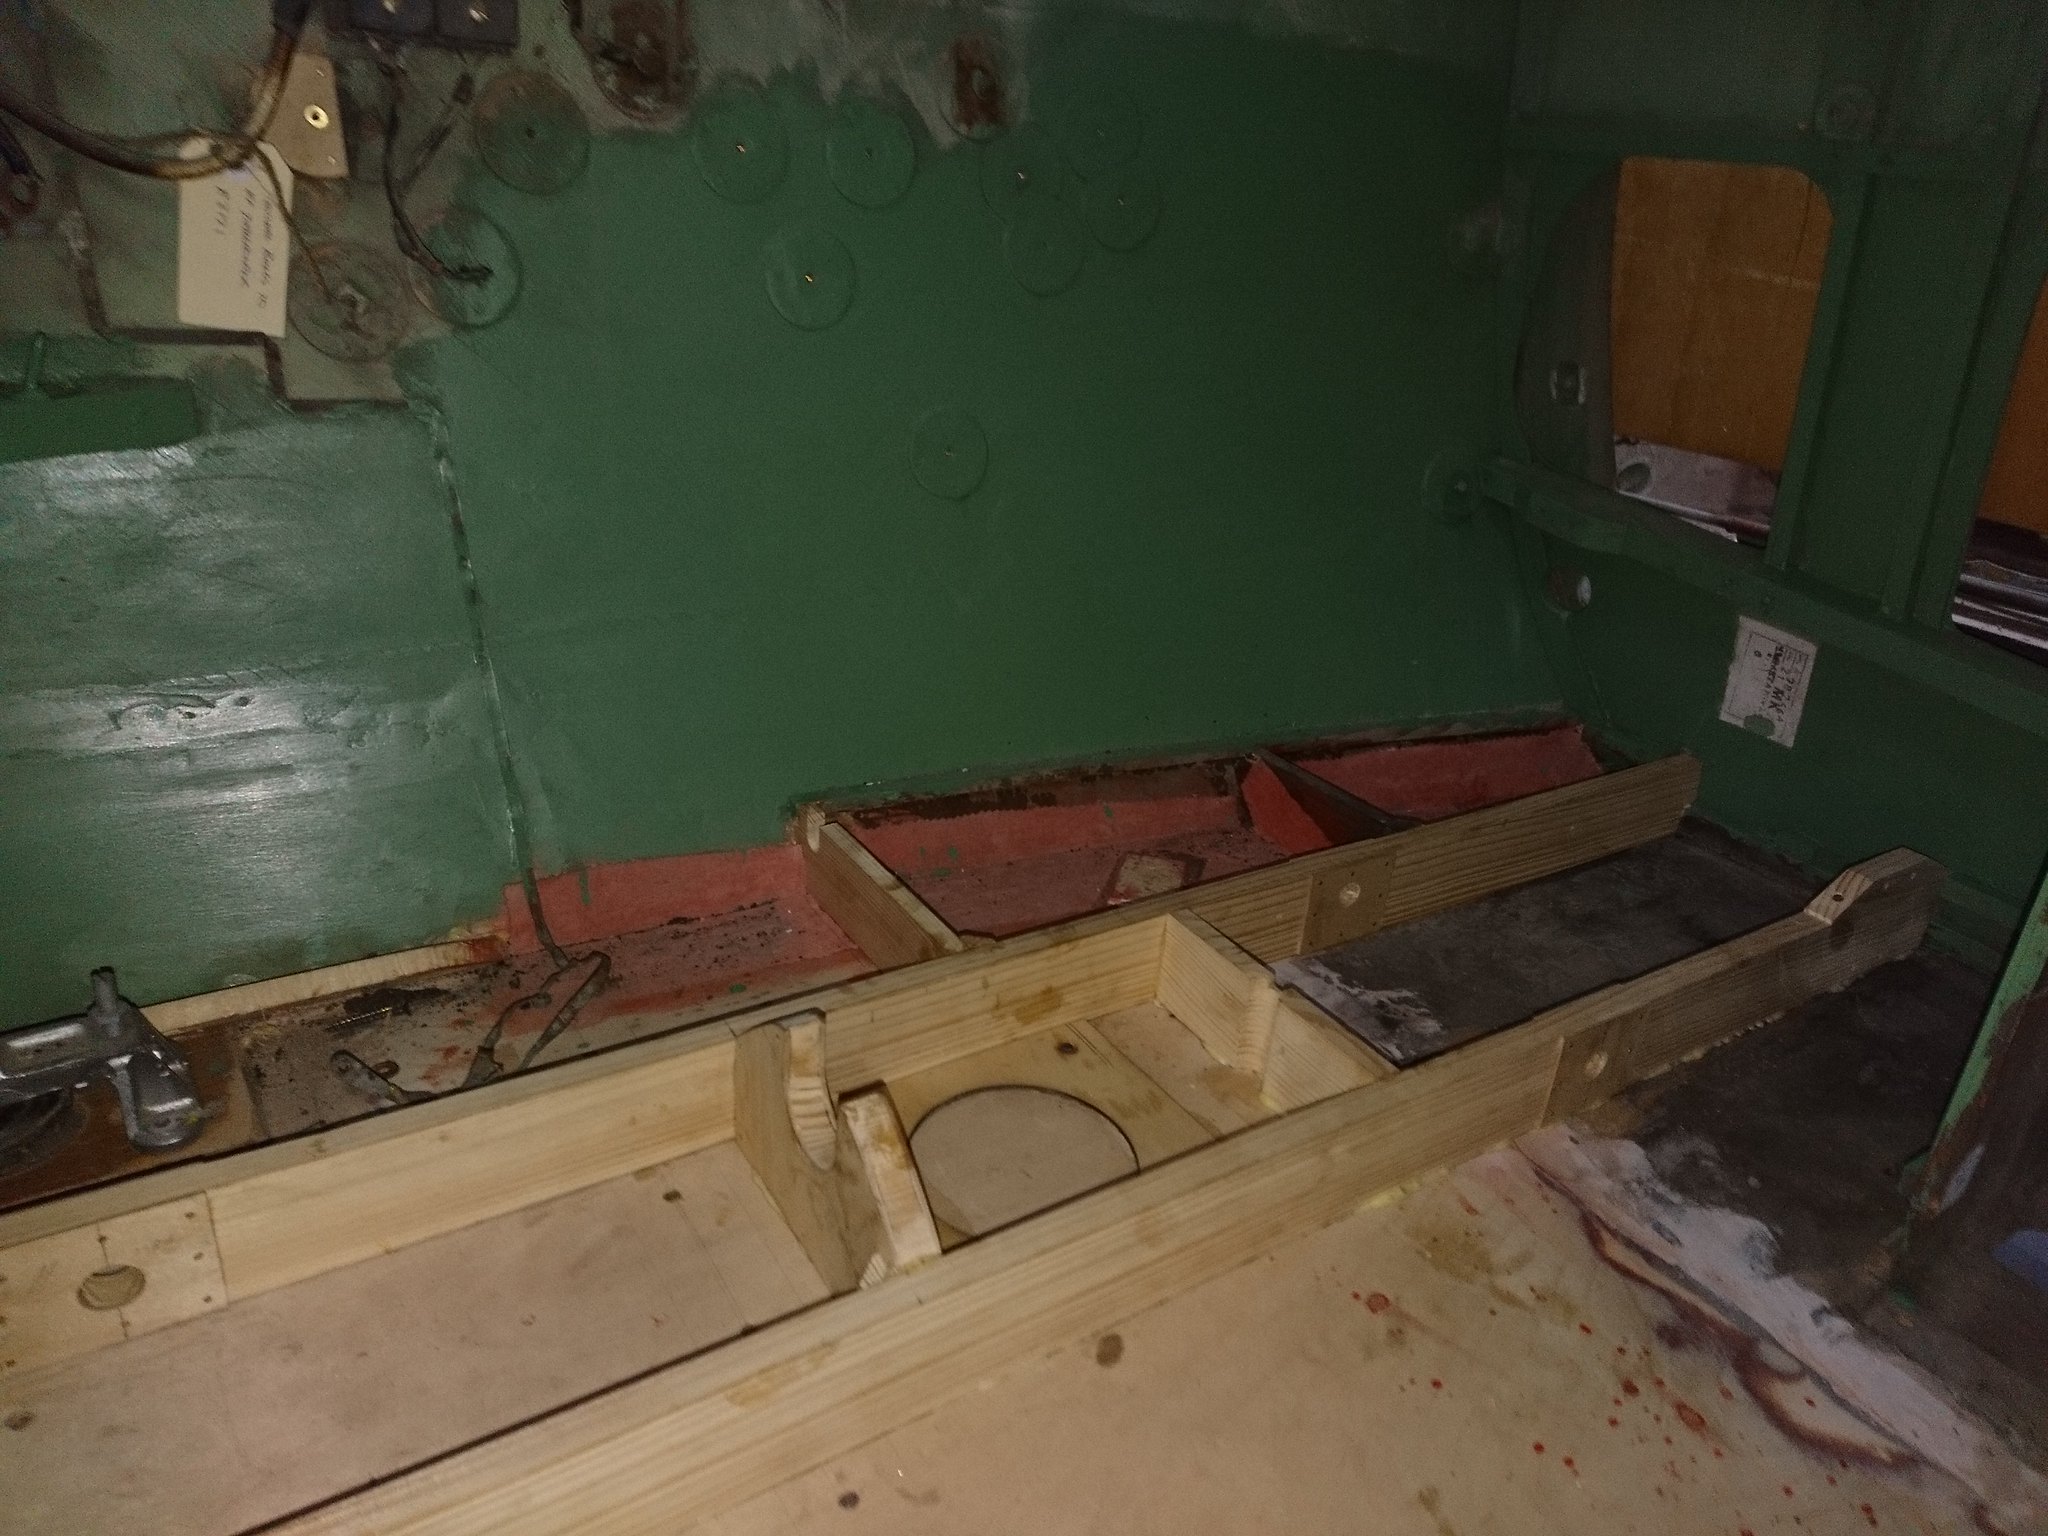 Port half of floor painted, CC bracket and other bits going back in - this is where we are now: 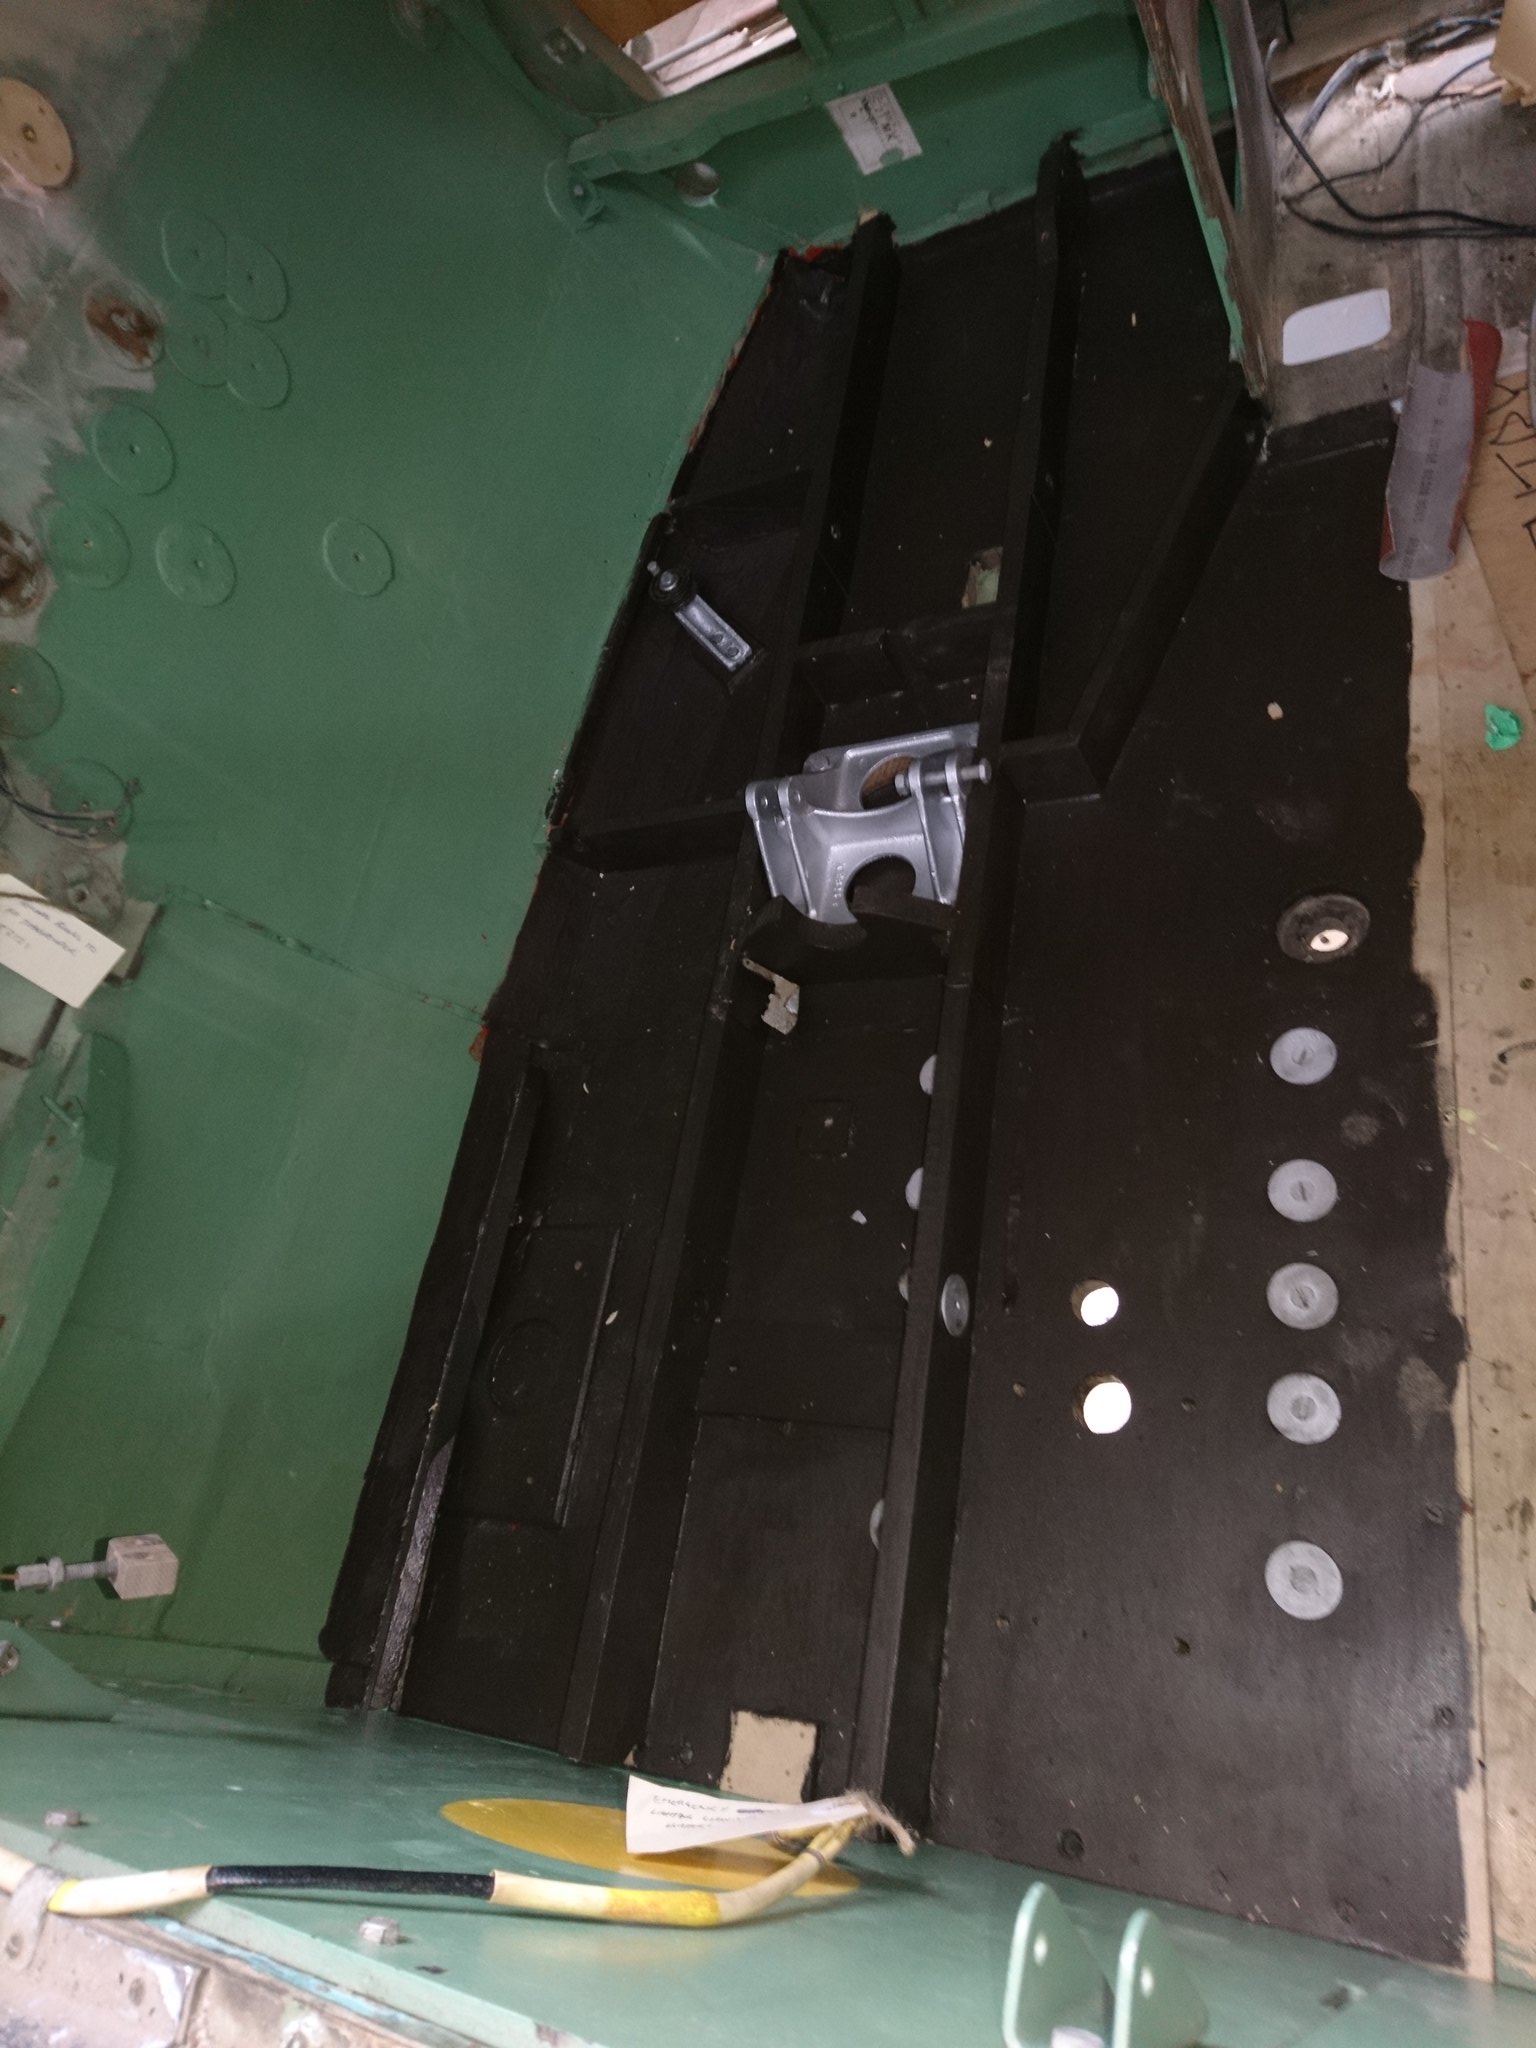 If you are wondering why it is brown, not green, this is actually the colour of the original and the other NZ mossies we have seen pics of (NZ2336, NZ2355). According to AP2019E large parts of the interior are supposed to be painted with hydraulic resisting alumimium cellulose paint under the usual green. I don't know that we've ever seen any sign of this, but the cockpit and battery bay floors are liberally coated with a hard resinous brown, so brown it is. All of the above doesn't show the hours spent dicking around shaping new bits to fit, documenting all the parts that came out etc, or the repairs to the armour bulkhead and the structure behind it that went on in tandem. There has also been ongoing fabric, preferably when there weren't too many people around to gas with the dope fumes:  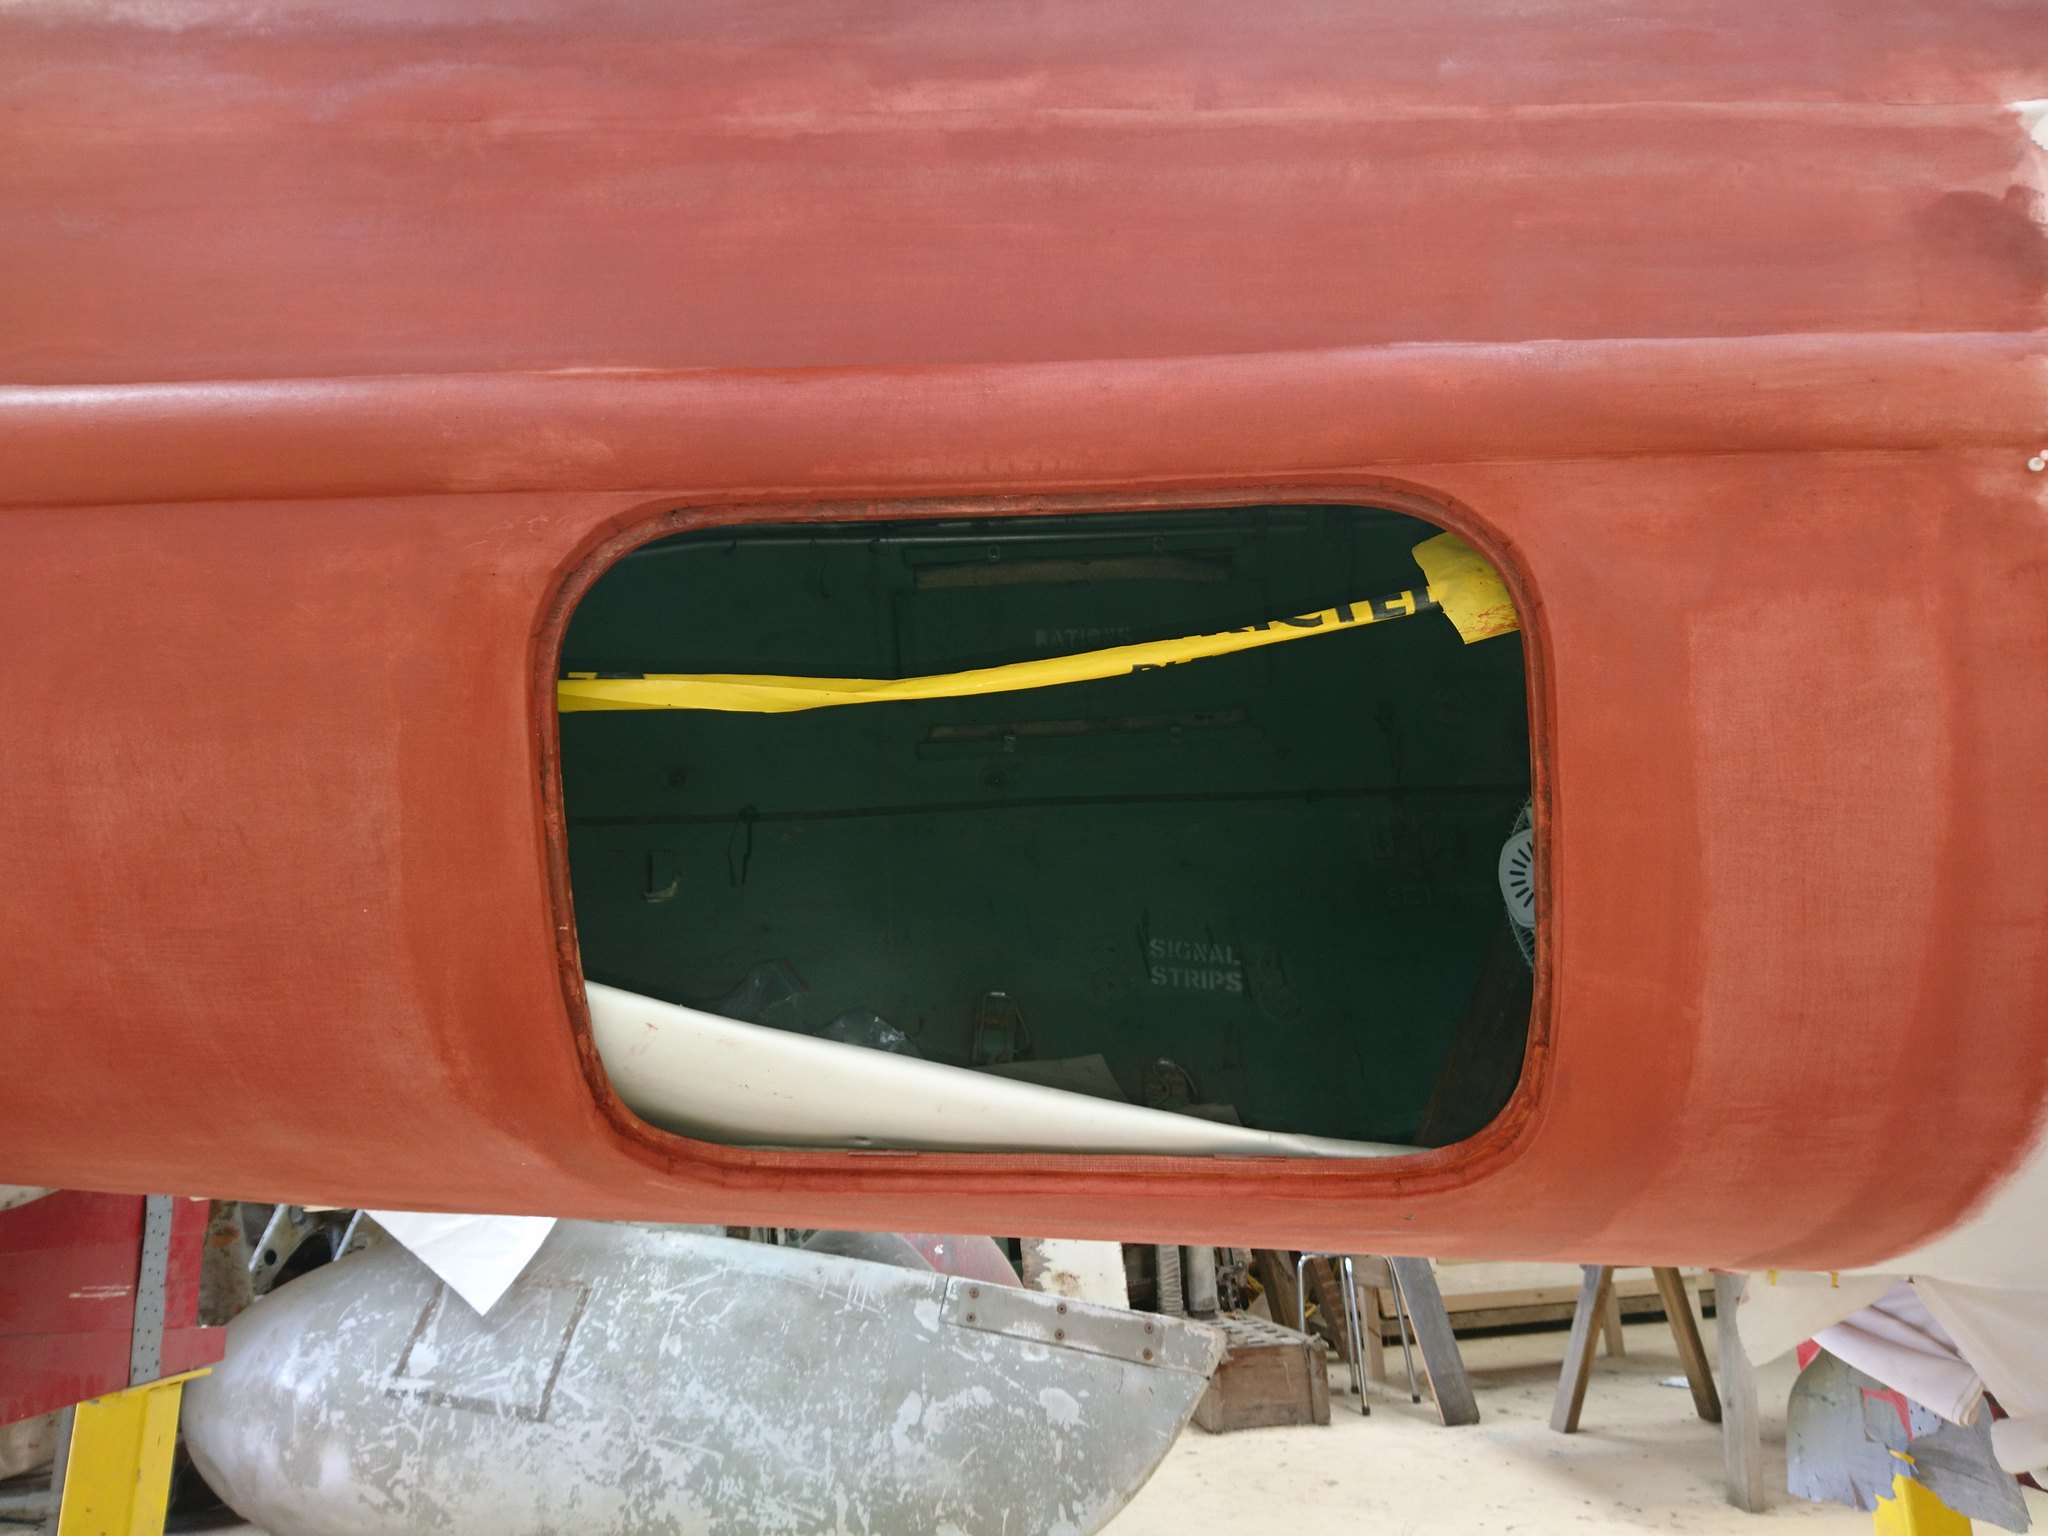 The fuselage up to just behind the wings is now done less a few seam tapes and patches. As the work on the floor draws to a close we have started the big repair - the fuselage over the wing and down the starboard side of the cockpit. Here is the first bit of new skin going on behind the dinghy hatch (the pinky plastic is covering the rolled up fabric that will later cover this area, to keep the UV and dust off it). The circular plate in the middle is where the aerial mast for the TR1154/55 radio goes through - this will be blanked over as HR339's would have been in 1945. The laminated wooden ring around this, and for the fuselage tank filler cap (under the new skin) were badly rotted and had to be built back up. There is a ring of bolts around the fuseleage in this area, the heads of two of which are visible below the rear edge of the patch. These help hold the bulkhead underneath in place - they have had to come out, which was... not a fun experience. 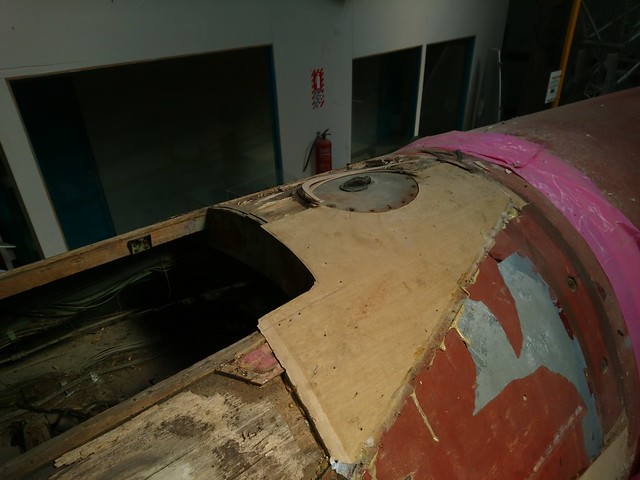 Our resident electrical wizard Angus has been restoring the electrical fit as we go. This is the armaments relay box that lives in the front of the cannon bay, under the cockpit, before and after: 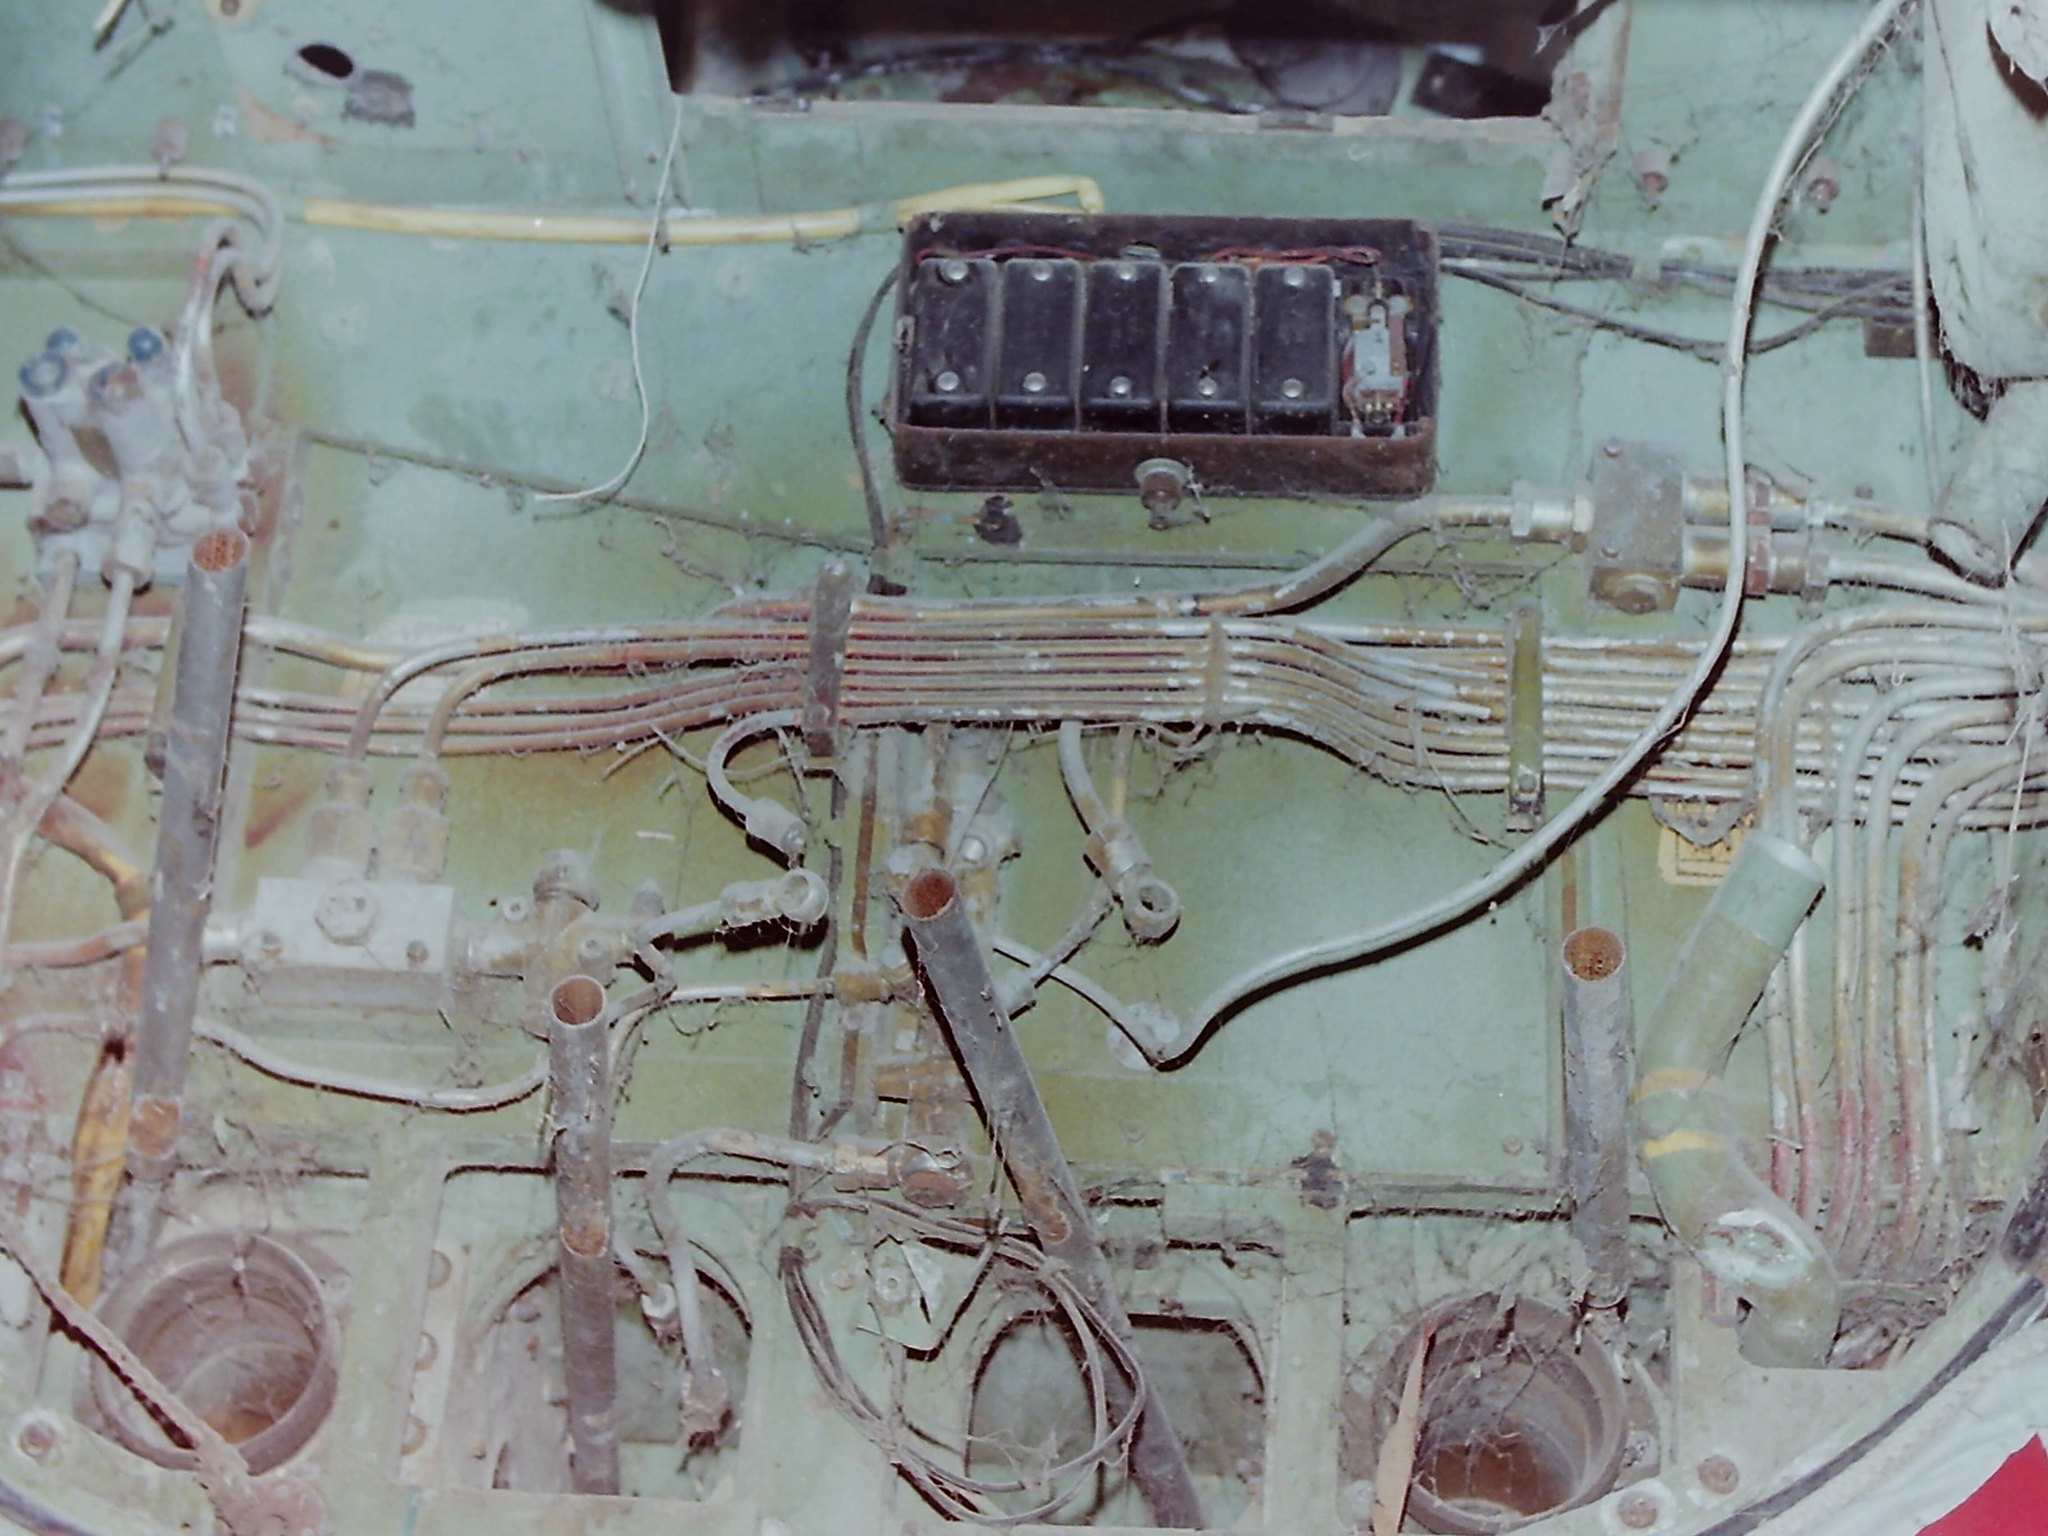  Again, with the covers on the relays and the box all of his good work is hidden, but it's nice to know it's right. Here's an example that will always be visible - Junction Box C, the main fusebox which goes behind the Nav, before and after: 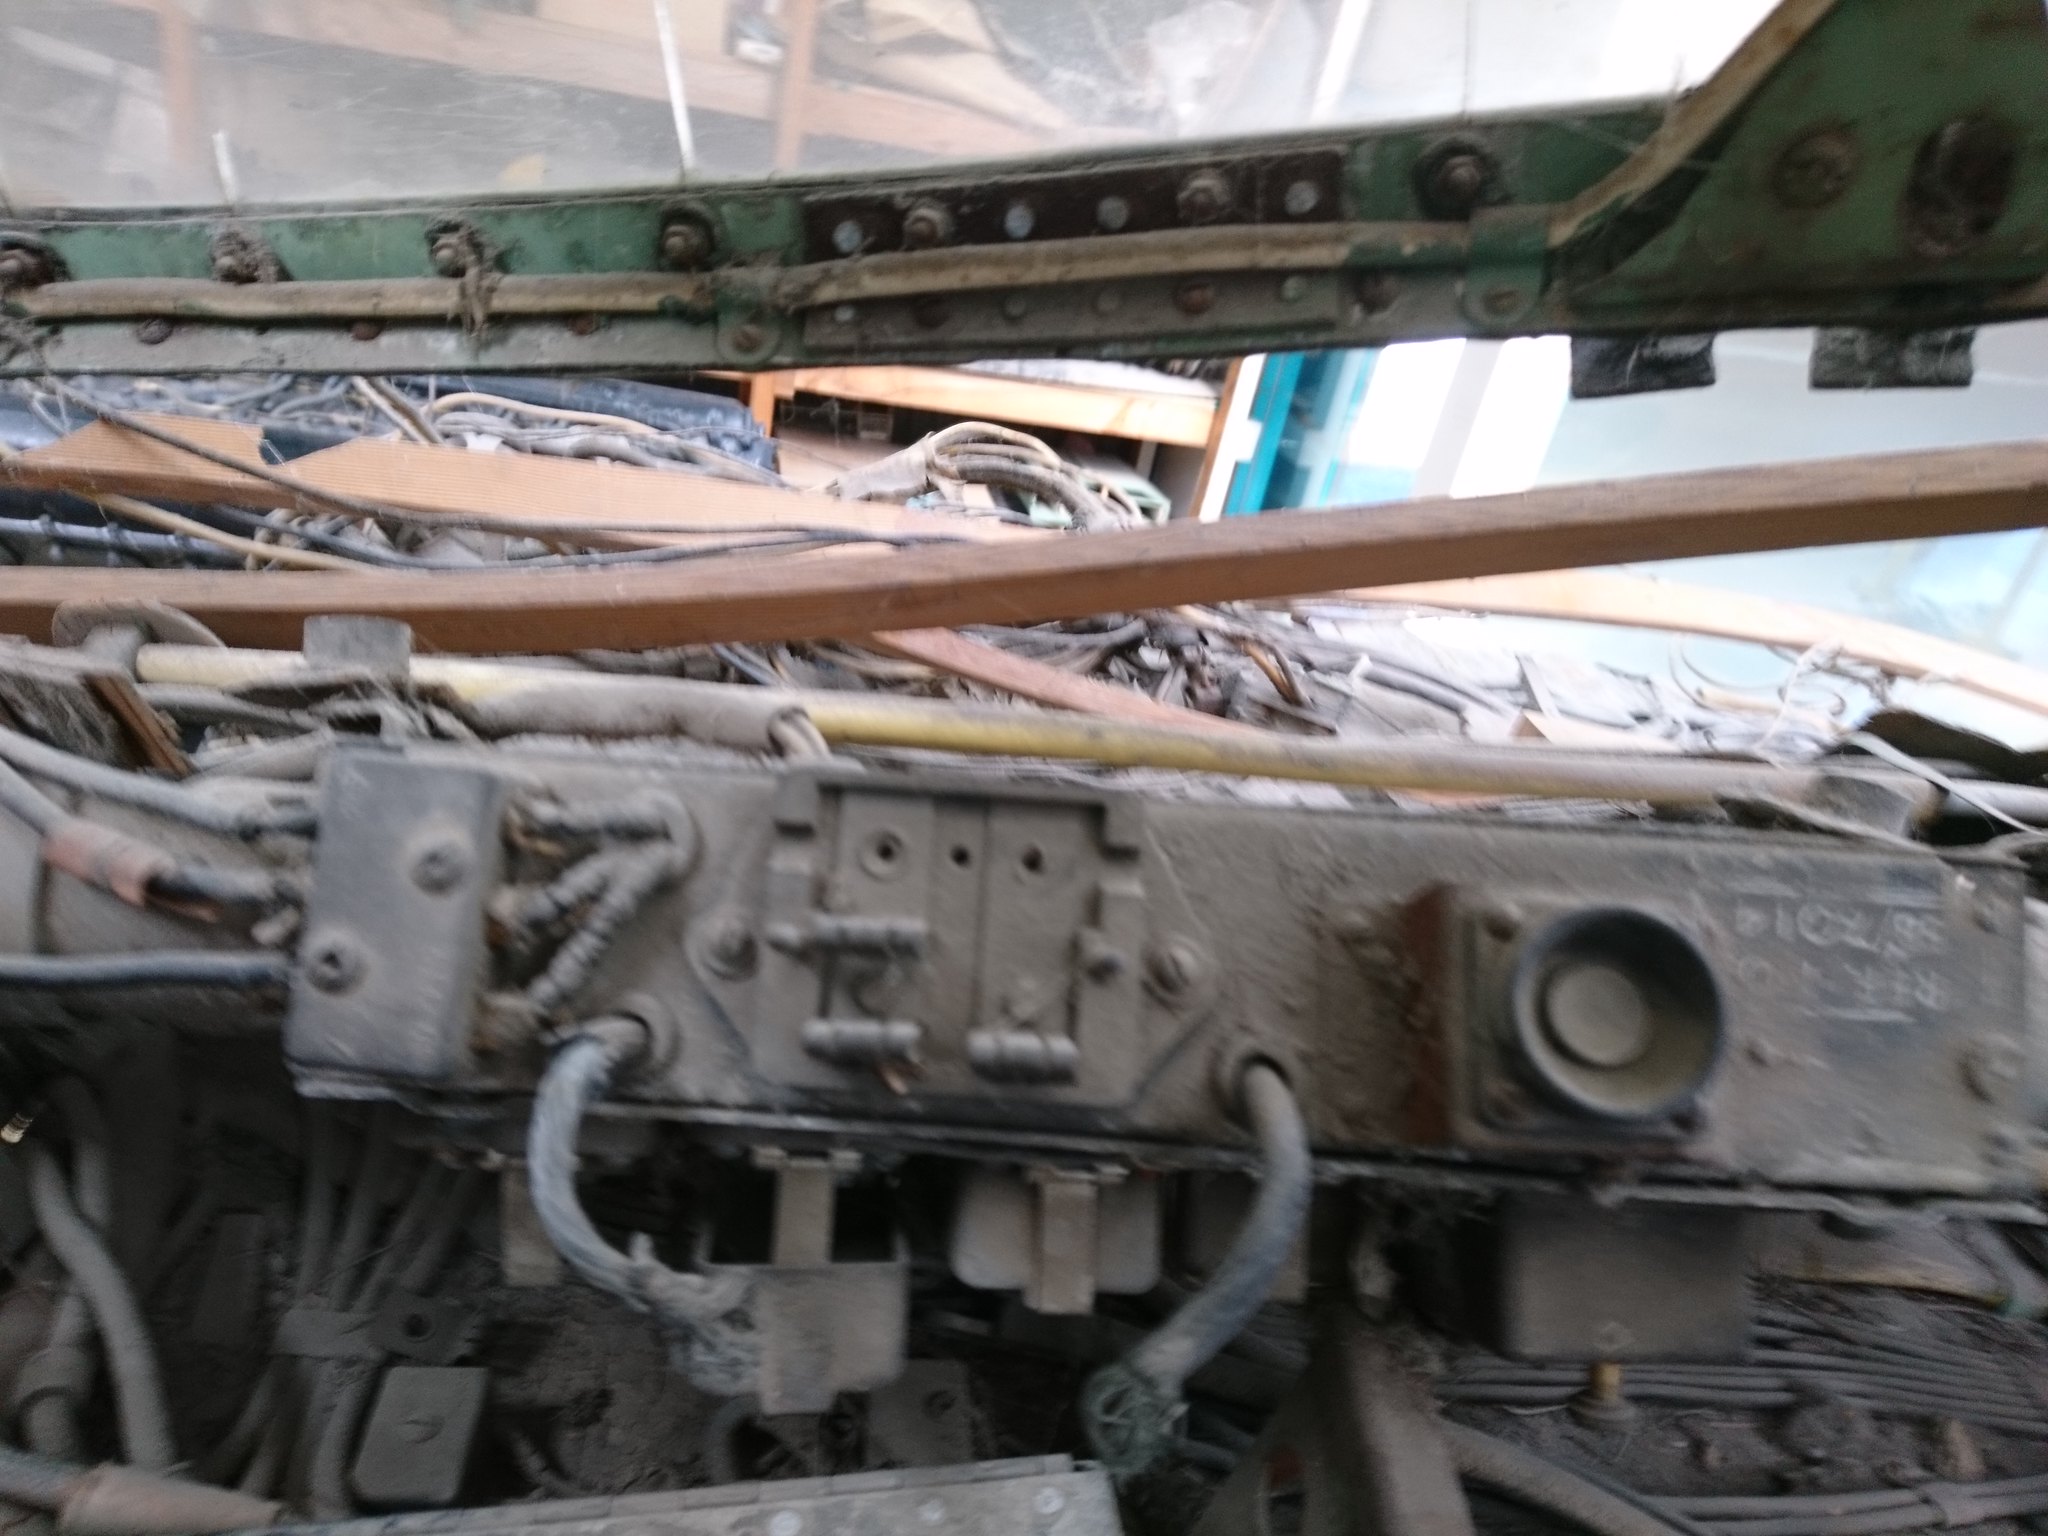  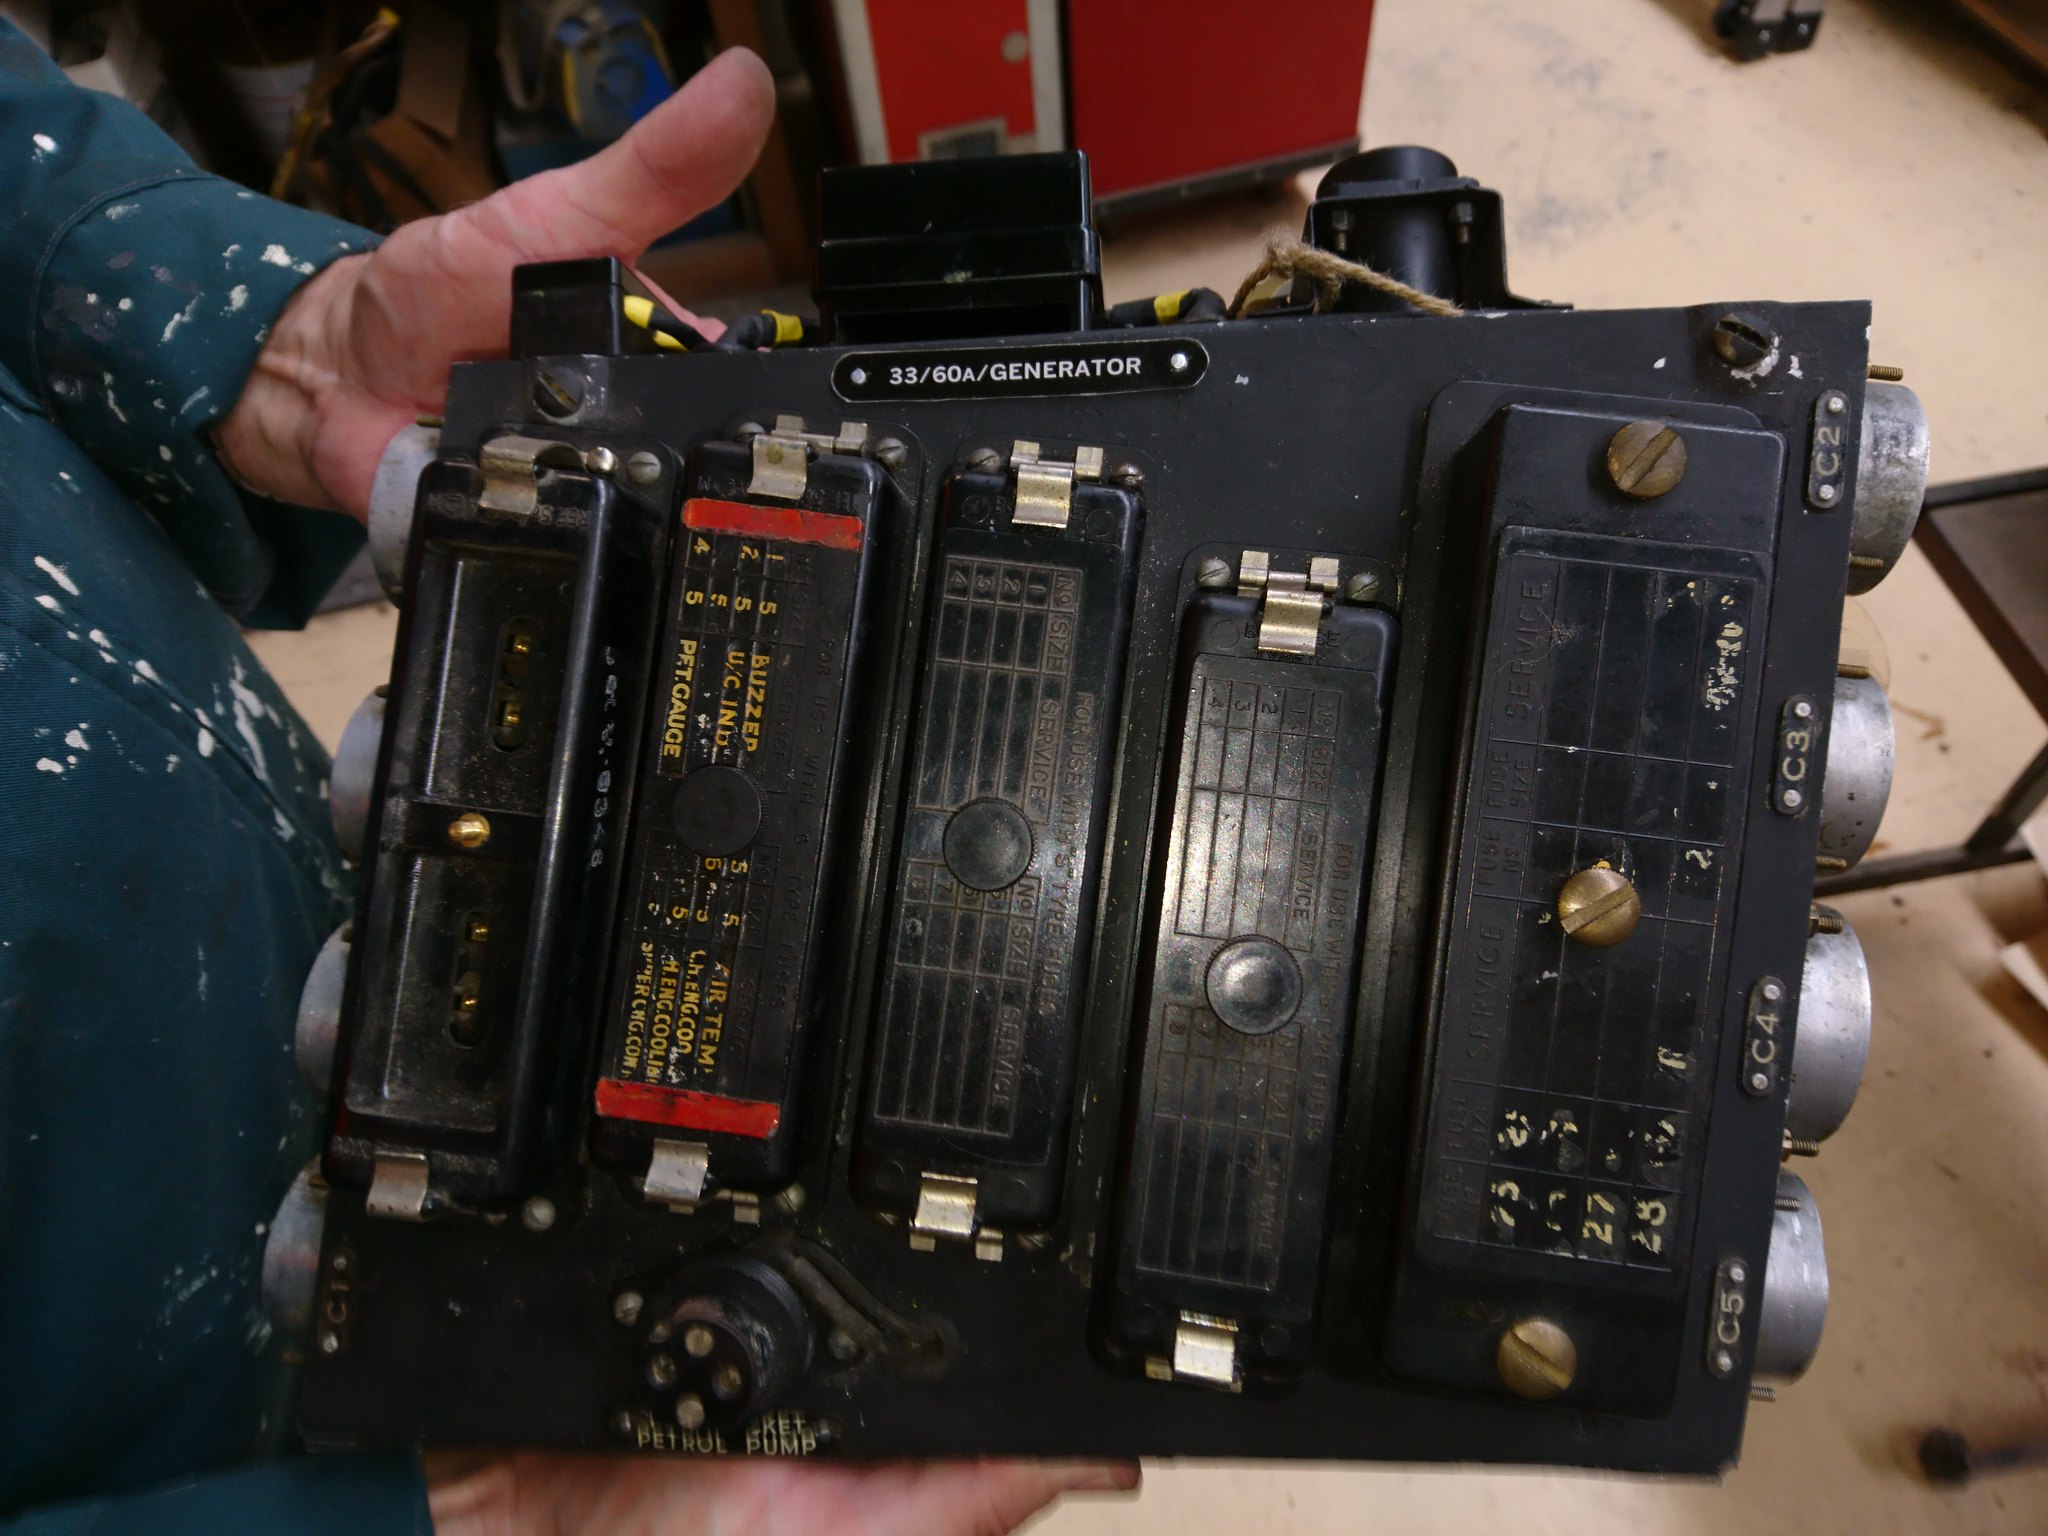 Of course completing tasks like this means finding parts. In this case a fair bit it was sourced from ASAP Airspares, which is an offshoot of the Beaufort Project at Caboulture, who were most helpful. Thanks also to Ants Galbraith, who was instrumental in this. It goes without saying that this stuff is pretty expensive - here is what ~$400 of bits looks like:  I have personally spent about $1,800 this year on bits for the Mossie, and that's just me - the other members of the Society likewise subsidise this project and their own as well; I mean you gotta have a hobby. OTOH if you have ever considered a donation to the home of what will substantially be the only surviving 487 Squadron aicraft (albeit with a donor fuselage), and which is safe in a public museum in NZ, or indeed if you think keeping a roof over the head of the only Viscount in NZ and the F-27, Hudson LC47 etc is a worthwhile goal, we'd love your support via a tax deductible donation: givealittle.co.nz/org/ferrymead-aeronautical-societyFull disclosure - donations go towards the Society general fund (ie keeping the roofwater tight, the insurance paid and the lights on) unless you leave a comment requesting otherwise. Two forumites in particular have been very generous to us recently, and while they might choose to remain nameless, I'll just say that one of them literally wrote the book on RNZAF Skyhawks, and the other is famed for his type-specific photo threads and vast photo library - thanks guys, it means a lot to us. Also, if you have any Mossie, British electrical or AGS plumbing bits in the shed, we'll definitely find them a good home. Cheers A |
|
|
|
Post by baz62 on Mar 24, 2019 16:34:20 GMT 12
Wow it's fantastic what you have managed to do considering the sad state the fuselage was in. I'm never complaining about the state of my Auster's floorboards again! They were mint compared with your wood work. Regarding Junction box C the main fusebox? I was wondering in the first photo what the push button did that's on the right side of the panel? I'll have to make another wee donation (I have to crowbar it out of my little Auster account, the owner doesn't like spending money ha ha) as I love seeing your progress.
|
|
|
|
Post by johnnyfalcon on Mar 24, 2019 17:44:02 GMT 12
Great update Alex! And good on ya for having the gumption to give the team an unashamed plug!! It's just the prompt I needed to dig out my wallet
|
|
|
|
Post by agile on Mar 24, 2019 18:49:26 GMT 12
Thanks chaps.
Baz, the button on the top of JB C is the test button for the immersed fuel pump on the LR fuel tank that could be fitted in the bomb bay. Obviously these were an item that went in and out with the tank, and also which could cause major strife if faulty (I have heard of instances where they seized and acted as an immersion heater, aside from the range problem that a failure would cause). On the front panel of the box at the bottom you will see a socket labelled 'Test Socket Petrol Pump'. To test the pump you plug your ammeter into the test socket, fire up the pump and push the button to see how much current it draws.
|
|
|
|
Post by denysjones on Mar 27, 2019 19:08:36 GMT 12
Double dose of stuff this week folks. I was going to post a wee report on things of the last month but Alex got in before me with his blitz so I left it for a few days for you to recover! Things on BXG are that stage where lots of time gets eaten up as small things go ahead following on from the centre section re-installation. The lower portions of the firewall that couldn't be cleaned while the c/s was on the deck have been dealt to by stripping off the various units then cleaning the firewall, cleaning and painting the units and re-installing them. What you can't see here is that running across the rear face, in the next bay rearwards, just below the bottom of the cutout is a 1" angle. Well there is now but before there were just a couple of bits either end and a gap in the middle, more of the old corrosion's work. You can compare shot this to the post of 23/8/18. Also now the engine frame and cowling attachment brackets have been dealt to.  Down at the rear of the nacelle the tail cone has gone on, and those structure items that featured a few weeks ago, along with some others, have gone back in and new skin installed and the two venturi attached. The hatch was able to be rescued with new latches being fitted. The real treat was the placard on it, relating to the water-methanol which is housed in the tank above, was able to be salvaged in situ.  Then inside the u/c bay the plumbing, its mounts, and connections to the venturi have been fabricated and installed. 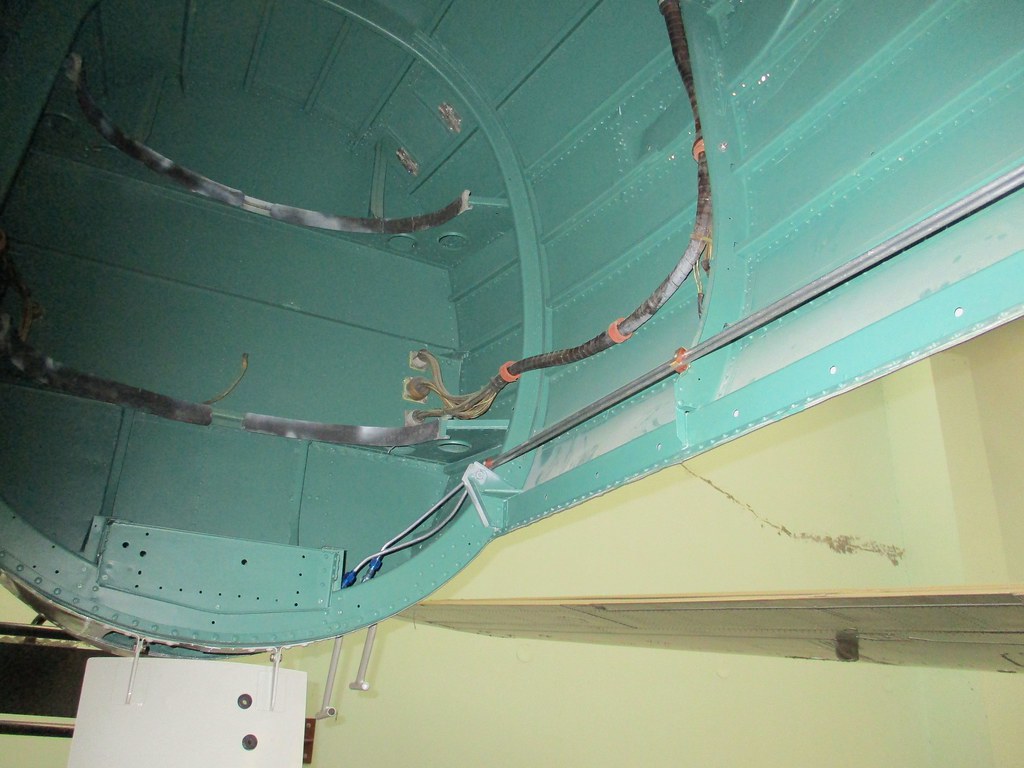 In the background of the second photo you can also see that re-installation of the fairings around the centre-section to fuselage area are starting to re-appear as well |
|
|
|
Post by kiwi285 on Apr 4, 2019 7:19:06 GMT 12
The team there are doing fantastic work on these two aircraft and the Mossie cockpit is starting to look the part. Keep up the great work from the team up here.
|
|
|
|
Post by isc on Apr 8, 2019 14:43:51 GMT 12
See article in todays Chch press. Soorry can,t put a link to that. isc
|
|
|
|
Post by agile on Apr 8, 2019 15:12:04 GMT 12
|
|
|
|
Post by skyhawkdon on Apr 8, 2019 17:36:30 GMT 12
Great story and connection with the aircraft.
|
|
|
|
Post by agile on Apr 10, 2019 22:32:34 GMT 12
Thanks Don. For anyone interested in this, keep an ear on RNZ National on Friday arvo. Oh, and have a look at the Facebook page - there's something a bit exciting just gone up.
|
|
|
|
Post by Dave Homewood on Apr 12, 2019 13:36:16 GMT 12
Just listening to Alex on Radio New Zealand, great work mate!
|
|
|
|
Post by Dave Homewood on Apr 12, 2019 13:48:17 GMT 12
|
|


