|
|
Post by agalbraith on Sept 30, 2008 9:59:38 GMT 12
Thanks Guys, much appreciated. I was up till late last night working on the bulkhead between the pilots door and the sliding door. Its coming up nice. Going flat out as I am away for a conference on Thursday and back Monday night. Mmmm as for the Mustang, um..............not much progress I am afraid  Cheers Anthony |
|
|
|
Post by Dave Homewood on Sept 30, 2008 11:45:54 GMT 12
Once the helicopter is finished maybe you can 'rescue' the Mustang project.  And the Mossie. You know you're a great modeller when we're all on tenterhooks to see the next step done. :-) |
|
|
|
Post by agalbraith on Oct 8, 2008 21:50:31 GMT 12
Quick update tonight, I have been away for a week and have been busy on the bulkhead between the pilots door and sliding one. There is 12 pieces in this bulkhead and oddly it is a different shape to the one on the port side too. Started making the track for the top of the door once the rear face is glued onto the bulkhead. 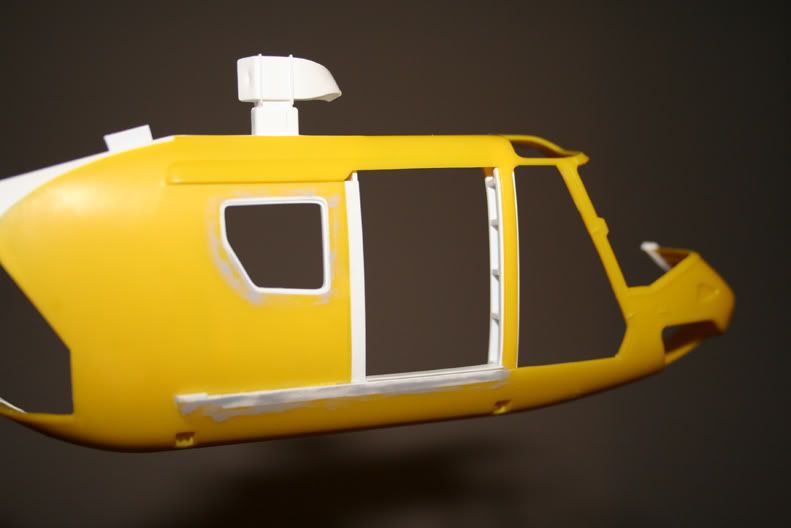 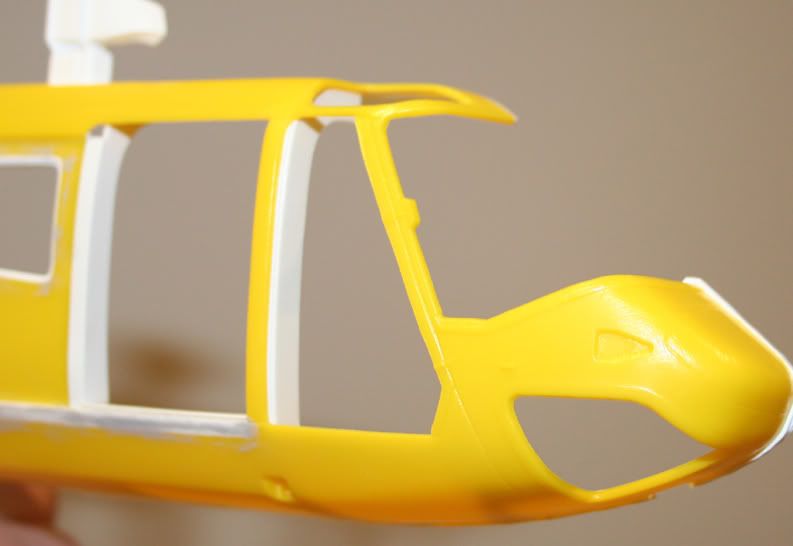 Better get cracking on the port side before I forget how I did this one! Thanks for looking Cheers Anthony |
|
|
|
Post by Dave Homewood on Oct 9, 2008 1:26:04 GMT 12
Great work Anthony. I noted the Wellington rescue helicopter had a brief appearance in TV3's excellent 'AFTERSHOCK' programme tonight.
|
|
|
|
Post by agalbraith on Oct 14, 2008 15:01:12 GMT 12
Hi Gents
Thanks Dave, I wished I had seen that, I heard a lot about that show.
I know there hasnt been much of an update recently but I am still actually working on it. I am plugging away at the upper forward fuselage.....actually completely rebuilding it! It nearly got the better of me, but I am too stubborn to let it do that. My first idea failed but have now gone about it quite differently as my main challenge is to have all the glazing frames all nice and even. I had a breakthrough a few days ago, as it turns out the whole forward roof line/profile in the kit is wrong, I have now fixed it and it is all making sense now. I am framing up the eyebrow windows at the moment and making a new structure to hang it all off. So far so good
Pics in a few days when I have something more tangeable to show.
Cheers
Anthony
|
|
|
|
Post by Dave Homewood on Oct 14, 2008 18:03:24 GMT 12
The show should still be available on the TV3 website, they said it would be there to watch for 14 days.
I'm looking forward to the next lot of photos. This is as good as the AvSpecs updates, seeing the amazing progress.
|
|
|
|
Post by agalbraith on Oct 16, 2008 13:07:38 GMT 12
Thanks Dave, no pressure.........................8^) OK, here we go. I am not sure where to start, but basically the whole nose is a bit too square (not that bad to fix though), the problem was that I didnt realise this first off. Tou will see in this first pic hopefully what I mean. The roof cross section at the forward end of the cowl has quite square shoulders and then notice how it tapers down to a gentle curve at the eyebrow windows. Whereas the kit has a square cros section going right through. 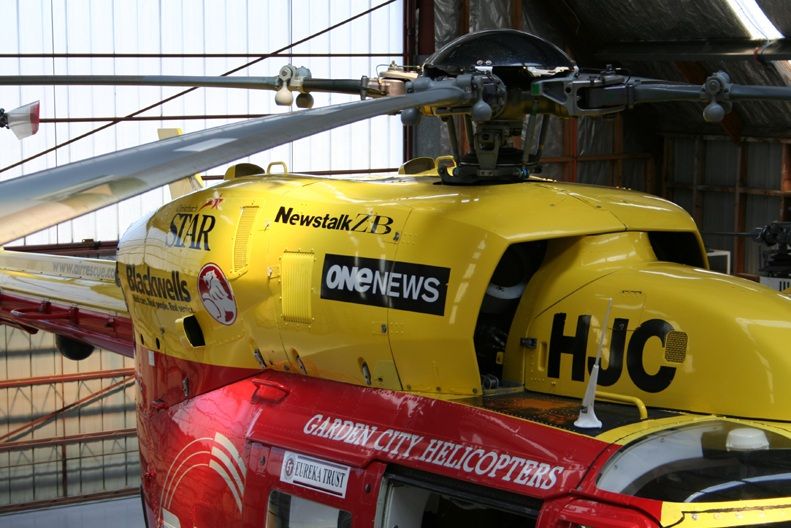 It was easy to fix with much sanding and constantly checking photos to make sure I dont go too far. After the roof line was established the door opening was trimmed to its edges and thinned right out to about 10thou. I then spent literally hours working on the inside framework. There is a curved frame that runs around the inside so I firstly had to make up a template at the right shape. Then a piece of rectangle section was bent to shape and glued to a piece of 10thou card (with the curve of each side drawn on it). Each side was done seperately and then PVA'd to each other back to back and filed/sanded so I had 2 pieces exactly the same (this will be quite critical later for the glazing). Here is a shot of that top internal frame I was talking about 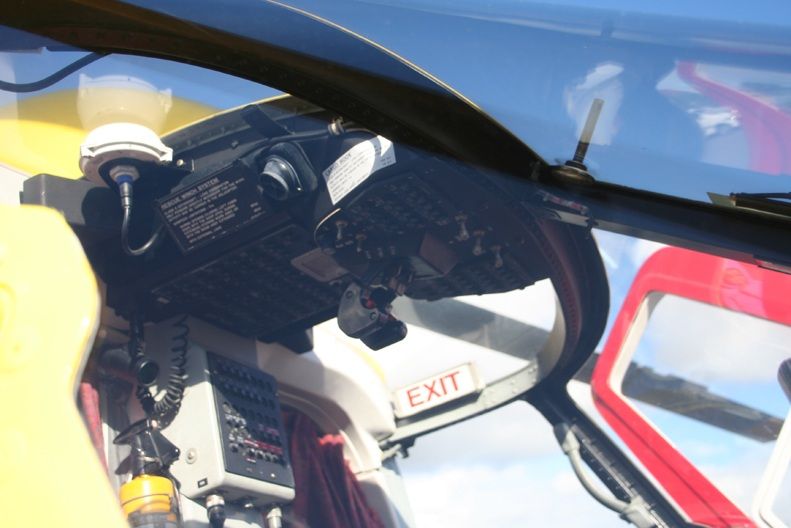 The quarter round curve was then glued to the rear bulkhead. Once dry it then had the wafer thin upper door frame attached(thought I was going to bust that for sure!). Now because I had made a new framework the centre upper structure(between the 2 eyebrow windows) was too long, so it was carefully trimmed back to the new correct length. Because there is a window frame to sit over top of that curved frame I had to shim it out allow the final glazing piece to sit flush. The front of it was then glued to the shim making sure everything stays in perfect square. Then the upper frames were boxed in (more to go in there yet) and a piece was glued to the inside of the forward door line. This needed to be also curved to the right shape as the kit has them straight. Now I discovered the lower windscreen line was a bit square down the side and needed a gentle curve to the front. I have started making the lower window frame for the glazing to rebate into. Hopefully what I have said makes sense.......if not then these pics should hopefully illustrate what has been done better. 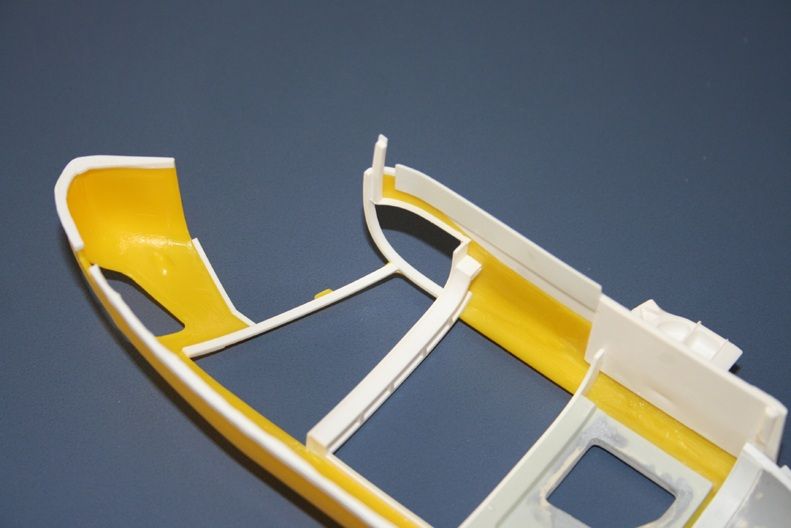 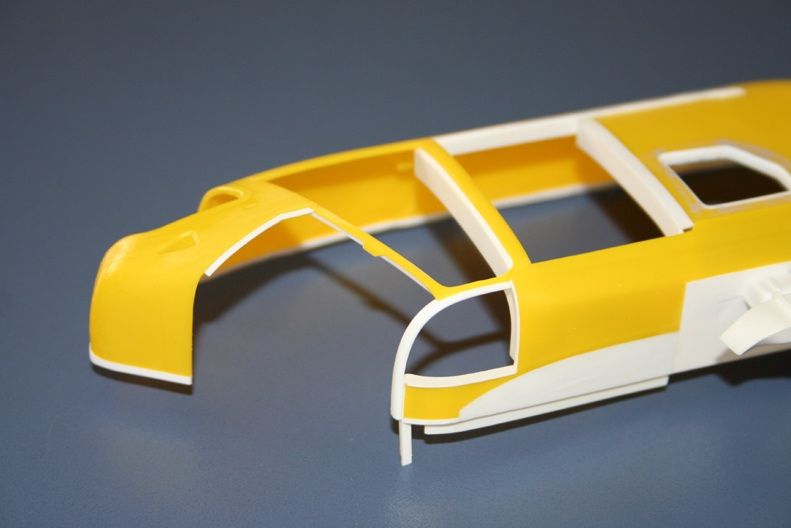 Here is a std fuse sitting next to my modified one. Maybe you cant tell in the pics but in real life they look noticeably different.......or maybe I am trying to convince myself!!! 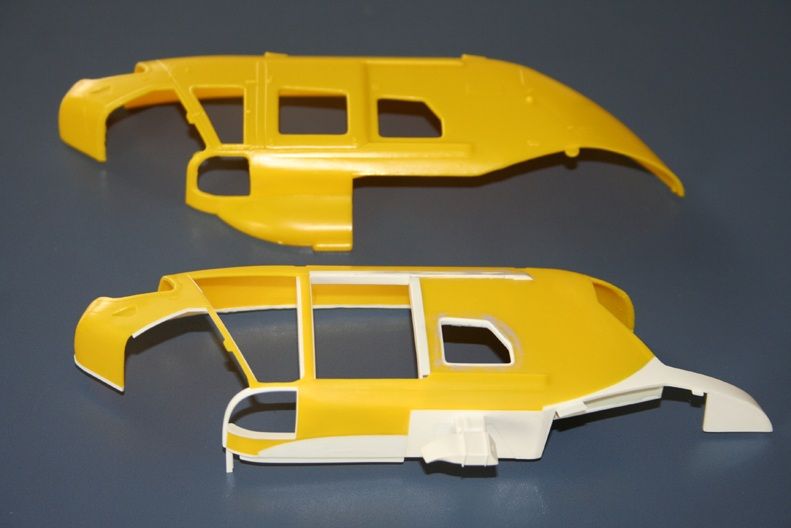  On to the port side now. Hopefully this side wont take as long as I know how to tackle it now and I have made a couple of duplicate parts. Thanks for looking Cheers Anthony |
|
|
|
Post by Dave Homewood on Oct 16, 2008 17:40:29 GMT 12
I can see the huge differences. Amazing work.
|
|
|
|
Post by hairy on Oct 16, 2008 18:43:17 GMT 12
Anthony, you will probably hate me for this, but......................the Auckland Rescue Helicopter has grown a "wart" on its nose as part of its upgrade in late '06/ early '07. Unfortunately this is the only picture I have of it, you can see the new section on the upturned "bonnet"  Closer...........  Does anyone have a better pic of this new bump, and has it been done to any of the others?  |
|
|
|
Post by agalbraith on Oct 16, 2008 19:52:18 GMT 12
Great photo, yes indeed Aucklands new(ish) machine HLN has a few differences than HJC (Christchurch machine). Notice also the winch is on the pilots side (presumably so it is easier to hover and watch the winching operation) and is very different to the other ones. Her interior is different and aparently during her build up she got more a more torquey(is that a word??) engine. I think it is a weather radar, that is supposed to be under that 'bump' but could be wrong. I have a pic on file of it installed.
Great photo and thanks for posting it, but thankfully the one I am doing dosent have it installed.......phew.
I wouldnt mind a higher res copy of that photo if that is ok, its a cracker.
Cheers
Anthony
|
|
|
|
Post by hairy on Oct 16, 2008 22:20:00 GMT 12
No probs, E-mail sent. I've answered my own question too................. ................ZK-HUP out of Dunedin has the bump too.  |
|
|
|
Post by flyjoe180 on Nov 10, 2008 21:52:30 GMT 12
HLF in WLG does not have the 'bump' mod. Anthony, check your PM, I have a series of walk around shots for you. I'll post them here in the walk around section too if appropriate for anyone else as well.
|
|
|
|
Post by agalbraith on Nov 16, 2008 10:49:36 GMT 12
Well it has been a while since my last update............I have actually been working on it! Thanks for the photo's Joe, there was some very good shots that highlighted some details I had lacked getting in my pics. Most of the work lately has been on concentrating on the interior panels down the port side. As you can see that last panel (that Revell moulded on the equipment on) has had it all removed leaving me with a big hole. I curved up some plastic card to match the panel curvature and spliced in a new piece. The rest is being done as per the other side. 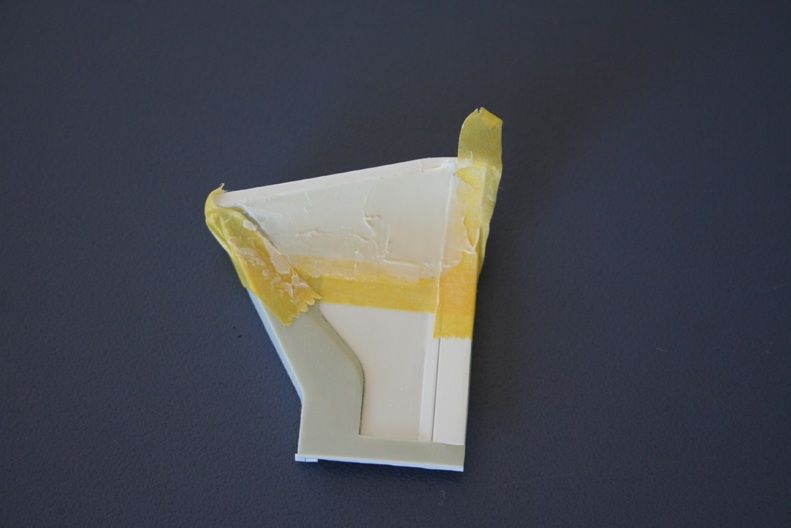 You can see in this pic that I am in the process of blending it all together. Notice in the next photos that the left/port side bulkhead is a different shape to the stbd just behind the front doors.  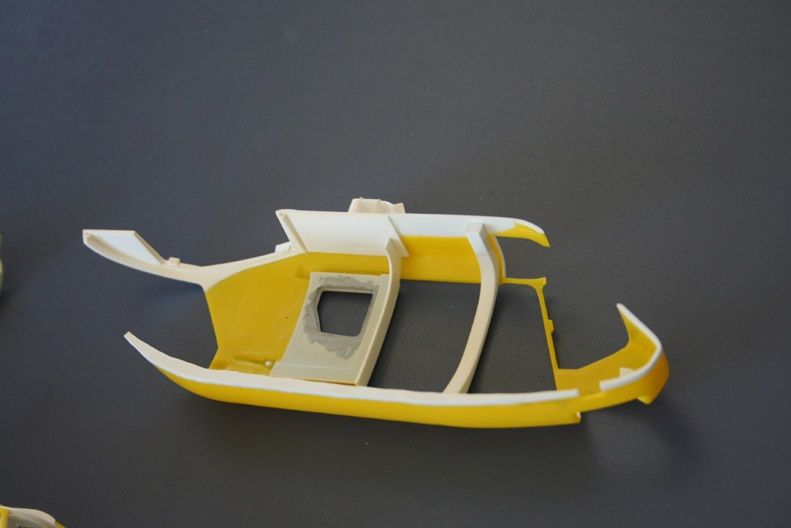 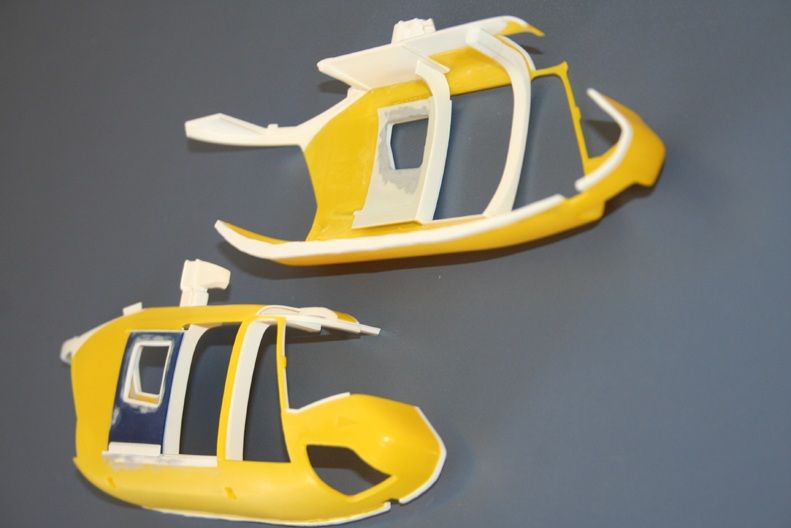 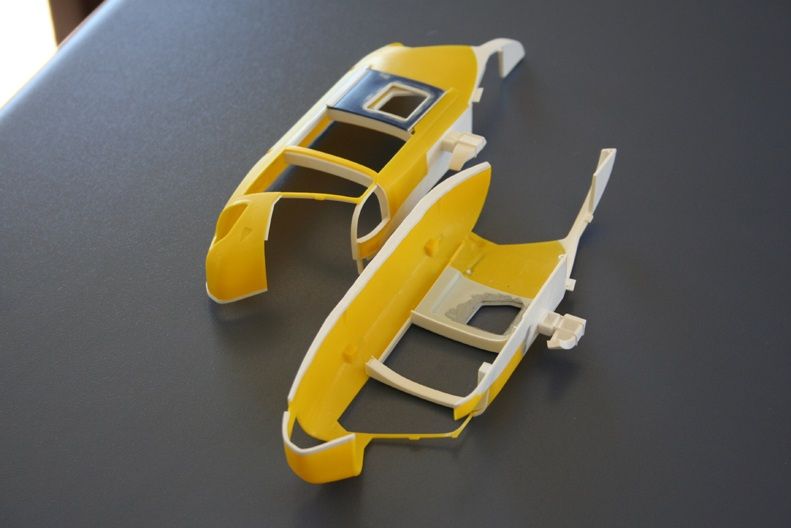 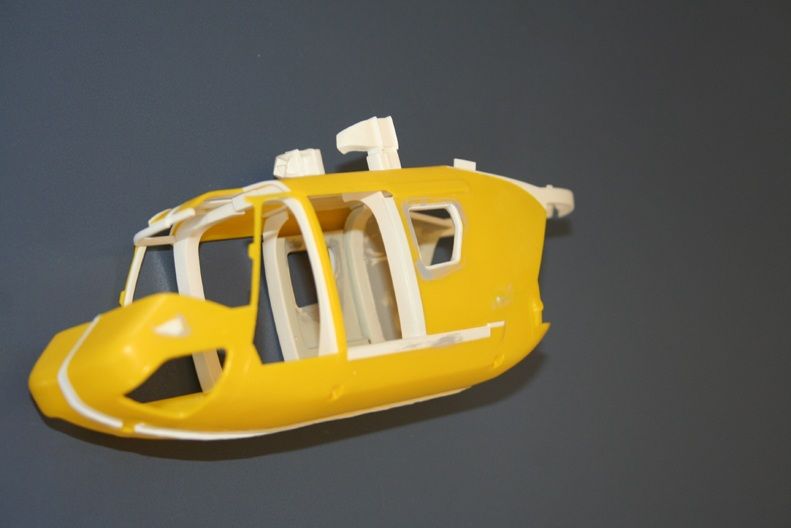 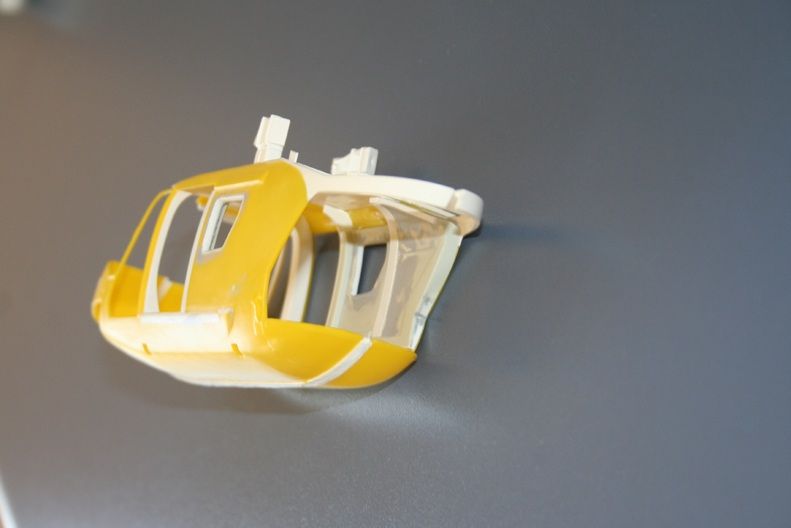 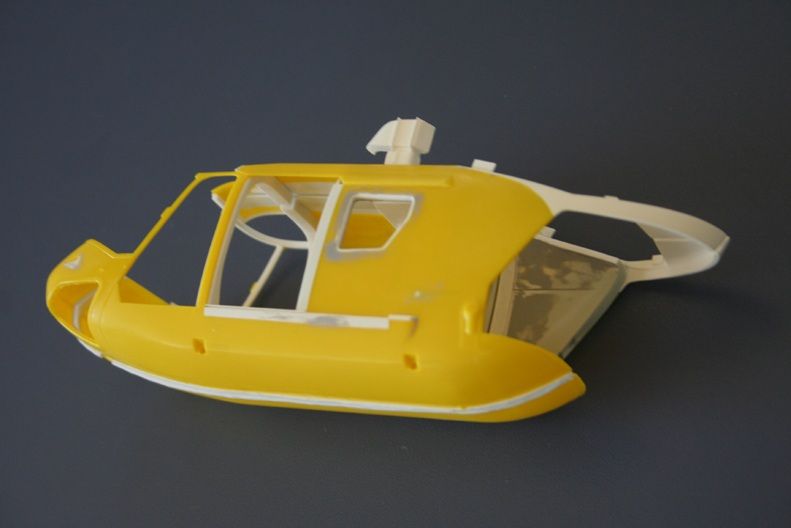 Thanks for dropping by for a look Cheers Anthony |
|
|
|
Post by Dave Homewood on Nov 16, 2008 13:44:16 GMT 12
It's getting better and better with each update. Awesome work mate.
|
|
|
|
Post by agalbraith on Nov 16, 2008 15:11:24 GMT 12
|
|
|
|
Post by Dave Homewood on Nov 16, 2008 16:57:24 GMT 12
Holy cow, now that is master modelling! The instrument panel is superb, especially lit up!
|
|
|
|
Post by kiwichappers on Nov 20, 2008 23:23:37 GMT 12
Well Anthony I am impressed by your work and am enjoying looking in of this project.
I have just come back from the UK nationals at Telford and seen a number of exquisite models built by Continental modellers to the standard of your German correspondent. My conclusion is I don't think they have a day job.
Keep up the good work.
|
|
|
|
Post by agalbraith on Dec 19, 2008 20:59:49 GMT 12
Thanks guys, yes indeed I do wonder what some of these European guys do during the day, I have no idea where they find the time. Well as promised here is another update, thingswere a little slow with one thing and another. Having said that, the work done actually took me a while. On the port rear interior panel was moulded with equipment on it. This BK dosent have this particular style medical fit-out. I have now blended in all of the panels, and carefully restored the panel lines. The last panel has now been glued in place in prep for making a new floor and more panelling. I am really pleased at how it has come up, even though it has been a lot of work. 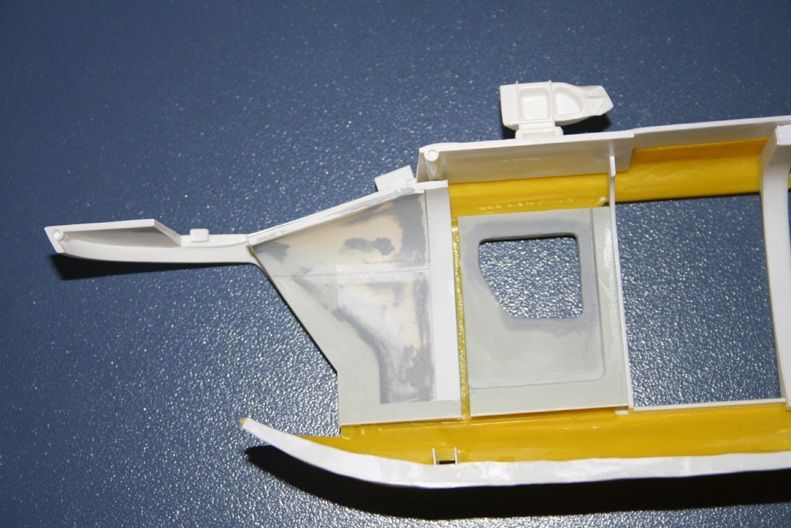 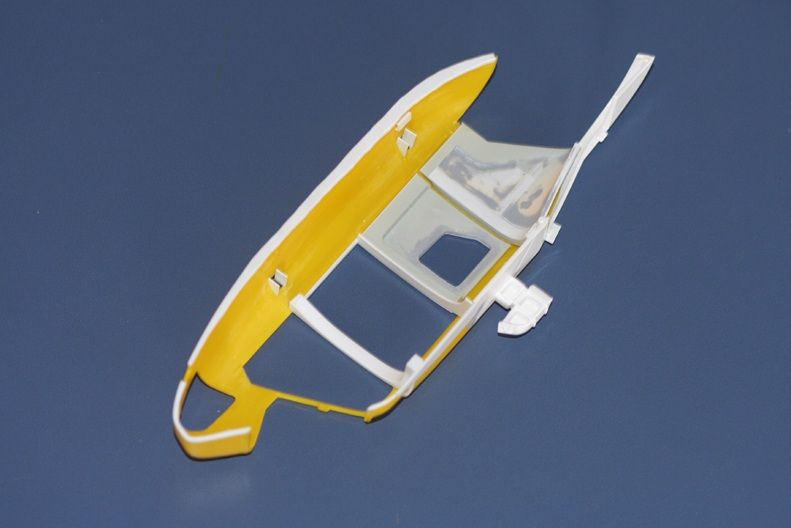 Next up came a spotlight that is situated in the belly of this machine under the pilots seat. 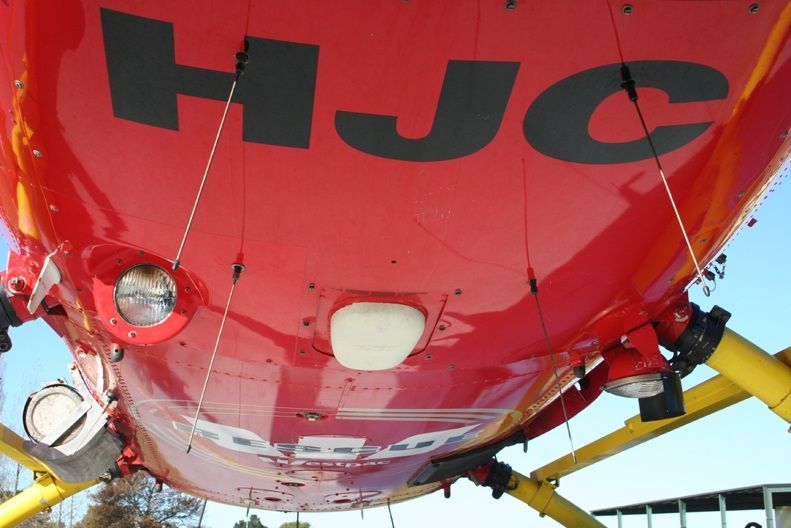 I marked out the centre after measuring up the postion on the real machine and a large hole was drilled out. A piece of 5.5mm plastic rod was taken and a 3mm hole drilled through the centre and carefully reamed out a fraction more to the right lens dia. A piece of larger tube was truncated and a triangular section was layed over one end and glued. This assy was then slid through at about a 40deg angle carefully trimming to get a precise fit and use as little filler as possible. The purpose of the larger piece on the end ensured that I was able to replicate the scalloped interior leading up to the front face as the light is set into the fuse. I have brushed some Mr Surfacer 500 around the edges to blend it all in (still needs buffing back) then trimmed the top where it protruded into the fuselage so the floor will fit later. This was a lot harder than it looks to get spot on and really took me ages. 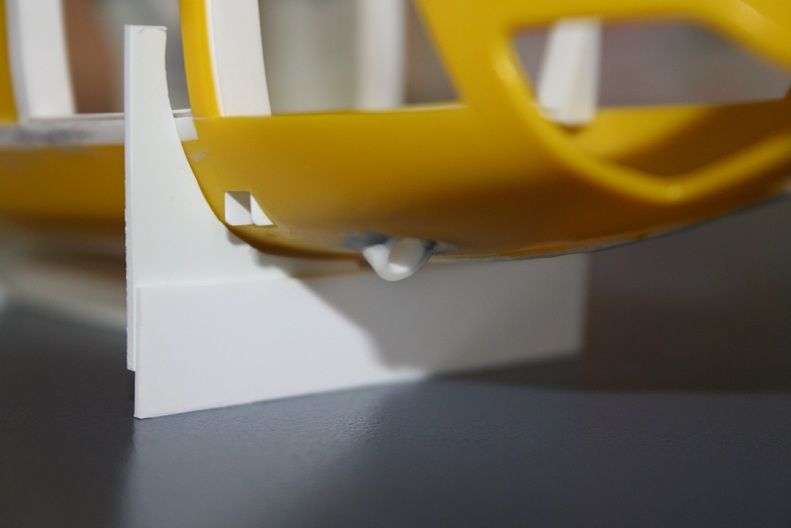 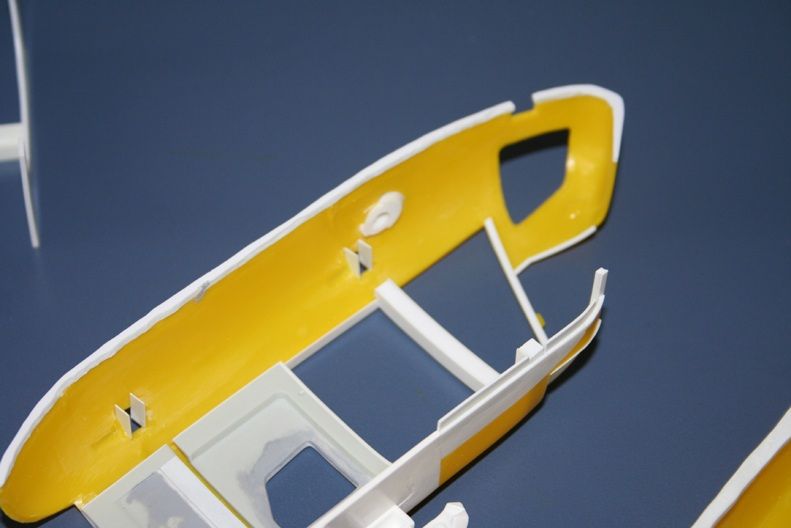 Next up that I saw that needed attention was the skid openings. They are way too small. The actual dimensions in 32nd scale is 4mm(horizontal)X5.5mm(vertical) with the lower line slightly curved. The skid dia is 3mm (95mm actual). I needed plates on the front and rear faces so the openings had to be just wide enough to slide a 10thou shim down each side. These protruding 'triangles'were then sanded up to round the corners off. I still have to put a hex bolt head on the corner of each one. 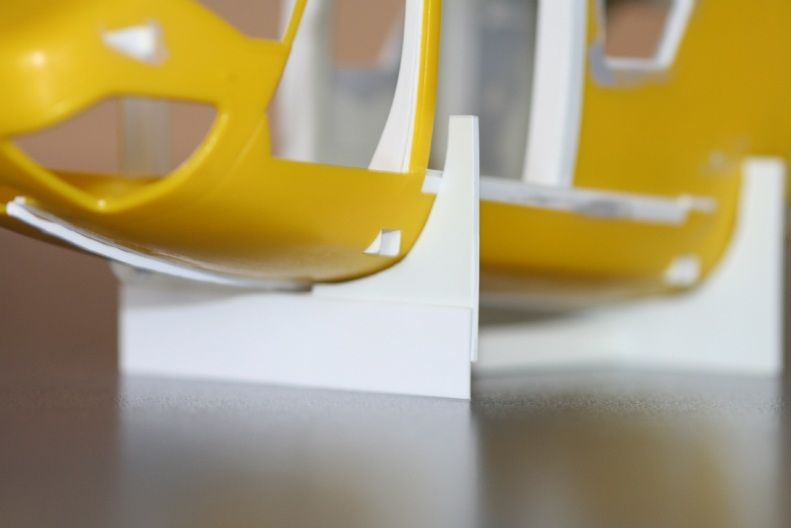 I think that these little details will make all the difference on the end result. I have made a stand to sit her on during construction as well. I am working on the other upper windscreen frame at the moment and then I might look at the gutter tracks on the upper door track fairing. I think I am going to make new vertical stabs too....... 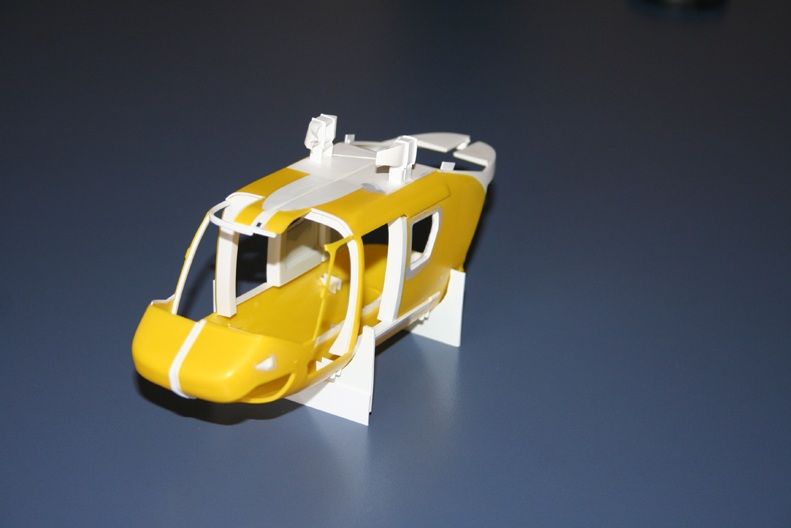 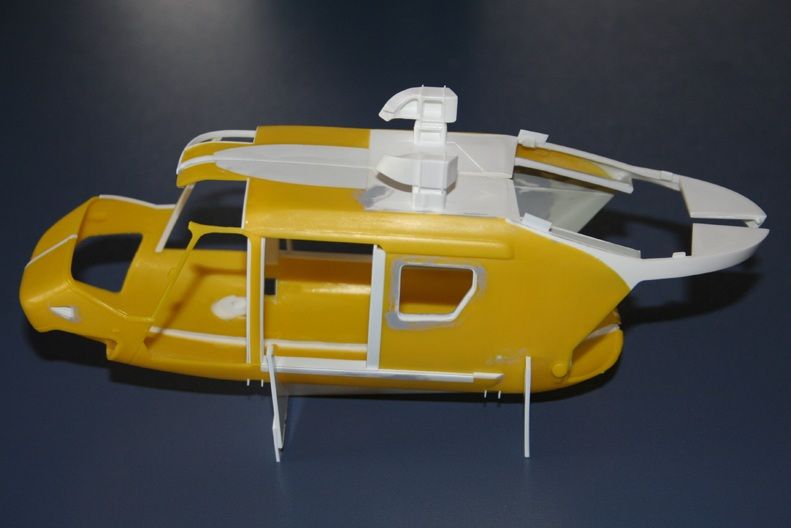 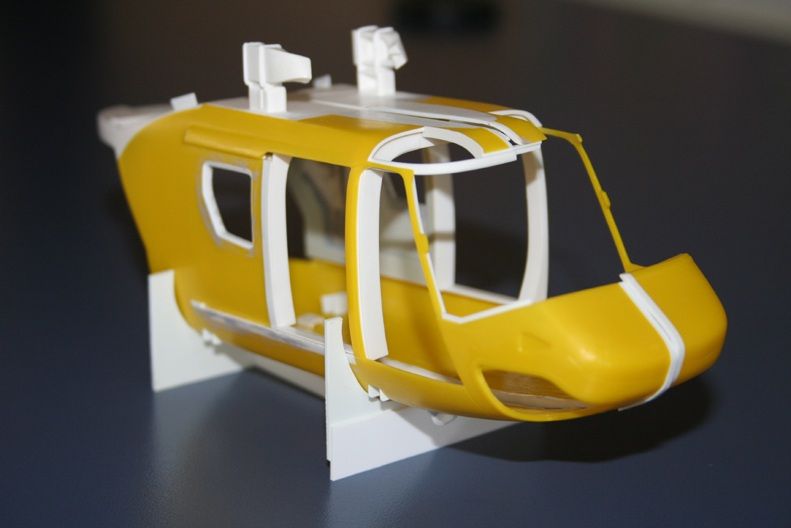 Thanks for looking and the encouragement you guys give me, it really spurs me on. Cheers Anthony |
|
|
|
Post by flyjoe180 on Dec 20, 2008 8:47:36 GMT 12
Good progress Anthony. I can't wait to see the finished product!
|
|
|
|
Post by agalbraith on Dec 20, 2008 9:33:46 GMT 12
Thanks Joe........neither can I!!!
|
|


 And the Mossie.