|
|
Post by emron on Sept 6, 2020 19:35:35 GMT 12
As well as the Hucks Starter claw I picked up a few other Kestrel parts from Aladdin’s Cave on Friday. They included the Potts type nine-fin oil cooler with one of it’s cover plates, the V-shaped cooling duct/ drip pan that hangs below the crankcase together with all the remaining pieces of the engine mount (tubes all separated and loose). All of these items had sustained a certain amount of crash damage but some of them fared better than others during their subsequent stay in the bush. Over the weekend I’ve been assessing their condition. The Hucks Starter cone has already been
refurbished and repainted once before but I scraped and brushed out any paint and rust in the threads on the shaft so I could release one of the spinner retaining nuts. I managed to get that free. The other one’s at the top of the thread and stuck tight. I’ll leave that there until I get proof that it’s not in the right place. All we need to complete this fitting is the adapter ring that supports the front of the spinner and the locking washer. I have the measurements to make both of these but will wait to see if I can locate originals.
Likewise the oil cooler has been previously repaired when the buckled and bent fins were straightened. It’s ready to bolt straight on. The only problem is the engine is too close to the floor for it to be fitted in the correct position but it’s only you that would notice if I moved it further forward to display. It’s cover plate was badly crumpled but I worked on it this morning and it’s now back in shape. The anodising is in good condition with only a little bit of corrosion blistering through, so once that’s dealt to it could go on as well.
I’ll report on the state of the other bits next time.
|
|
|
|
Post by emron on Sept 7, 2020 14:54:21 GMT 12
Flying Boat Update
Newsflash
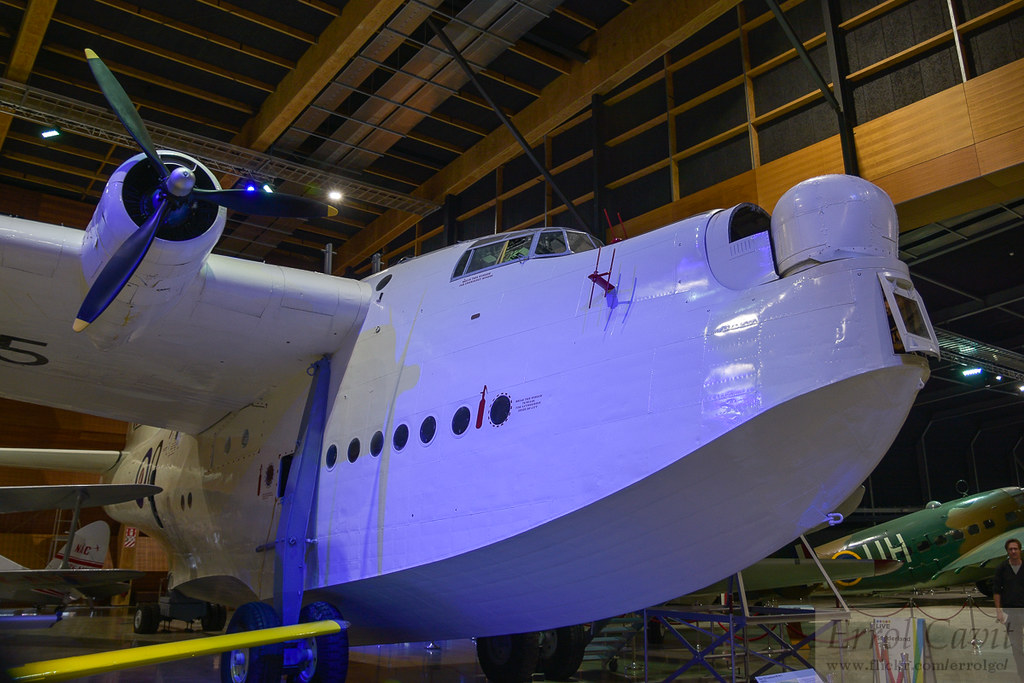
I’ve just been on the phone to my source who tells me that the Sunderland is recovering well from it’s recent nose operation. The front turret transplant is a success and the Museum will be open tomorrow for admirers.
You’re hearing about it first here.
|
|
|
|
MOTAT
Sept 7, 2020 16:19:35 GMT 12
Post by Richard Wesley on Sept 7, 2020 16:19:35 GMT 12
Flying Boat Update Newsflash I’ve just been on the phone to my source who tells me that the Sunderland is recovering well from it’s recent nose operation. The front turret transplant is a success and the Museum will be open tomorrow for admirers. You’re hearing about it first here. Look forward to seeing photos. |
|
|
|
Post by Dave Homewood on Sept 9, 2020 16:25:28 GMT 12
Member Sputnik767 very kindly sent through these photos to post. He writes:   Photos copyright Mark Wade. |
|
|
|
MOTAT
Sept 9, 2020 16:26:09 GMT 12
Post by Dave Homewood on Sept 9, 2020 16:26:09 GMT 12
The turret looks fantastic Ron and team!
|
|
|
|
Post by ErrolC on Sept 9, 2020 16:39:35 GMT 12
|
|
|
|
MOTAT
Sept 9, 2020 16:43:46 GMT 12
Post by sputnik767 on Sept 9, 2020 16:43:46 GMT 12
That's great to see, Errol. Pretty much the same spot.
|
|
|
|
MOTAT
Sept 9, 2020 22:55:24 GMT 12
Post by campbellbox on Sept 9, 2020 22:55:24 GMT 12
So good! It just looks right. Great work.
|
|
|
|
Post by emron on Sept 11, 2020 18:49:03 GMT 12
Earlier in the week I looked a bit closer at the Vickers-Potts oil cooler and discovered some bad corrosion on the alloy spacer rings that separate and seal between the fins. I ended up pulling the unit apart so the 16 spacers could be degreased and corrosion removed. I managed to salvage them all and have filled in the worst of the holes. I’ll leave all the pieces loose until I can get it back to the paint shop. I managed to separate the three sections of the crankcase cooling ducts and cleaned off the worst of the grease and dirt. The front portion is the air intake port through the chin cowl and was badly crushed and cracked in the accident. It’s only good as a pattern now and will wait for return to the workshop for a replacement. I paid another visit to the Home of Hawker Hinds today and came away with some more bits. I was kindly loaned a second partial engine frame so I can gain accurate measurements for the tubes that were broken, rusted or sawn through on the original. I can also now make templates for the numerous stainless steel junction plates that are missing. We only just squeezed another of the items into the van. In “Mysteries at the Museum” parlance this object is described as wooden, painted black, about 10ft 10in long, 12 inches wide and tapering to the ends.  Now I can get the accurate profile for the stubby propeller I’m planning. |
|
|
|
Post by emron on Sept 25, 2020 21:49:46 GMT 12
Still working from home since last update I’ve spent some time re-assembling the Kestrel engine mount. Instead of making templates I’ve finished a full set of joiner plates in aluminium. We can polish them up and they’ll suffice for display purposes even if we don’t locate more of the originals or make new stainless ones. That has allowed me to bolt all the pieces together. As mentioned before some of the steel tubes are missing, broken or sawn through so I had to improvise to fill in the gaps. I’ll leave any further repairs until I can get it back to the museum to see if welding, straightening and patching are going to be feasible. Next I traced out the propeller blade cross section at the 6”,10” and 15” distance from centre and combined them onto a full scale drawing. I've planned the cut down propeller to be 30" long. Now I’ll be able to transfer the measurements to the laminations and precut to shape before gluing. I don’t yet have materials but am thinking to use five 45mm layers to achieve the nine inch thickness. Yesterday I did some work on the Hucks starter cone. I machined a new 3” spacer ring that supports the front of the metal spinner as well as cutting out the locking ring from sheet aluminium. Today I made another fruitful visit to our friends up north. I came away with enough ferrules so that we can now re-use the correct 1/4” bolts and substitute with copper for the tubular rivets on the engine mount fastenings. I also collected the fuel filter and once we’ve repaired it’s mounting bracket, it clamps on to the bottom of the engine mount. On an earlier trip I picked up the hand starter extension shaft and sprocket. These connect the crank handle to the engine and turn the starting magneto by chain drive. We’ll have to make do without the mag for now but the shaft is complete with mounting and is ready to bolt on.
|
|
|
|
Post by emron on Oct 14, 2020 16:16:04 GMT 12
Having to take myself off to the Dental Repair Shop a couple of times this week I’m sorry that I can’t yet report on today’s happenings at the Museum. However MOTAT did resume normal operations on Thursday last week following Auckland’s return to Level 1 and the first volunteer team was back on Sunday. We took up where we left off nearly two months ago. Steve was able to continue with parts of the Sunderland while we were away. As noted earlier, the front turret has been swapped out. Trying to avoid the use of the word “extraction” just now but when I arrived on Sunday morning I discovered that the rear turret had also been removed and was now alongside it’s replacement in the workshop. Steve had commenced fabrication of corrosion damaged frames and fittings made accessible in the now empty tail opening while others in the team continued with the clean up in the rear fuselage and rebuild of the rear turret. John and Frank meanwhile got back to the re-assembly of the DC3 flap mechanism. I took a few minutes out for the Kestrel engine job. I gave the Hucks Starter cone a gentle blast and then a coat of primer. I finished it off with a light coat of grease on the threads. It only took a little adjustment before it was bolted home on the prop hub. I was pleased to see it back on there after nearly fifty years.
|
|
|
|
Post by emron on Oct 19, 2020 15:15:09 GMT 12
Now that the Hucks starter cone is fitted I can start working backwards down the Kestrel. Next up is the metal spinner that provides the streamlining from the starter claw back to to the front face of the propeller. As mentioned earlier, the original one was badly squashed in the accident and must have been discarded. So that you will still see the detail underneath, I decided to make a replacement but cross-sectioned instead. I had made up a former so that I could make the half cone to the correct taper and length and yesterday I cut out the metal off my template and it proved easy enough to pull into shape by hand. The next step was the tricky one, the bottom rim is folded under where it butts against the prop (it engages on to two pins there that prevent it from slipping or going off-centre) I was able to bend it part way by hand until the flange began to buckle. With repeated passes through the shrinker I was eventually able to achieve the desired acute angle and as well tighten up to the correct curve at the cone’s base. I finished it off at home today, for the top rim I just slitted to fold down and rivetted a ring over the top. I’m planning to leave it polished bare metal so this too is now ready for a test fit.
|
|
|
|
Post by emron on Oct 25, 2020 19:10:20 GMT 12
I must have got the measurements right because the spinner slipped on without trouble. It may be just a shiny new replica part but hopefully it will catch the eye of more passing visitors. Next up should be the stubby propeller. The special feature of the Watts type prop is the plywood fairing that’s built onto the centre of the blades after they are machined to shape. It continues the streamlining from the spinner back to the circular opening in the engine cowls. I’ve gathered enough lumber and am thinking it would be easiest to precut each lamination and reduce wastage. But that will need a further lot of drawings so I’ll leave that project for a while. At the same time I was working out the simplest way to attach the hand starter layshaft and the oil cooler. They can both clamp directly on to the engine stand using U-bolts, once they’ve been refurbished and painted. Anyway it’s time to get back to where we left off with the flying boat turrets before the last lockdown. The two imitation Brownings were only half done so I’ve been cutting out, folding and rivetting on both sets of covers and endcaps to complete the external detail of their receivers. They’ll be finished and ready for the paint shop by Wednesday.
|
|
|
|
Post by webfooter1 on Oct 28, 2020 17:12:34 GMT 12
Hi There, Can you advise me who/ where the group is that are restoring the Sunderland turrets please and advise me how I can contact them? I am from Pembroke Dock Sunderland Trust In Wales, UK and we are working on a similar restoration project on the front turret from our Mk1 (reclaimed from the depths of Milford Haven)
|
|
|
|
MOTAT
Oct 28, 2020 21:26:50 GMT 12
Post by emron on Oct 28, 2020 21:26:50 GMT 12
Welcome to the Forum.
The turret restorations are being undertaken for Sunderland NZ4115 by the Aviation Workshop team at the Museum of Transport and Technology, Auckland.
I've sent a PM so we can exchange/renew contact details.
Ron.
|
|
|
|
Post by emron on Nov 2, 2020 14:58:22 GMT 12
Yesterday I finished assembling the Vickers-Potts oil cooler for the Kestrel and then clamped it into position alongside the engine, hanging from the stand. I mustn’t have tightened all the joints enough between the fins of the cooler as I had to wipe off some of the 80 year old oil that had seeped out. Woe betide me if there are any spills on the polished display hall floor later  . Not yet having found out what make or model of starting magneto was attached to the hand crank, I decided to mock up a 12-tooth sprocket so I could wrap a length of roller chain on for looks. It turns out that the chain is the same 8mm pitch and type 05B-1 as is used on the Sunderland turret winder and I was able to pick out a length to suit from a new stash that I found in the store. I also finished the bracket that will hold the hand crank layshaft in place and once those two parts are painted they can be clamped into position too. Earlier in the week I made a new clamp to go around the barrel of the fuel filter. The original clamp is badly rusted but I’ve kept it in case it can be rescued. I’ve designed a small pedestal for it and once that’s made the filter can be attached next. |
|
|
|
Post by corsairarm on Nov 2, 2020 19:28:20 GMT 12
Following on from Dave's comment in the Tauranga Avenger thread I use to follow on Ron comments with supporting photos. I stopped that when Photo bucket started charging and I upgraded to a later version of Photoshop elements. I haven't yet found how to convert my previous version categories over.
I thought I would write about my observations on what else is going on in the aviation section. Frank and John are working on the DC3. They have just finished reinstalling the flaps, making adjustments and have just tested them so we have one more little exhibit we can display. We used to have the main gear of the Hasting's working but that developed an oil leak which we haven't yet been able to fix.
Mike and I are working in the rear of the Sunderland's fuselage, scraping off the flaky paint and attending to any corrosion that we find. Mike has started working around where the rear turret is situated doing the same old there but also making a couple of replacement pieces that were badly corroded before the refurbished turret is reinstalled.
I am only there on a Sunday, which is a small group, but the Wednesday boys are also hard at work on these and other projects as well. I'll check with Steve next Sunday on these and update you all then.
Cheers
Richard
|
|
|
|
Post by emron on Nov 4, 2020 16:12:34 GMT 12
Here’s a couple of Peashooter Brownies fresh out of the oven and destined for the Sunderland front turret. Courtesy of Steve’s Paint Shop and thanks to Dave L. And John D. for machining the tricky bits. 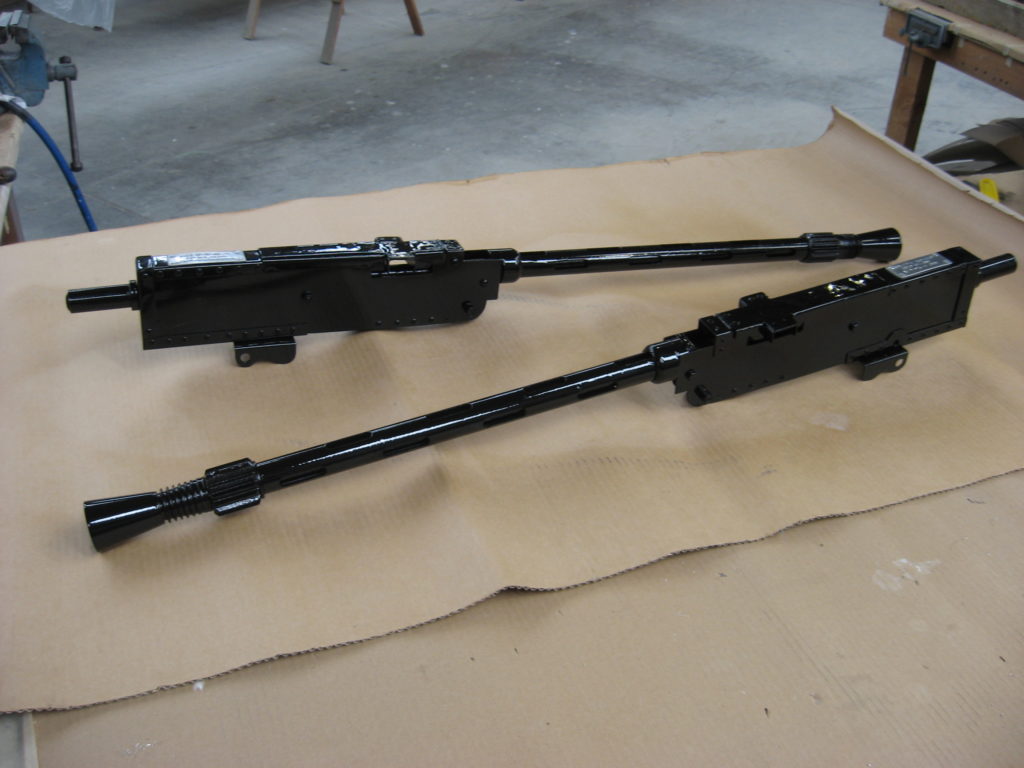 Technical description: British Browning .303 M.G. MkII*. The Kestrel engine is now resplendent with it’s hand starter crankshaft and fuel filter. Next up is the cooling duct that hangs below the crankcase and then the air scoop for the left hand side carb intake. |
|
|
|
Post by campbellbox on Nov 4, 2020 22:36:35 GMT 12
 C50E06C4-C1A8-4191-A446-6E05D176F3EB C50E06C4-C1A8-4191-A446-6E05D176F3EB by Campbell McGill, on Flickr Just confirming the turret looked great on Sunday when I popped in for a visit. I also really liked how the depth charges were cranked out under the wing and a few airframes has some interior lighting going. |
|
|
|
Post by emron on Nov 8, 2020 18:32:40 GMT 12
Flying Boat Update I managed to get the Browning replicas installed in the turret today. One small snag first, it wasn’t obvious straight away but I eventually worked out that I’d crossed over the front clamps when I refitted them on the cradle after painting. They were pointing forward instead of backwards. Luckily they were still accessible but nonetheless awkward to reach. They got swapped over after lunch and both guns then slid forward easily and snapped correctly into place. You can’t change the elevation of the turret yet and I had to leave them pointing skyward and menacingly close to the Harvards’ tail . Sorry I didn’t have time for photos but our Live Day next Sunday Nov-15 would be a good opportunity for you to take your own. I also got the gunner’s seat mounted back in place but the latch that holds it in both the down and up position is missing. I’ll need to find or make a replacement next time so it’s safe to sit on !. |
|


 Now I can get the accurate profile for the stubby propeller I’m planning.
 . Not yet having found out what make or model of starting magneto was attached to the hand crank, I decided to mock up a 12-tooth sprocket so I could wrap a length of roller chain on for looks. It turns out that the chain is the same 8mm pitch and type 05B-1 as is used on the Sunderland turret winder and I was able to pick out a length to suit from a new stash that I found in the store. I also finished the bracket that will hold the hand crank layshaft in place and once those two parts are painted they can be clamped into position too. Earlier in the week I made a new clamp to go around the barrel of the fuel filter. The original clamp is badly rusted but I’ve kept it in case it can be rescued. I’ve designed a small pedestal for it and once that’s made the filter can be attached next.