|
|
Post by emron on Apr 17, 2023 13:09:04 GMT 12
Another productive one yesterday. Mike finished the last of the floorboard sections and the full set of five were laid out to check for fit, the first time in many years. Then I was able to start fitting some of the equipment back into the rear compartment, starting with the camera mounting. It’s held on by only two bolts, getting them to line up was a battle but with Mike’s help it’s now secured. Next up was the flare chute. I was able to connect it up to the stay arms and lock it into the stowed position but when lowered down onto the ejection slot it became obvious that it was missing the parts to centre it over the hole. I took it back to the shop and worked out that a couple of angled brackets would solve the issue. I’ll return with them next time. The final job was the rack for the T.R. 1936 VHF transceiver. When it came to bolt the four bracing arms to the fuselage side, I couldn’t find matching holes in the frames. So again, back to the shop and with Brian’s help I swapped the arms all about until I got the right combination. Once back in the plane it mounted up straight and level and we sat Dennis’ transceiver replica on top. After consulting the manual to see where other parts should fit, I discovered that one of the two racks still to be painted is the camera stowage rack. So that will first in the queue for the next painting run.
|
|
|
|
Post by emron on Apr 20, 2023 16:33:38 GMT 12
The rear escape hatch and the starboard gunner’s hatch are back from the paint shop, Max set about to add the yellow highlighting on the handle and latches. After the next coat they’ll be ready to return to the Sunderland. The two final stowage racks have been broken down and ready for paint. I fitted the locating brackets to the flare chute and after a test fit and paint on the new parts it was bolted back in place. While I was doing that, I noticed the hinged cover that seals the slot, required overhaul so that was removed.  flare_chute_cover flare_chute_cover by Ron Wilson, on Flickr Dennis and I then made a walkaround of the rear compartment checking the locations for intercom and electrical panels shown in the manual. Back in the workshop store we found the test socket panel for the VHF transceiver complete with the cabling. After a clean they will plug together nicely.  TR1936_panel TR1936_panel by Ron Wilson, on Flickr |
|
|
|
Post by emron on Apr 23, 2023 16:45:58 GMT 12
The two stowage racks came back from painting today and were re=assembled, the shorter one shown here with its Type 25 camera mounting attached. In the same box that the VHF cabling was in, I found the cable loom and brackets for the camera panels, seen here also. One of the backing plates has corroded away but that’s a simple shape to replace. The others are retrievable. While searching through the radio shelves, one more time, I was delighted to find a drive motor for the camera (bottom left). We now only have to find the elusive flexible drive cable for us to have a full set of camera gear to display.  camera_gear camera_gear by Ron Wilson, on Flickr |
|
|
|
Post by emron on Apr 27, 2023 16:43:43 GMT 12
During the walkaround of the rear compartment I noticed one from the pair of aerial tightening reels was missing, so we selected the best one from the spares and Mike cleaned and prepped it for paint. When I came to plug the cables in to the TR1936, the sockets didn’t match. When the replica was built, they must have fitted the nearest ones they could find. Consulting with Dennis, he showed me our better example of a TR1936 in the Hastings console and we figured out the correct combination. I rummaged through the spares boxes and found only one of the required sockets. I replaced that one and adapted another so three of the cables now connect. I’m still on the hunt for the correct VHF one, but for now that will suffice. I fitted the larger of the stowage racks that stands alongside the small flare chute. Repairs are ongoing with the camera wiring and I’m making a second wedge plate to stow the motor on. Other loose equipment being readied to return are the bilge pump and its hoses and fittings.
|
|
|
|
Post by emron on Apr 30, 2023 16:03:04 GMT 12
|
|
|
|
MOTAT
Apr 30, 2023 19:55:22 GMT 12
via mobile
Post by agile on Apr 30, 2023 19:55:22 GMT 12
Do you know the P/N of the missing connector, or have a piccy of it Ron? We've got loads of the Pye type antenna connectors and we'll have spares of some of the others - just have to make sure we have enough for the Harvard and Vampire.
The interior looks really nice BTW, thanks for sharing - nice work.
|
|
|
|
Post by emron on May 1, 2023 15:47:50 GMT 12
Thanks for the offer, Alex. The plug on the aerial cable in the Sunderland is too badly corroded to identify. It will also need an extension cable to reach the radio. I’ll check out the Hasting’s set up again on Wednesday and get a close up of the socket. The dummy panel already has a Pye plug filling the hole, so it might be easiest just to replace it with a Pye socket, if I can find one of them. Then I can use a cable with Pye plugs as an extender. We've got a selection of those.
|
|
|
|
MOTAT
May 1, 2023 20:48:38 GMT 12
via mobile
Post by agile on May 1, 2023 20:48:38 GMT 12
That's interesting, so the antenna cable has a coax connector that isn't a Pye one. I'll have to have a nosy at our TRs as well and see what they are fitted with. We've got loads of Pye sockets so let me know if you go down that track and have trouble finding one.
|
|
|
|
Post by tbf2504 on May 2, 2023 9:07:32 GMT 12
The standard RNZAF aircraft radio fit in the 1950s was Marconi, so there could be compatible fittings in Devon/Freighter/Dakota spare bits around the country.
|
|
|
|
MOTAT
May 2, 2023 16:58:19 GMT 12
Post by Richard Wesley on May 2, 2023 16:58:19 GMT 12
Looking great Ron, I don't even recognise the space now with the correct green, I got so used to that dark army jeep green that someone painted it with at some stage.
|
|
|
|
Post by emron on May 3, 2023 18:00:42 GMT 12
That's interesting, so the antenna cable has a coax connector that isn't a Pye one. I'll have to have a nosy at our TRs as well and see what they are fitted with. We've got loads of Pye sockets so let me know if you go down that track and have trouble finding one. Here’s the TR1936 aerial socket.  aerial_socket aerial_socket by Ron Wilson, on Flickr Front and back view of the aerial cable plug in the Sunderland. 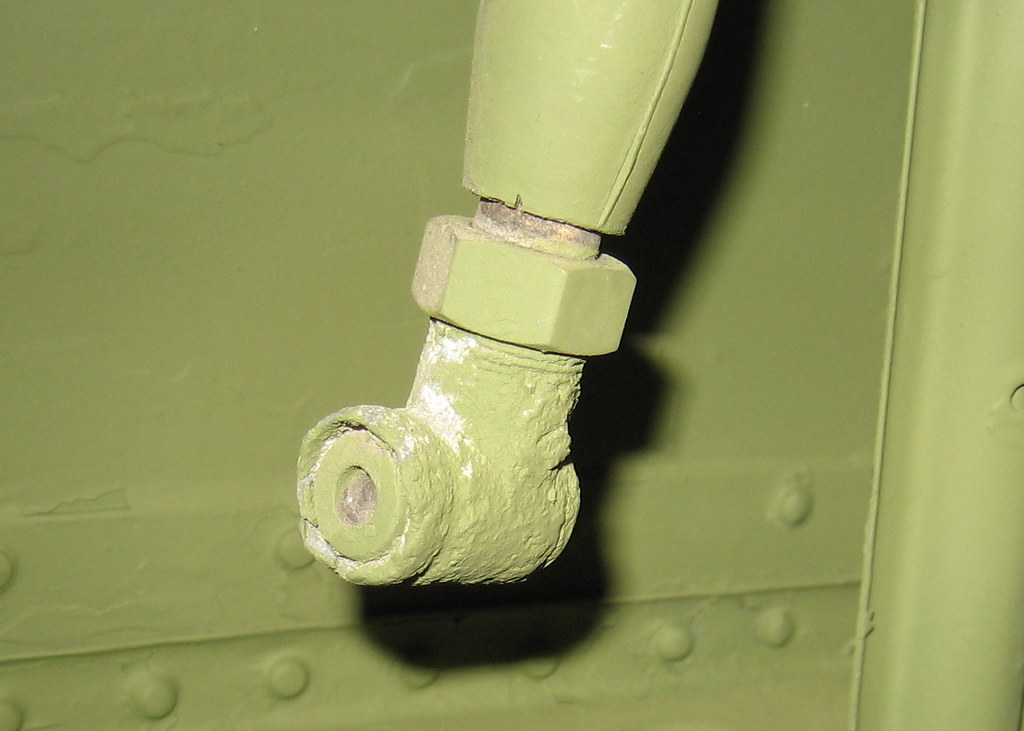 plug_front plug_front by Ron Wilson, on Flickr  plug_back plug_back by Ron Wilson, on Flickr Same push-in style plugs I’ve found; straight one on left is marked 10H/18588, elbow type on right marked 10H/3931.  coax_plugs coax_plugs by Ron Wilson, on Flickr |
|
|
|
Post by emron on May 7, 2023 18:21:58 GMT 12
There have been some pleasing developments. Talking further with Dennis about the radio cable, he thought it was unlikely that an extension would have been used and suggested that I try to re-route the aerial cable to see if it then reached. Today I found that I could pull down more that was bunched up in the fin and was then able to lay it close to the front panel! I haven’t seen any sign of the genuine socket, so will make do with a UHF type as below, and with a simple sleeve in between. I’ve also been puzzling over the layout of the camera wiring and accessories. After consulting the basic diagram in the manual and comparing bolt holes in the frames, I finally worked out the correct position of the three mounting plates and the electrical wiring loom, so I’ll be able to secure them in place next time. I was missing one wedge plate to mount the camera motor on, so began to make one. But before I’d finished, I was going through a box of miscellaneous parts in the galley and what did I find in the bottom! Anyway, the original is now painted and back in place too. I’ve kept an eye out for a flexible drive shaft for the camera but no success so far. I’ve repurposed another type also using a simple adapter as seen on the right. That will suffice until a genuine part comes to light.  cable_adapters cable_adapters by Ron Wilson, on Flickr |
|
|
|
Post by agile on May 8, 2023 21:11:28 GMT 12
Nice one Ron. I was wondering why there would be an extension. I'll try and see if we have one of those sockets - if they were used in civvy radio gear there's a good chance one will be floating about the place.
|
|
|
|
Post by emron on May 11, 2023 20:27:08 GMT 12
Rain interrupted play yesterday, but I was able to swap out the aerial socket on the TR1936 and remove the worst of the corrosion from the aerial plug. After cleaning off paint over-spray from the other plugs and cables, all four connected up well. Next time I’ll take the radio back to the shop for some further refinements and finish off securing the cable clips and bindings. Then I can move back to the camera bay. I’ve thought of a use for the second wedge plate that I started, so it wasn’t wasted effort. We have a spare camera intervalometer which I can position near to the camera. Here’s the completed base plate and wedge with the intervalometer.  intervalometer_wedge_plate intervalometer_wedge_plate by Ron Wilson, on Flickr |
|
|
|
MOTAT
May 17, 2023 9:16:39 GMT 12
Post by curtiss on May 17, 2023 9:16:39 GMT 12
Ron, I have sent you a message regarding a part that may be useful for the Sunderland.
|
|
|
|
MOTAT
May 17, 2023 16:46:27 GMT 12
Post by emron on May 17, 2023 16:46:27 GMT 12
Thanks Mike, email now sent.
|
|
|
|
Post by emron on May 21, 2023 20:54:16 GMT 12
After a few visits back to the Hastings to compare with the real thing, the reworked front panel for the TR1936 is now ready to paint. I fitted a two-pin core to the power socket, salvaged two 12-pin sockets from surplus Marconi comms boxes and converted one of them with a male core from a spare plug. Then I made a copy of the triangular raised side panel that the 3 right hand sockets are installed in and re-positioned the other two sockets. As a result of those changes, I ended up cutting out a new front plate now slightly wider and with the correct hole locations. When the replica's back together it will be hard to tell the two apart.
|
|
|
|
Post by emron on May 25, 2023 16:50:32 GMT 12
The VHF radio is now re-assembled and the paint left to dry. Another long-buried item that’s come to the surface of the to-do shelf is the fuel jettison panel. The fuel jettison levers are located at top centre of the Sunderland’s windscreen, forward of the trim tab controls. Once painted the panel’s ready to be screwed back in place.  fuel_jettison_panel_a fuel_jettison_panel_a by Ron Wilson, on Flickr  fuel_jettison_panel_b fuel_jettison_panel_b by Ron Wilson, on Flickr |
|
|
|
Post by emron on Jun 1, 2023 12:27:25 GMT 12
The VHF radio is now back on its shelf and all the cables plugged in and clipped back in place against the fuselage. The camera and drive motor have been brought aboard and also now in their stowed positions. Yesterday, I finished repairs to the small wooden grid to the side of the camera hatch, where the hatch rests when it's removed from the opening. I had previously glued up the vertical battens, so then screwed on two new rungs to replace missing ones. I continued to re-attach backing plates and wiring at the camera station and that just leaves a few more clips and screws before they’re done. Some minor metalwork repairs are necessary before we can fit the row of stowage bags (for the camera leads) that will complete the setup. I hung the G4B compass sensor unit back on its overhead shelf aft of the crew door and next time I’ll re-fit the blackout blinds for the two ceiling portholes. While I was working above the camera hatch, I noticed that the two sockets that secure the flare chute in position were a little worse for wear. They were soon unbolted and now both have been repaired. I had to remove a crusty layer of corrosion that had built up between both of them and the floor frame. One of the side holes had been bored out oversize so I plugged the hole and redrilled and tapped to the original 2BA. One locking screw was broken and the other lost so I adapted a couple of wing nuts to suit.  flare_chute_sockets flare_chute_sockets by Ron Wilson, on Flickr |
|
|
|
Post by emron on Jun 18, 2023 17:31:39 GMT 12
Ron, I have sent you a message regarding a part that may be useful for the Sunderland. Mike, your parcel was received with much delight during the week. I can’t imagine a better present for the Sunderland. I think its official description is: Carrier, gun, complete and either part no. S25B36136 or S25B36137 depending on which side its mounted on.  beam_gun_carrier beam_gun_carrier by Ron Wilson, on Flickr We knew it was missing some parts. When I found what the dimensions were, I was able to make the rear slider assembly that the receiver bolts to.  receiver_slide receiver_slide by Ron Wilson, on Flickr We already had to hand this front assembly that supports the barrel trunnion. 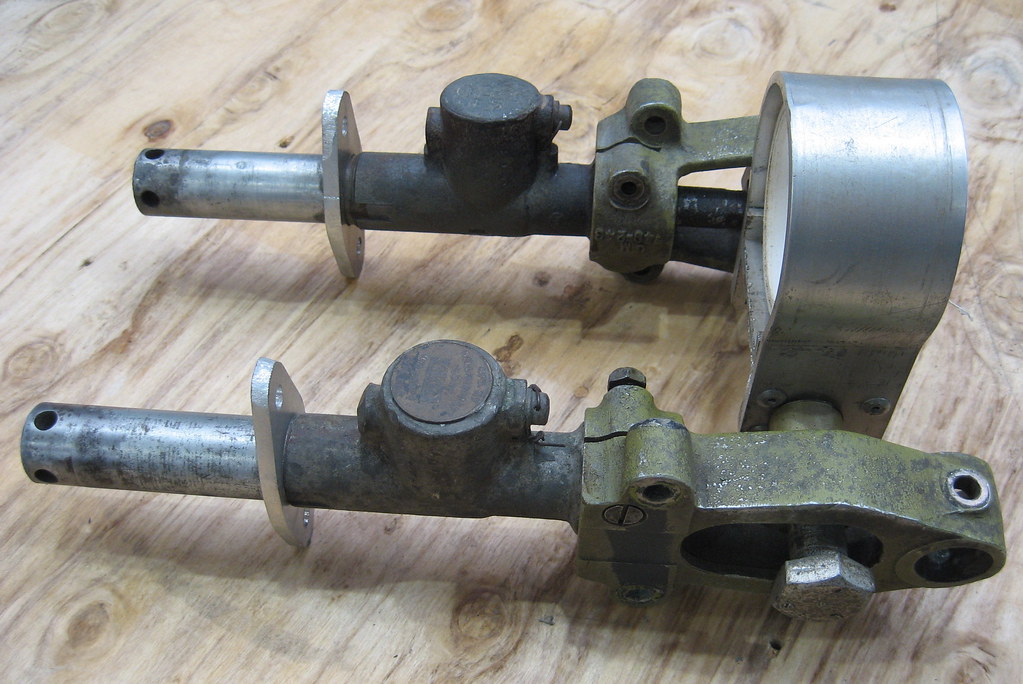 carrier_front_assembly carrier_front_assembly by Ron Wilson, on Flickr Andy from our Tramways workshop had earlier, kindly completed a set of replica gunsights for the Sunderland, so one of those will easily clamp on the top as the finishing touch. As for the replica Browning, that’s still a work in progress but will soon have its basic shape for a test fit. |
|


