|
|
Post by studentpilot on Jun 8, 2015 23:44:25 GMT 12
The thicker fiberglass strips would upset the airflow giving all sorts of negative effects. Rubber sheet was pretty good wrapped and glued.
|
|
|
|
Post by craig on Jun 9, 2015 6:46:37 GMT 12
Rubber strip OK for fert erosion but not much protection from stones
|
|
gtw
Flight Lieutenant

Posts: 85
|
Post by gtw on Jun 9, 2015 13:27:19 GMT 12
From memory it wasn`t the leading edge so much as the underside that got damaged from sticks & stones etc, mostly on early take off roll and high power taxi.
As yours will not be overloaded I don`t think you will have much trouble with stones. Mine had a rubber strip which is easy to remove if the glue fails.
Enjoy flying a nice aircraft.
|
|
|
|
Post by The Red Baron on Jun 9, 2015 14:52:43 GMT 12
Quite interesting watching when the Fletchers used to power up for take off on our strip they would hoover up loose stones through the blades from the loading area.I made it a point never to stand directly oposite the prop when they were taking off,if one came off the edge of the blade it could have ruined your day.
|
|
|
|
Post by craig on Jul 5, 2015 8:55:59 GMT 12
I have been fiddling around with the canopy. It has been as complicated as expected getting everything to slot together, slide smoothly and mate up with the windscreen nicely. The front and rear bows have a slit cut into them which the fiberglass roof and the perspex side windows then slot into. The next step (and most complicated) is to form the side windows. They need to have the correct curves and fit within tolerances less than 5 mm. So should be a challenge....   Shot of what we started with  |
|
gtw
Flight Lieutenant
Posts: 85
|
Post by gtw on Jul 5, 2015 13:23:07 GMT 12
Car windscreen repairers are the guys
|
|
|
|
Post by isc on Jul 22, 2015 23:13:42 GMT 12
Those canopy sides really need to be vacuum formed, that would involve making a couple of forms to mould the Perspex over, not impossible I suppose, Might be worth finding a tame plastics manufacturer, they at least can tell you what's needed. isc
|
|
|
|
Post by nzjet on Jul 23, 2015 17:47:47 GMT 12
do it yourself, its not hard provided you have a oven big enough. I will be doing some tomahawk side windows shortly
|
|
|
|
Post by baronbeeza on Jul 23, 2015 20:34:55 GMT 12
|
|
|
|
Post by isc on Jul 23, 2015 20:46:19 GMT 12
Just been watching the TV program on little houses, and a chap was doing a rebuild on one of those fibre glass flying saucer shape houses from the 1960s, and he required 32 oval convex windows in plastic, 16 windows double glazed, they came out looking good. I was thinking of CTX. isc
|
|
|
|
Post by craig on Aug 8, 2015 11:33:01 GMT 12
Engine is back from Southair. Has had a good run (1 hr approx) on the test bed, after some work (3 cylinders needed honed and rings) and is producing good compression on all cylinders. All that is needed now is a full set of mags (used a spare set from Southair to do engine runs) and a prop to complete the setup. Engine will now go into storage until required. To help avoid the possibility of storage corrosion, I have overfilled with oil to approx halfway up the crankcase and with the top plugs removed intend to wind it over with the starter motor from time to time (perhaps once a month). Hopefully this will splash oil all around the crankcase and up onto the camshaft which is one of the areas most at risk. At the same time I will spray WD40 (or similar) into the cylinders which should hopefully ensure the valves remain well lubricated also.
|
|
|
|
Post by baz62 on Aug 8, 2015 13:17:18 GMT 12
Good stuff Craig. How are you getting on with the perspex? I've recently acquired a top rear canopy for the Auster which (along with the windscreen) is quite the curvy bit of kit. I plan to do all the side windows which are flat but am thinking about having a go at doing the forward past of the top canopy myself since it fills the gap between the windscreen and the rear canopy.
|
|
|
|
Post by craig on Aug 8, 2015 14:11:02 GMT 12
Molds all ready to go and perspex cut, just need to make appointment with the oven
|
|
|
|
Post by baronbeeza on Aug 8, 2015 14:11:53 GMT 12
You will have to be careful with the oil in the crankcase Craig. Normally the oil is nowhere near the rotating parts so you can physically rotate the engine all about on a sling may help. Ideally it needs to be inverted for a period. You will get an idea from this pic. 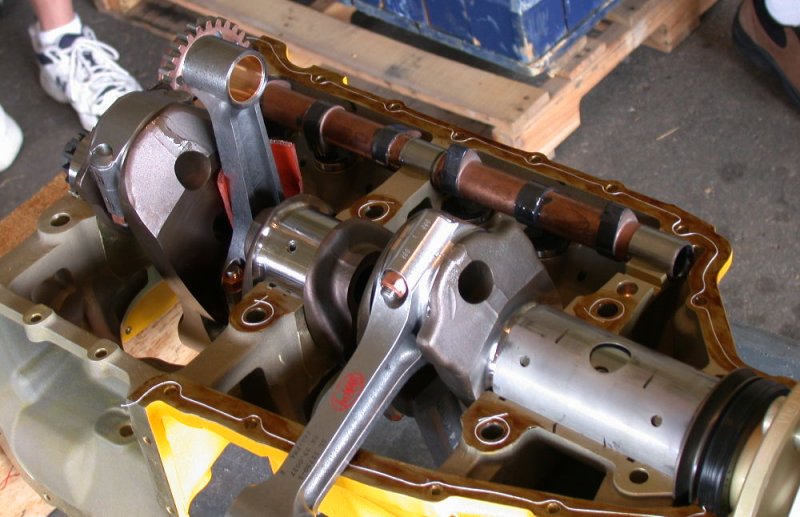 The sump is just to the rear of the yellow portion on the underneath and you can see the few 'slots' that interconnect the sump to the engine. The oil can also pass down the rear cover which generally has the breather behind a shroud at the top. I usually run the engines with a strong dose of Phillips Anti-rust oil and then spray CRC Marine 66 into the cylinders and everywhere possible afterwards. Having oil in the sump does little to preserve the engine unless you can get that oil up to the camshaft. Blocking the breather and storing the engine upside down would probably do the trick. I have the same trouble here as I have quite a few Lycomings in storage. |
|
|
|
Post by baronbeeza on Aug 8, 2015 14:21:55 GMT 12
Going on from my comments above. The oil tank is basically removed from the engine, well if compared to a car engine. The splash within the engine will be much the same and probably dictated more by engine rpm etc than anything related to oil level. The sump is nowhere near any moving parts and indeed is down amongst the induction tubes. There are only a few narrow drainage slots between the sump and the rotating parts. The breather is at the top of the accessory cover and has a baffle minimising spray thrown from the various gears making it's way out. I have seen a Lycoming O-540 with 19 quarts in it trying to run and yes the oil level was up around the crank throws on that occasion. The engine was sluggish and blowing smoke, all pretty obvious clues of what had happened. 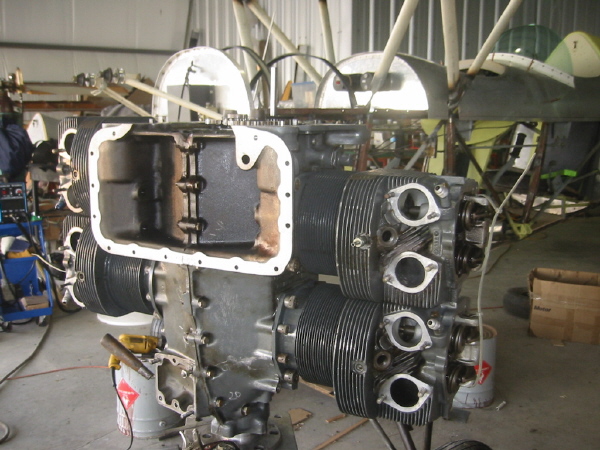  A couple of pics showing the breather position at the top of the rear cover.   The dipstick does extend into the sump cavity however but is normally well sealed. The camshaft lobes are splash lubricated only and that is why we need a thin oil at start up that can get thrown about the engine interior. We would normally go straight to 1500 rpm on start just to ensure that. The splash in this case is coming from the pressure fed oil to the camshaft bearings oozing out along with the crank journal bearings. The O-235 is a good example of just how far removed the breather is from the oil sump. The only oil inside the 'engine' is the excess dripping out of the various journals. Even the rocker drain oil is routed by external pipe-work back to the very top of the sump cavity.    This last pic is a great example. It is of an O-320 but an H2AD model with the 6 Quart capacity. We can see the absence of moving parts in the oil storage area, the pick-up screen and the dipstick. The drain can be seen and is the low point in the sump. The oil pump inlet is directly next to it and not far off the same level. We can see the inlet is at the rear of the engine so gets oil in nose up attitudes and we can see the reason for cleaning the suction screen at the oil change. The dipstick clearly does not extend all the way to the bottom of the sump, even with nothing on the stick the engine may still run satisfactory. That would depend of course on how much oil drains back to the sump on shutdown. The oil level just needs to be sufficient to keep the pick-up immersed at all times. Well at least as far as oil pressure is concerned. For lubrication purposes we may want more oil for cooling and contamination considerations. We can also see that the oil heats the incoming air, or rather the air is used to cool the oil. I run a Tomahawk without any form of oil cooling, no shroud and no cooler. The engine oil temp needs to be hot and from my experience having variable quantities in the sump makes little difference. With a lowish utilisation engine such as my Tomahawk I would have little hesitation in operating the engine at the 4 quart level, the oil runs hot enough and there is little discolouration if you do 4 monthly oil changes. |
|
|
|
Post by craig on Aug 8, 2015 15:23:46 GMT 12
Yeh I thought about storing inverted. But then became concerned about any abrasive sludge/sediment which will have overtime, collected in crevices, being dislodged (due to prolonged inversion) and ending up around the cam.
So long as I don't fill oil beyond the centerline of the crankshaft and keep the dip stick out as well as breather open, surely there should not be any risk of hydraulicing (spelling?) which is the only potential risk I can see.
|
|
|
|
Post by baronbeeza on Aug 8, 2015 16:35:13 GMT 12
I think the problems are camshaft, camshaft and camshaft.
Whatever you do has to address those areas.
I have tried misting CRC into the crankcase itself but it is really difficult. The only places that you can easily access are the dipstick, the breather and the rocker drain lines. None get anywhere near the camshaft.
You have got me worried because I have to get out and do some more treatment here.
|
|
|
|
Post by isc on Aug 8, 2015 21:39:43 GMT 12
I can give you the hand book info on storage for C IO-470 and O-300 engines, It's quite a little process, involves running the engine, drain the oil, refill with preheated Cosmoline no., 1122 (Houghtons)or equivalent, run the engine at 1200/1500rpm do not exceed 450*F cylinder head temp, inject the same oil into the air intake at 1/2 a gallon per minute until white smoke comes from the exhaust, then increase the spray until the motor stops. Don't turn the crankshaft at any time after doing this. Remove all the spark plugs, and spray anti-corrosion oil without air into the lower, and then upper plug holes, the oil should be warm 150/180*F. Replace the lower plugs, or blanks. Fit Dehydrator plugs in the top holes. Blank off all other holes. Drain the inhibiting oil from the sump, replace the plug. Put a warning notice on the engine, and if a prop is fitted, it must not be moved. Put grease on the bare metal such as the prop shaft, cover the engine.
There are similar instructions for getting the engine ready for use. Done it a few times many years ago, I'm not sure of the specs of the oil we used. isc
|
|
|
|
Post by craig on Aug 14, 2015 18:26:02 GMT 12
|
|
|
|
Post by lumpy on Aug 14, 2015 20:39:43 GMT 12
In my earlier days we occasionally had reason to try and prevent corrosion damage to car engines that had been submerged in water ( sometimes salt water ) . Our answer was to simply fill them to overflowing with oil ( after draining the water out ) . These cars usually wound up being insurance write offs , but engines were worth good money back then , and the oil trick seemed to work .
Sometimes the complete cars found their way back onto the roads too , but I wouldnt want to have owned one !
Sorry , not really much to do with you engine , but I think your precautions should work .
|
|