|
|
Post by aeromedia on Jun 30, 2019 20:09:42 GMT 12
So good to see a Dart in-situ. And a prop. Terrific stuff guys.
|
|
|
|
Post by denysjones on Jul 6, 2019 21:49:00 GMT 12
Following on from last week some may have noticed that there was a ratchet strop around the prop on BXG and this was because the prop ex SAFE was less than complete and one of the salient missing items was the proverbial "Jesus nut" but luckily the Dart as received from AirNZ had the protector dome over the threading on the end of the prop shaft in place. So this week we took said dome and drilled the end to receive a 3/8 UNF bolt and made a stepped plate to match a step face in the prop interior so now we have said unit locked securely enough for our purposes.   Then we moved onto the matter as revealed last week regarding the front cowl ring and the number of side cowl lock-down points. We had four surplus front cowl rings in stock, so to speak, and as luck would have it one turned out to be the correct 8 point lock down unit that we needed. The front cowl ring is in fact a 3 stage unit. First the actual front as is visible, complete with intake at the top, then a facing ring which has the side cowl latches in it, and then attached to that an air bleed to presumably warm incoming air. Thence various bits will get swapped over to first strip down the partial unit on the engine and then add the bits to it again as required.  The unit we had thus today got separated into it's units and will now move onto the next stage...watch this space for next week's report folks |
|
|
|
Post by kiwi285 on Jul 10, 2019 19:44:43 GMT 12
That is really looking smart Denys and the team. Keep up the great work.
|
|
|
|
Post by denysjones on Jul 11, 2019 15:20:40 GMT 12
With a bit of time available during the week I decided to press on forthwith with the job from Saturday to get it over with. The corresponding front cowl piece in place on the engine was separated from the main casing and then into the same three parts as the ex-spares one and then the "wrong ring" was cut into two and removed from play. The next mission was to populate Saturday's replacement ring with the cowl latch receptors and in our spares area was abox with a varied selection of said items (as in different models) but luckily eight of one type just as we needed. These were then fitted to the ring and a tedious wee job it is for sure. Each unit consists of four parts being a base, a cap, into which goes a spring to provide pressure on the threaded plate that slides on the base and which the actual latch screws into. Each assembly was then held in with a pair of 2BA bolts, a pair of 2BA countersunk screws, four nuts, six washers and four split pins. The ring was then cut in two as per the removed one and offered up to the front piece waiting on the engine front. The two were then attached with two circumferential sets of 2BA bolts with castelated nuts and more split pins. The outer set has 16 bolts in it and the inner has 10. Some of the inners have added complications of distance pieces to support the hot air bleed pipe. However after quite a fiddly process of getting ones fingers in through various holes to insert the bolts it's done. There's just some minor work to tidy up the join between the two ring bits and to then slide the whole assembly back into place and bolt it to the front of the engine (you will see two of the attachment lugs to the right of the red hose in the photo)...phew! Then onto what we set out to do the other week...namely fit the cowls. 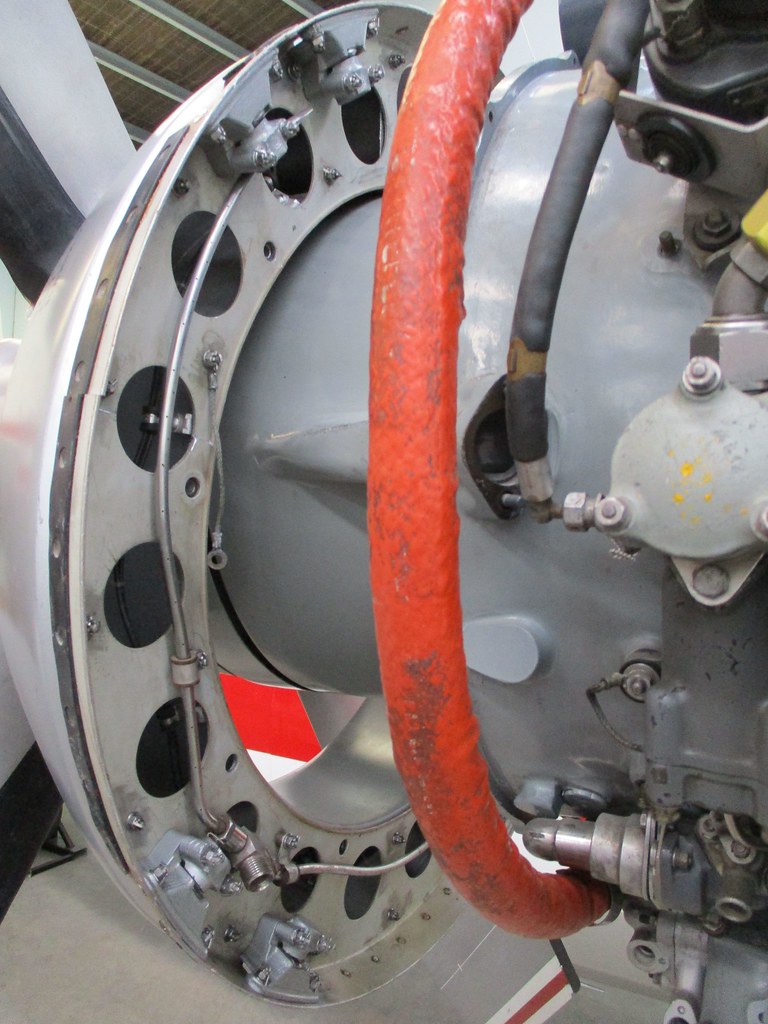 |
|
|
|
Post by denysjones on Jul 13, 2019 20:13:49 GMT 12
Not too dramatic I know, but after the trials and tribulations of the front cowl ring...yeah the upper cowl fits and locks! The rest of the time was spent in fixing the assorted cable and linkage attachments around the Dart prior to installing the side cowls (saves head butting with them in place). Now a wee question....does anyone out there have pix of an F27 with the side cowls open? I confess I've not spent hours looking for same but they've not turned up with a quick Google. cheers 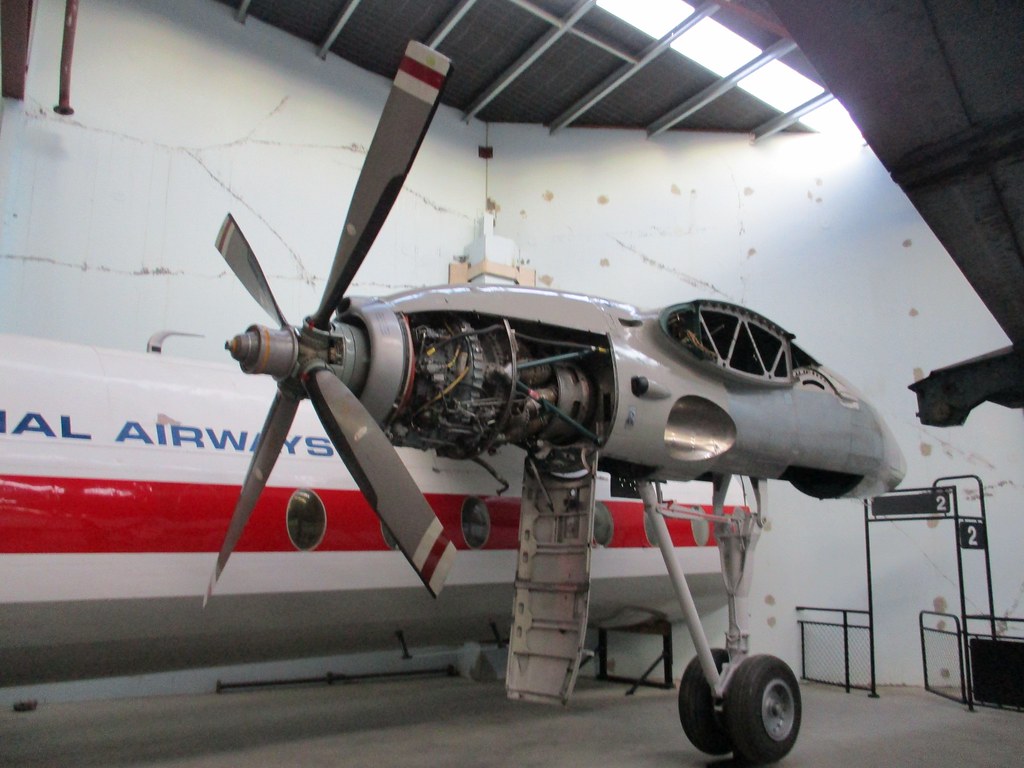 |
|
|
|
Post by baz62 on Jul 14, 2019 17:10:06 GMT 12
That looks fantastic Denys, certainly evokes memories flying on these. In fact my very first flight was in a NAC F27. What are the odds it would be this very one..........
|
|
|
|
Post by denysjones on Aug 16, 2019 15:35:15 GMT 12
One of the on-going problems with BXG has now had its time come. The doors on the F27 have a cable drum affair attached to either side and the drum has a coil spring tensioner. The effect of these units is to provide assistance with the door going up and also to restrain its descent and so allow it to be stopped at locations on the way down. The front door had one of its springs u/s so we salvaged a unit from a rear door only to find it was in the same state that is snapped, so we guess these might have been a common fatigue failure. The big problem has been that if the person closing the door didn't keep a firm steadying hand on it the door would begin to track out of square with its track and eventually would jam which became a two person job to solve (one inside and one out). Today we've just received the anticipated solution. NZ Spring Works in Wgtn have fabricated a new spring for the princely sum of $278 for us. On the left is the original broken spring in two bits and the new one is all safely coiled up in the housing on the right ready to go back in the aircraft.  |
|
|
|
Post by davidd on Aug 17, 2019 13:13:15 GMT 12
I must say Denys, the photographs (yours?) of many of your engineering problems are generally of a very high quality (at least to my eyes) and your explanations of how the parts actually work are masterpieces of clarity, and the shout of "of course that's how it all comes together"!
David D
|
|
|
|
Post by Dave Homewood on Aug 17, 2019 13:39:14 GMT 12
I agree David. It's fascinating to see the intricacies of the engineering explained. It shows the massive amount of challenges involved in the restoration of old museum aeroplanes, and the innovation and skills needed to make them as they should be.
|
|
|
|
Post by denysjones on Aug 24, 2019 21:39:41 GMT 12
Not super dramatic stuff this week but... Following on the matter of 27Apr having got the generous donation of the pivot units from Dave Brew at GAPS we were left with the issue of the fact that the undercarriage rams have pegs on them which fit into bearings which in turn pivot in the units from GAPS. We have a pair of pivot and bearing of Hudson origin but Dave was only able to supply the pivot mounts but no bearings. Said bearings have proven beyond acquisition but after some fossicking in stocks of bearings from Bristol Hercules I found some whose OD were as required and ID matched the ram pegs minus the sleeves on them. The only issue was the depth of said bearings being but half that as required. So I've resorted to imbedding the units in polyester resin and then profiling the product to fit the pivot mounts. See here top the original Hudson/Lockheed units, left lower the Bristol bearings and the lower right the final units.  Meanwhile just another wip BXG today got her side cowls fitted and we're nearing the end of outfitting the Dart with all the usual connections etc.  ttfn |
|
|
|
Post by baz62 on Aug 25, 2019 11:03:27 GMT 12
You are a clever chap young Denys! What were the original Bristol Bearings for do you know? I'll have to come out and have a closer look sometime soon.
|
|
|
|
Post by denysjones on Aug 25, 2019 21:23:54 GMT 12
Hi Baz,
Bit of story there....
Years ago I had a call from a chap who was operating the ex-Kiwi B170 on mineral exploration support work in Alaska-Canada and was out here looking for support stocks. He asked if we had any bits which we didn't, but in the conversation told me of two 20'containers of bits he'd seen in a container park here. The story was they were full of ex-SAFE stuff which had got to LPC for shipment but the paperwork wasn't in order so the boxes had gone back to the depot. I tried to track the container park down but his directions proved a bit errant so...end of that story.
A few years later a guy rocks into Ferrymead one day and says he has the contents of two containers of aircraft bits that are ours for the taking but they have to be all or nothing and gone the next week.
They turn out to be all the bits from story stage 1 but they're no longer in containers but are two stacks of boxes, cartons etc exactly as if they were in containers if you see what I'm saying.
We uplifted the items and publicised their availabilty and long story short sold most of them to TFC Duxford but we kept a selection of assorted items that might be of use to us such as BA/BSF hardware etc etc....hence the bearings!
|
|
|
|
Post by baz62 on Aug 26, 2019 11:43:58 GMT 12
|
|
|
|
Post by shorty on Aug 26, 2019 14:28:59 GMT 12
That sounds like the stuff that I got from SAFE on behalf of Seaflite Oceanographic in San Francisco for their Solent III(the one that was in Raiders of the Lost Ark) I got 10 powerplants from SAFE and a bunch of spare parts.These were railed down to Christchurch and stored on a farm out Hoon Hay way. From there most went up to Auckland for shipment to the States but that is where my involvement ended and I lost track of what happened from there on. The Solent project ended up at a Museum in Oakland painted as a RAF Seaford.
|
|
|
|
Post by denysjones on Sept 7, 2019 21:43:40 GMT 12
Latest from the coal face but you need to go back to the post of 21/4/18 where young member Tim had built up a RR Dart basis. Background from here is/was that when the Viscount went back to AirNZ in the 1990s the old NAC guys working on her got sufficient Dart components to hang cowls and props off. Later after we got BRF back to Ferrymead AirNZ got in touch and offered us accessories that they had surplus from the purchase of parts from a Dart shop in the UK so we attached them to the core engines we had pending future works. So the average installation look like this but the main thing is the prop shafts on these cobbled up units did not turn.  Then as part of acquiring BXG we got cores of two engines Peter Mac had acquired with rotatable shafts so now we refer you to the post of 21/4/18. Moving onto current time we are now reworking the units as you might see on the above shot to augment Tim's endeavours plus for a second unit to then replace the two stbd ones on BRF. These two shots show the prop feathering unit before and after treatment. 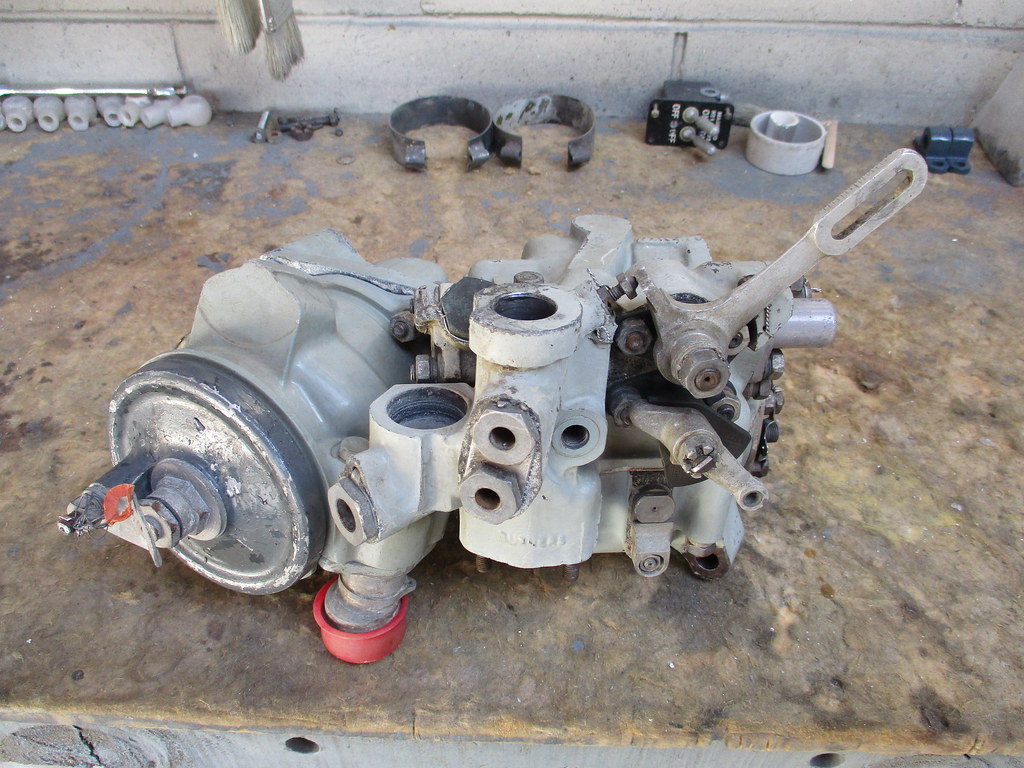  this being the right most unit on the lower side of the first photo here. cheers |
|
|
|
Post by Dave Homewood on Sept 8, 2019 9:04:54 GMT 12
Great stuff guys!
|
|
|
|
Post by denysjones on Sept 8, 2019 9:35:22 GMT 12
oops a bit of finger trouble in that the two photos I uploaded and linked are in fact part of the fuel units from the other side of the Dart, the feathering unit is the forward one of the two on photo one and I couldn't find the refurbished photo of it but failed to amend the text....mea culpa I'll get a shot of that to make amends!
One thing that might interest people is the colours of the Darts. It seems that overhaul units were in the habit of selecting a "house colour" which clearly identified their handiwork. Brian Burrage, from vickersviscount.net, saw the blue on the Dart as posted and says that is the colour used by Hants & Sussex Aviation where he worked for over 30years.
David Laughlin tells me that NAC only painted the forward casings, a grey shade, as they were magnesium alloy and needed protection whereas the rear ones (from where the engine mounts to the frame) were left in their bare aluminium alloy finish.
Another interesting point is that the left unit in photo one is the pitch control and on its top you'll see three red protection caps for electrical connections. David Laughlin also told me the fact that there are three says that the unit is applicable to only Andovers and YS-11s as the third solenoid is for reverse pitch which other Dart powered aircraft apparently lacked. Hence why we were gifted them.
|
|
|
|
Post by denysjones on Sept 14, 2019 21:25:00 GMT 12
Last week Tim and I began the installation of the door spring unit in BXG and today carried on the job. The difficulty was around the interior lining of the bay being constrained by the galley unit being present and so two pairs of hands were needed to wrap back the lining s the unit could be bolted in place seeing there were no captive nuts in the fuselage frame so spanners and nuts and fingers were called for. The unit works by way of the process that as the door moves down the cable which is wrapped around the drum on the unit unwinds and thereby causes the drum to rotate anti-clockwise thereby tensioning the spring. So as the door goes up the reverse happens in that the spring de-tensions and winds the cable back onto the drum. Here you can see the drum and the cable playing out and around the flat pulley inside the housing at the end of the track whence it goes down the other side over rollers so it follows the door to which it is attached.  Once we get the number of rounds of the drum of the cable right the door should be able to be positioned at any point in its travel. However our cable has several glitches in it which are making it hard to get the right number of rounds of the drum resolved so once we straighten the cable we should be sweet but for now she tracks correctly getting us over the issue of old. Just making amends for the oops from last week here is a shot of the dart production line we have underway. Looking at the units you'll see the items uppermost with brass maker's plates on them, they are the prop feathering units. Below them are the prop control units whose photo I meant to post last week, better late than never.  The two units on the right engine are those off the first image on last week's post after appropriate refurb. Hopes that all of interest |
|
|
|
Post by denysjones on Oct 6, 2019 8:33:05 GMT 12
A few things have been going on but nothing particularly photogenic for reporting. However I've now turned my attention to the port wing panel of BXG and have made start of the prep work there. The first task being the trailing edge of the wing which forms the front of the flap bay and is made up of numerous hinged access panels running the entire length. Running through the bay are such items as aileron cables and flap actuator torque tube. After first getting the fasteners to play the game and release opening the panel revealed that our feathered friends had entered from both ends and made themselves at home from either end similar distances thus  So after the better part of an hour this is what was in but one end, another hour later the other was dealt to.  Then it was time to brush and vacuum out the usual dirt etc. Fortunately the bay appears to have seen little moisture getting in and there's just one piece of surface corrosion to sort out and a clean-up of the access doors. On the dart build work recently reported we'd had to deal to some shock mounts for sensitive accessories and so while in the swing of those I though it time to attend to four similar units for the Viscount which have been awaiting their time. Here's a before and after shot  These units go by the delightful title of pressure differential switch and they form part of fuel de-icer heater sensing system. Two reside in the undercarriage bays tucked away on the outboard side of the main leg. 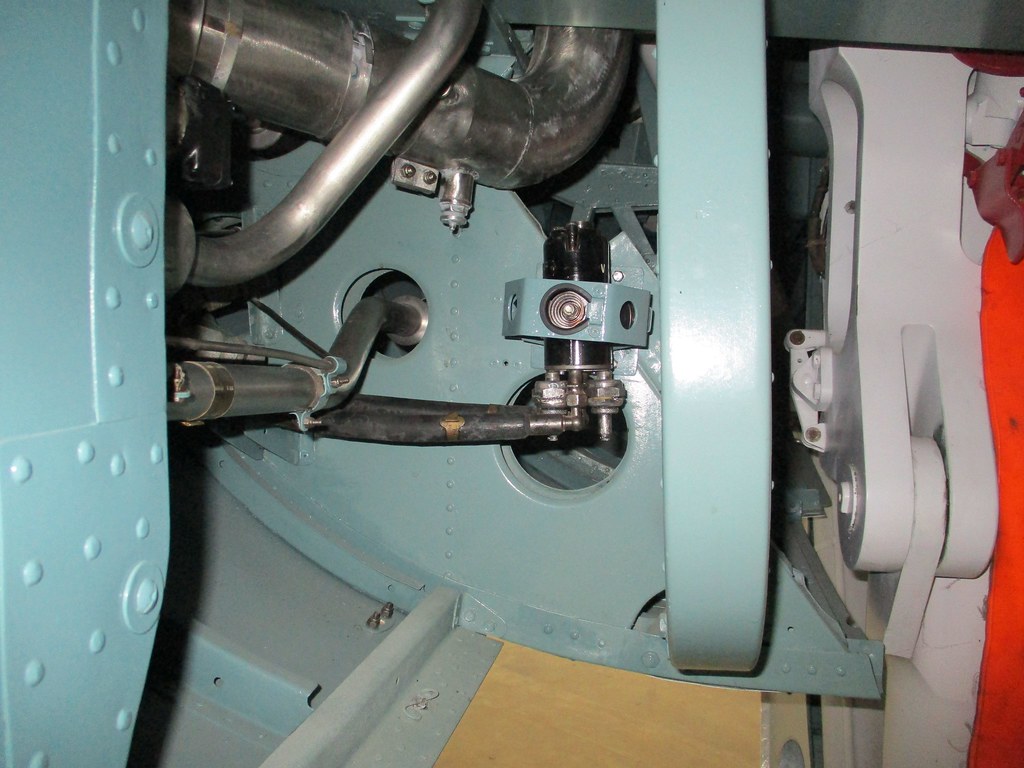 In helicopter land the guys are pressing on with a very rare NZ beast, and probably the sole example in the world, being the Robinson R33 which is what you get if you take surplus parts from R22 and R44 projects and blend them together to make something for visiting youngsters to play in.  Last week a much awaited R22 fuselage arrived and so that project will kick into life now.  ttfn |
|
|
|
Post by denysjones on Nov 3, 2019 14:17:24 GMT 12
Over the last few weeks its been wings and wings down in the hangars. After my appeal in the Civil board for photos of Viscount upper wings showing the walkway markings Steve Jenks came up trumps with a couple shot by his father Cliff and so, many metres of vinyl tape later the inboard half of the port wings is bedecked. Once the outer half is done we've then got to commission the large NAC to go out there.  The wing for BXG has been on-going. The root had to be cleaned,its fittings attended to and then repainted.  Meanwhile the upper surface is reverting from its late AirNZ grey to the appropriate NAC one and in the course of that the wing tip was removed to reveal...you guessed it more birds nesting running approx a metre rootwards to where a panel is missing on the underside which I guess was probably the landing light but made a damn fine bird gateway. There's just the panel forward of the aileron to paint, the aileron itself to remove and attend to, and then its down under so to speak! The de-icer boot will be the very last bit of the job. 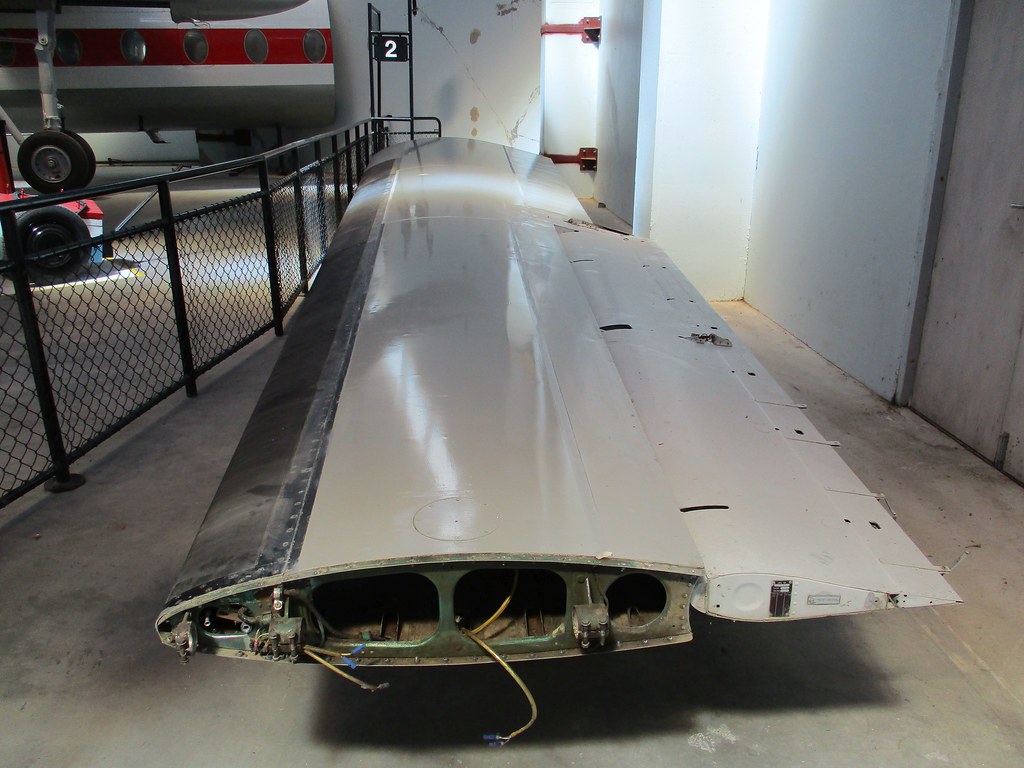 The doors in the flap bays whence the bird nests in the last post were removed are being cleaned, primed and painted and so far 4 of the 8 have been done.  As always hope there some interest in this. cheers |
|