|
|
Post by planemad46 on Jun 25, 2020 21:25:50 GMT 12
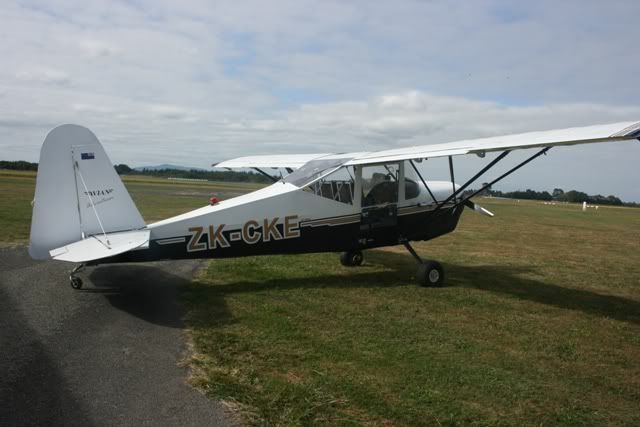
I have made a number of scratch built scale models in my lifetime and with the prospect of 3-D printing becoming a reality I was keen to see how this could be workable. Being experienced in 3-D CAD, I was able to create something to print and chose a Cessna 170. Apart from being a Cessna fan, I had already made one to this same scale many years ago using balsa and other materials in traditional style and thought it would be interesting to compare the results. I tried to find some hints and tips online as to how the CAD file should be presented for printing but found nothing of real use. I ended up evolving a process with a printing business that was also a great help with choosing the right printing system. This attached photo shows the basic result and overall it was a success. The finish isn't the greatest as it was all a bit of an experiment. I was particularly pleased with the more crisp result of the shape and detail. There was a lot of work doing the CAD work but getting a finished model was a lot quicker. I would be interested to hear if any other modelers have tried this sort of thing before. As I have indicated this was entirely my own approach to getting the end result.  C170_3D printed model C170_3D printed model by Planemad46, on Flickr |
|
|
|
Post by davidd on Jun 25, 2020 22:38:14 GMT 12
Looks pretty darn good, only thing that jars slightly is the control surface ribbing which just seems a teeny bit overdone as the height of this on the real aircraft would not be much more than a quarter of an inch. The windscreen wing/fuselage joint looks pretty good, and finish around front of cowl and cooling intakes, prop, etc also looks good. However only going on memory here rather than comparing with photographs, but seems to be a pretty good representation to me, although I cannot recall ever having seen the real thing "in the flesh" (perhaps at a distance). As a kid I took a great interest in seeing real aircraft up close, in particular the Cessna 180, and Piper Pawnee, and began to appreciate the methods of construction employed - nothing like being ALMOST hands on! I think your experiment has been a notable success - capturing the daintiness (or any other characteristic for that matter) and the overall qualities of the real thing is the only object of modelling in my humble opinion.
David D
|
|
|
|
Post by Dave Homewood on Jun 25, 2020 22:43:05 GMT 12
That's terrific. Welcome to the forum. There are a few other modellers here on the forum also using CAD an 3-D printing too.
|
|
|
|
Post by Bruce on Jun 25, 2020 22:53:33 GMT 12
I've been using 3D printed sections on several model in my collection - I used the technique for the engine, undercarriage and cockpit framing of my scratch-built resin Porterfield 35W, and I've made a fuselage to convert the 1/72 Airfix DH-4 into a DH-9, which worked very well. I've just finished the CAD model for a 1/72 Boeing 757-2K2 but the cost to get it printed is over $1000 so I'm not in a position to do that just yet! I use the Shapeways.com printing service as they have a "fine detail plastic" method which is incredibly good. Home Filament printers just arent good enough for the small scales I'm using. I'd post some photos but I'm not paying photobucket's ransom...
|
|
|
|
Post by shorty on Jun 26, 2020 8:33:23 GMT 12
Quote-" I'd post some photos but I'm not paying photobucket's ransom...
Try Flickr
|
|
|
|
Post by Bruce on Jun 26, 2020 21:15:03 GMT 12
OK, trying Flickr... The Porterfield 35W: This was a scratchbuilt 1/72 resin project (I had even measured the aircraft in the Ashburton Aviation Museum to get the drawings accurate!) but I needed to get the proper radial engine, the very obvious tube framing in the cockpit and the fiddly little landing gear made accurately - difficult when it is such a small aircraft! I drew the bits in CAD (Fusion 360) and had them printed by Shapeways.I also made a blank block to match the cockpit frame, that I used as a pattern to vacform the cockpit glazing. Just after sending the engine it was pointed Out I had modelled the 7 Cylinder Warner Scarab, rather than the 5 Cylinder Scarab Junior! as a result I ended up with both engines. I was very pleased with the detail obatianble in the "fine detail" plastic, so would use the technique again.  scarabs scarabs by Bruce Cooke, on Flickr  Portfield detail Portfield detail by Bruce Cooke, on Flickr  IMG_1642 IMG_1642 by Bruce Cooke, on Flickr Airco DH-9: The next 3D print model job was my Airco DH-9. I had a vacform kit that I had never got around to building as it was so poor, but I discovered that the DH-9 used identical wings and tail section to the DH-4, which I could get as an Airfix kit. I used the Vacform kit and the drawings it came with to model a new fuselage in CAD. I split the fuselage into 4 separate components, but because the 3D print was so capable, a lot of detail could be included in it, including the upper wing centre section. The parts came out incredibly well and fitted the donor Airfix kit perfectly, and I am really pleased with the results! Cad model:  DH9 Fuselage 8 DH9 Fuselage 8 by Bruce Cooke, on Flickr 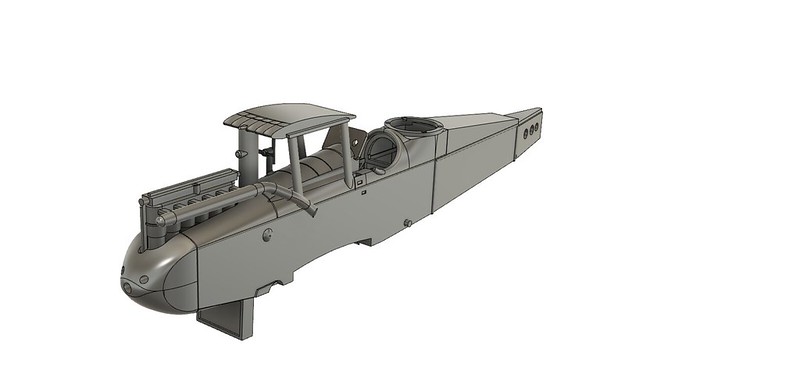 DH9 Fuselage 9 DH9 Fuselage 9 by Bruce Cooke, on Flickr 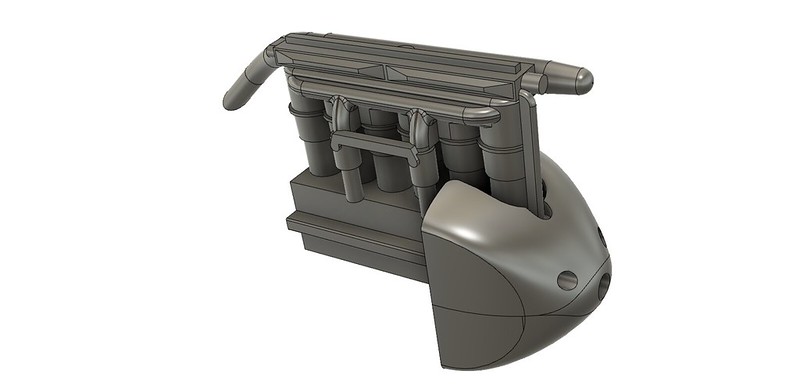 DH9 Engine DH9 Engine by Bruce Cooke, on Flickr  DH9 Cockpit DH9 Cockpit by Bruce Cooke, on Flickr  DH9 Turtledeck DH9 Turtledeck by Bruce Cooke, on Flickr Printed parts:  IMG_2046 IMG_2046 by Bruce Cooke, on Flickr  IMG_2047 IMG_2047 by Bruce Cooke, on Flickr Finished model:  IMG_2093 IMG_2093 by Bruce Cooke, on Flickr  IMG_2092 IMG_2092 by Bruce Cooke, on Flickr B757: My latest CAD model is a 1/72 Boeing 757-2K2. This is a complex build of over 30 individual parts, including undercarriage legs intended to be made in 3D Cast Brass. This will however be extremely expensive to get printed, so my current idea is to get one set of parts done and make resin casts of them and sell them as kits. I think there would be a market for a decent sized 757, especially as I have also modelled an alternative forward fuselage to make a standard Pax -200. I also think I will model winglets so that people could make the latest variants such as Thompson Airlines and DHL use. Each kit will still be expensive, approx $350 NZ but it might allow me to recover some costs. I just need the capital to start it!  I might look at this in the next few months...  B757 complete B757 complete by Bruce Cooke, on Flickr |
|
|
|
Post by Dave Homewood on Jun 27, 2020 12:40:59 GMT 12
Bloody cool Bruce!
|
|
|
|
Post by johnnyfalcon on Jun 27, 2020 18:13:12 GMT 12
I have made a number of scratch built scale models in my lifetime and with the prospect of 3-D printing becoming a reality I was keen to see how this could be workable. Being experienced in 3-D CAD, I was able to create something to print and chose a Cessna 170. Apart from being a Cessna fan, I had already made one to this same scale many years ago using balsa and other materials in traditional style and thought it would be interesting to compare the results. I tried to find some hints and tips online as to how the CAD file should be presented for printing but found nothing of real use. I ended up evolving a process with a printing business that was also a great help with choosing the right printing system. This attached photo shows the basic result and overall it was a success. The finish isn't the greatest as it was all a bit of an experiment. I was particularly pleased with the more crisp result of the shape and detail. There was a lot of work doing the CAD work but getting a finished model was a lot quicker. I would be interested to hear if any other modelers have tried this sort of thing before. As I have indicated this was entirely my own approach to getting the end result. C170_3D printed model by Planemad46, on Flickr Brilliant! |
|


 I might look at this in the next few months...