|
|
Post by agalbraith on Nov 7, 2009 10:55:04 GMT 12
Hey Mike
Sorry for the late reply. I have been on the road all week for work and am catching up with everything today.
Thanks for such an informative post..........and my word, what amazing results!!! This is going to be a true masterpiece when finished, I am totally amazed!
Are you still thinking of making the vac parts available for us admirers wanting to do one???
I just love your build, thanks for the update
Cheers
Anthony
|
|
|
|
Post by mstokes on Nov 17, 2009 22:02:05 GMT 12
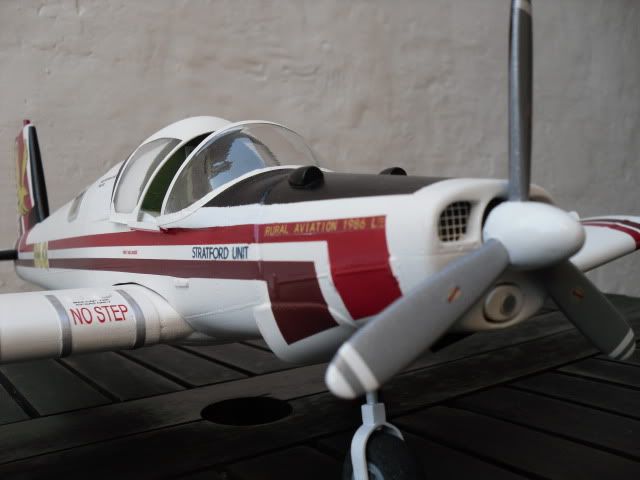
Only a small update... I have a pic of the canopy and I have been working on the scissor link and undercarriage strut for the nose wheel. This has ended up being quite a mixed bag of modelling media with brass, styrene sheet, styrene stock and piano wire all being used to construct BOF's nose leg. Eye strain is part of the fun of this task   ;D The canopy, not much different although a coat of white gloss has been misted by airbrush over it a few times, the archers rivets still show slightly which I think is a good effect. The masking fluid came off beautifully, I am sold on it and wish I could have had it years ago when I was trying to mask all those canopy curves with straight tape   These are only a few shots of the front nose wheel with the support linkages and scissors starting to be worked on. Believe it or not this has been about a weeks work! The mix of brass, piano wire and styrene has been used for a combnation of strength and scale effect. BOF's nose leg will be quite depressed as there is no load in the hopper. It looks even better with the nose wheel in place, however that is in the paintshop so I will have to wait, but thought I would update this thread for interest sake. ONce the noise wheel is attache, only two strips of styrene have to be added running from the nose wheel back up to the scissor at the left of the picture to complete it. Once panted and weathered I think this will look brilliant   Cheers Mike! |
|
|
|
Post by Fletcher400 on Nov 19, 2009 19:33:17 GMT 12
Cant wait to see the nose wheel on, those scissor links are looking awesome, bet that took a while! Canopy is looking cool with the rivet detail aswell. In regards to if the 300hp canopys were different to the 400hp with the extra seat, from photos they look identical. I doubt they would've gone to the trouble of re engineering that back then. Anyone know a good match for Fieldair yellow?  Look forward to the next update Mike. Cheers. Alan |
|
|
|
Post by agalbraith on Nov 19, 2009 20:24:59 GMT 12
Yep.......what Alan said. That canopy looks awesome with those rivets on.
Cheers
Anthony
|
|
iflylo
Pilot Officer

Posts: 53
|
Post by iflylo on Nov 25, 2009 17:18:36 GMT 12
Hey there, 300 canopies were the same as 400's
they interchanged and bolted straight on
|
|
iflylo
Pilot Officer
Posts: 53
|
Post by iflylo on Nov 25, 2009 17:27:03 GMT 12
by the way mike that is an excellent model, keep up the good work
|
|
|
|
Post by mstokes on Dec 5, 2009 16:54:15 GMT 12
It is amazing how much fun building a fletcher can be, already 7 months over delivery time (I can't bring out any 787 excuses here!) and upon fixing the wings permanently to the fuselage, I find out that the C of G is just a bit out when the tailplane is fitted . THIS MEANS THAT I EVER SO SLIGHTLY HAVE A TAIL SITTER      Feeling a bit morose about the whole thing, I nealry put the fletcher aside as I had already packed a lot of weight into the nose and I feared there woud be little room to put anymore. Over the last few days, I placed a bit of weight into the fuel tanks on the wing and then crammed as much as I could into the little cavities below and behind the engine. With a bit of patience, I filled everything up and fixed the C of G issue, but you will notice the milliput patches where I had to put holes into the plane to add the weights. I am now excited though, as the wings on means that if I prop BOF on it's undercarriage legs carefully, she will sit on her own feet. The characteristic droopy tail of the 300 is also captured quite well (I think) and to me it is getting to the exciting part. There will be a bit of fiddling with the filling around the wing roots and the like, but it is starting to look the goods to me. Still a bit of detailing to do, but thought I would fuel the thread with an update to keep interest up. Thanks for looking!     |
|
|
|
Post by baz62 on Dec 5, 2009 18:27:45 GMT 12
wow thats looking really good. You have captured the look of a Fletcher perfectly!
|
|
|
|
Post by Dave Homewood on Dec 5, 2009 21:57:01 GMT 12
Simply superb!
|
|
|
|
Post by 30sqnatc on Dec 5, 2009 22:53:48 GMT 12
You can be very proud of your work. That really is classy modelling. I'm very impressed.
|
|
|
|
Post by Fletcher400 on Dec 7, 2009 12:10:18 GMT 12
Hey Mike - only just seen this, but shes looking amazing, good to see BOF sitting on all 3 wheels now. Mine are abit tail heavy too, so need lead up in the cowl, Hows she look with the canopy on?
cheers.
|
|
|
|
Post by agalbraith on Dec 7, 2009 12:47:02 GMT 12
You are a legend my friend, she looks stunning! You truly have captured the look perfectly. Great save on getting her to sit on her nosewheel too!
Cheers
Anthony
|
|
|
|
Post by mstokes on Dec 13, 2009 23:26:56 GMT 12
|
|
|
|
Post by agalbraith on Dec 14, 2009 6:01:14 GMT 12
Oh Wow!!!
I am speechless........that is truly amazing!
Cheers
Anthony
|
|
|
|
Post by ZacYates on Dec 15, 2009 11:08:11 GMT 12
Superb! Now all you need to do is get a load in and off you go!
|
|
|
|
Post by Fletcher400 on Dec 22, 2009 11:13:38 GMT 12
Nice work Mike, she's looking great with the canopy on and the slight tail heavy angle, Nice to see you got the 2 degree forward main undercarriage forward strake looking bang on too. On the fuel caps for my new style wing I used a drill press with a tube of brass acting as a bit to cut out small discs, the way in which they pop out afterwards seemed to create a nice slightly domed top. Things you do when you dont have a punch set!
Must be almost ready for primering now?
Cheers
|
|
|
|
Post by agalbraith on Jan 25, 2010 21:27:54 GMT 12
I know what it is like.................but
I NEED my Fletcher fix!
Hows she looking?
Cheers
Anthony
|
|
|
|
Post by mstokes on Jan 25, 2010 23:46:41 GMT 12
Hi Anthony,
HAve been thinking that I should update this thread, but not much is changing. Since I got back from the xmas break, I have been finishing the linkages for the hopper and the two cable cutters that were in front of the hopper and levers.
At the moment, white primer is being sprayed onto the model and it is covered in masking tape, I have already spent two days rubbing back the underneath of the model and I am adding the rivets to the tailplane. This is where my clash between true scale rivets and 'model effect' is currently plauging my mind.
Since I have a lot of the true scale rivets from Archer, I am thinking of staying true to the project and using scale rivets, even if they do look a bit busy in 1/32. i must thank Zac for his efforts in providing me with pictures of rivet details with a ruler for scale, things that have come very handy indeed.
I have a whole day off tomorrow and will try to get some progress shots, even if it does look like one big white blob!
Cheers Mike
|
|
|
|
Post by agalbraith on Jan 26, 2010 8:14:43 GMT 12
Thanks Mike. I know what you mean.................
How do the Archer rivets look under the coat of primer? Can you see the carrier film?
I am planning on using them on my BK but am nervous it is going to end up looking like an old Airfix kit. I am keen to use them but havent ruled out using my "Rosie the Rivetter" still.
Thanks again and look forward to your pics.
I was going back through the Fletcher thread and got all fired up! I am looking at scratchbuilding a Pawnee in 32nd using the Revell Super Cub wings n bits as a basis.
Cheers
Anthony
|
|
|
|
Post by mstokes on Feb 9, 2010 19:02:15 GMT 12
Weeks have gone by and I am still being afflicted by very high humidity and temperatures in Sydney, which is severly limiting my progress on the fletcher at the moment. The air compressor is struggling with the water wastegate filling up quite a bit and very long drying times between coats.
I have so far done about 7 coats of primer and as many rubdowns, I am finding little patches that need fixing quite often. I have also reshaped the canopy to try and make it look better on the model.
I will try and get some pics of the white thing up soon
|
|


 ;D
;D