|
|
Post by Fletcher400 on Jul 19, 2009 6:48:04 GMT 12
Looking great Mike, loving that hopper gatebox! The scissor links really bring it to life dont they. They're not an easy canopy are they!  Im still working on the 954 cowl, Been away on holidays and had guests staying so progress has been a little slow. I re-did it as the undercowl angle, as it was'nt quite right, also got the new prop with hub half molded, pleased with how its come out so far. Will update the ''other fletcher thread'' shortly Your models really looking awesome now, well done mate! |
|
|
|
Post by ZacYates on Jul 19, 2009 10:32:41 GMT 12
That hopperbox is truly awesome! Superb work! And those links look pretty spot on....this coming from the guy in charge of overhauling the 1:1 items at Aero Work.
I'm speechless!
|
|
|
|
Post by mstokes on Jul 19, 2009 13:11:03 GMT 12
Thanks for the comments guys. I must agree with you Alan in that the canopy is not fun to master or mould. I have got a few acceptable one's now, so I am planning to give these a bit of a micromesh to improve their transparency and then give them a dip in pledge one go, Oz's version of future or Klear. It does not help that I have decided to have the canopy partially open... Cheers Zac for the comments on the hopper box, I had some drawings of what it should look like and then went off pictures for the rest. I did my best to try and be as accurate as I could, however the sheet styrene I have can look a bit two dimensional. I took some better pictures today as well, I have included them below. Two beat up shot and then a fly over to give a better look at the hopper. Now back to cutting canopies!    |
|
|
|
Post by Fletcher400 on Jul 19, 2009 13:26:43 GMT 12
Very nice mate! I must get around to making a hopper box for DBZ. might have to grab a copy of those drawings you have That canopy does look pretty spot on though! And I know exactly how long that would have taken..... man the hours I spent on that plug!  |
|
|
|
Post by ZacYates on Aug 17, 2009 7:09:14 GMT 12
Mike, have you given any thought to a 1:72 kit? I'd definitely pick up a few How goes progress on BOF? Last update July 19.....I'm getting worried  |
|
|
|
Post by agalbraith on Aug 17, 2009 8:31:42 GMT 12
Mike, that is absolutely superb mate! I must say that I am deriving much enjoyment following this project!
Just beautiful....................................
|
|
|
|
Post by mstokes on Aug 17, 2009 20:32:11 GMT 12
BOF is still coming along. I have been working on the canopy and have just glued on a bit more framing 5 mins ago actually. I have decided to make the canopy open and close using the same rail system that the real BOF had, just mine will be Piano Wire and a brass sleeve combination. I have trimmed down a real rubber seal to add onto the back of the canopy as well, it will look quite effective once all together. I have had a few issues with vac forming the canopy, but have decided some of this is just super detailing vanity and will settle for what I have.
I have also put together the oil cooler that was retrofitted to some 300hp Fletchers. This might not be 100% correct but looks the part.
I have no pictures at the moment, but I did put a coat of white primer over, certainly makes it look cleaner (but also shows that there are a few more hours of sanding involved).
Will try a picture update in the next couple of days.
|
|
|
|
Post by ZacYates on Sept 3, 2009 7:15:31 GMT 12
How did you make the hopper box? I'd like to do mine the same  albeit a tad larger! |
|
|
|
Post by mstokes on Sept 3, 2009 22:05:17 GMT 12
The hopper box was created reather the asame way you would put together a box. Firstly I cut out two rectangular sections of plastic card for the front and back of the gate box. For the side I cut out two similar pieces, but I included the curve (I was fortunate enough to have a steel ruler with the same shallow curve required which I was able to use as a guide).
On the side pieces, I cut some heavy square styrene stock and placed it on the back of the side pieces, leaving enough of a gap so as the front would sit flush and make up the box.
I reinforced all the pieces with more sheet styrene before bending a piece of thin plastic sheet over the curve at the bottom to fill this in. I used some scrap styrene to put underneath the sheet to give it support.
The doors I did by 'planking' square stock with was about 1mm square I think. By planking I was able to follow the curve and leave a gap in the middle where there is no covereage by the clamshells. A bit of putty and a file to round the edge and the basic hopper shape was ready. I added details by putting a strap of styrene around the top of the hopper (where the levers all connect onto) and then simulated the levers with thin rod. I also used the smallest square stock i could find to add the reinforcement (or braces) onto the clamshell doors. I used CA glue and piano wires drilled into the heavy square stock that was originally glued onto the first sheets.
I will try and put some sketches together for you, as I only have 1/32 dimensions on me.
Let me know if anything needs explaining, what I have written could be terribly confusing!
|
|
|
|
Post by Dave Homewood on Sept 6, 2009 22:30:03 GMT 12
That model looks so fantastic!!
|
|
|
|
Post by mstokes on Sept 19, 2009 17:07:50 GMT 12
Well it has been a long time since I have updated this thread, the main reason behind that has been the difficulties I have had in getting the canopy right. Unlike styrene which can be sanded or filled, the PETG canopy has had to be perfect from day one. It took me about 21 goes to get this one right, and even though it is not perfect, it is very close. I have skinned it with thin styrene inside and out for strength and looks. It took me about 5 days to put the front perspex on, tacking it bit by bit with canopy glue and CA glue. I am also working on the opening hood which is being skinned at the moment. I was almost about to put the canopy on Monday when I nearly made an elementary mistake... I hadn't put the control stick in   !!! This has been rectified, I had made it quite early in the build and gave it a quick squirt under the airbrush and fitted it in later that night. The hood should look quite good when done, I even have a real seal to go onto the back of the canopy and I am also putting together some canopy rails out of piano wire which will allow the hood to move back and forward when they are sleeved with thin brass tube. I have started also priming the fuselage so it looks whiter and cleaner now. Fuel tanks have also been added onto the wings, although the bare metail straps will not be added until the end of the build. I also have to add the fuel cap onto each side. I hope you enjoy   |
|
|
|
Post by agalbraith on Sept 19, 2009 20:13:11 GMT 12
Mike, That is fantastic!!!
I cant wait for each update on this bird. Words fail me actually, when I reflect on the fact that this a scratchbuild......and you really started with nothing! Just fantastic my friend, I admire your work!
Cheers
Anthony
|
|
|
|
Post by Fletcher400 on Sept 20, 2009 4:30:32 GMT 12
Fantastic work Mike, pleased to see the rivets have come out aswell! Shes looking very smart now with the primer on aswell congratulations mate!
Cheers.
|
|
|
|
Post by Dave Homewood on Sept 20, 2009 17:55:49 GMT 12
Awesome work Mike.
|
|
|
|
Post by mstokes on Sept 20, 2009 19:01:11 GMT 12
Thanks for all the comments, still skinning the hood at the moment but feel the build will now progress much quicker now the canopy looks to have been done...
Thanks for looking, Mike
|
|
|
|
Post by mstokes on Nov 5, 2009 18:54:46 GMT 12
Hi all, it has been a while, but I have been bogged down with the canopy. Part of the reason is that clear plastic is unforgiving and I am notoriously clumsy, and fear of glue smears and pulling the canopy out of shape made me very hesitant to move fast on this. I have used .10 thou plastic card and strips to line the canopy frame work both outside and inside the canopy. This will give the canopy strength, but also (I feel) gives the whole canopy a more realistic look, especially as it will need to sit off the fletcher like the real ones. Also, I made the decision early on that a 1/32 scale fletcher should have a working canopy, just like the real one. I could not work out if I wanted the canopy closed or open. I like the shape of the fletcher with a closed canopy, but as I super detailed the cockpit I did not want to lose most of that detail behind plastic. A closed canopy was beginning to draw my favour (or at least slightly ajar) because of dust, when I happened to notice that some of my brass tube stock fitted my stash of piano wire exactly. This was also exactly to scale, so I would not lose any strength nor make the canopy slider look toy like. My next big challenge was the rubber strip behind the canopy. Originally I planned to use rubber, but I could not get it to shape right. Experiments with adhesion showed that rubber reacted to pretty much anything strong enough to hold it down anyway. My main problem was that the strip has to be angled down from the back of the canopy, adhere to the curve of the canopy (with a stright edge when folded where it meets the canopy framework) and then curved so as to meet the fuselage correctly when attached. As it was to open, I had to ensure that it was shaped well enough to avoid any defects I might have in the fuselage. using assorted plumbing rubber washers as a guide, I was able to get very close to the correct curve, which I then marked out on styrene and cut. It fitted pretty well, with just a bit of superglue employed to fill the minor gaps. I have used a new product to mask the windows which I have never used before called Micro Mask which is a liquid that dries to form a layer of 'masking tape' over the clear parts. It was a breeze to use on this and saved many hours of painful masking tape. I squirted a bit of white primer on the whole frame, then added the black onto the 'rubber strip' which was coated in matt lacquer with a brush to look more 'rubbery' I have included a couple of pictures of the starting product, I am working with some archers decals at the moment to add the bolts and rivets to the framework before the canopy gets it's coat of gloss white and a top to the opening handle. Fresh off the vac former  Mold out  Front windscreen is already attached to the fuselage, this is the sliding part of the canopy, 1/2 way through adding rivet details to the framework (not a great picture sorry)  not much of an update I am afraid. Only going to do planes without canopies from now on... although I am not very fond of rigging either ;D |
|
|
|
Post by ZacYates on Nov 5, 2009 21:21:20 GMT 12
*coughs* ZK-BDS next circa 1954 *cough*
Sounds pretty good Mike! I really don't want to be a stick in the mud, but shouldn't the sliding portion be longer? It looks a little anorexic to my eyes, may be just the quality of photo (no offence intended).
|
|
|
|
Post by Fletcher400 on Nov 6, 2009 6:13:20 GMT 12
Looking sweet Mike, You've spent quite some time on the canopy and its paid off! I think you and I both know they are a tricky sucker to get right especially as they sit off the fuse sides aswell and wedge out at the windscreen, Micro Mask is a bloody good time saving invention cant fault the stuff at all.
Am I right in guessing your plans for the slide back is brass tube glued to the inside of the bottom frame edge and wire internal runner fixed at one end to the windscreen and other end outside on the fuse?
cheers
|
|
|
|
Post by mstokes on Nov 6, 2009 23:31:32 GMT 12
Zac, you are sort of right with the sliding portion, however as my scratch building skills are still being developed, I am probably a millimetre off here and there and it starts to add up, as the windshield is already attached I have no option but to leave it as is to fit. However, one of my plans shows that for a 300 the canopy is correct, does anyone know if the extra seat in the 400 might have changed the canopy?
I am not happy that the canopy will be 100% accurate, however as thos is my 19th attempt I will run with it.
Alan, you got it spot on. The brass tube is already attached to the inside of the canopy and these have been skinned with plastic. Getting these both at the correct angle was a horrible exercise! The piano wire will be cut to length and then bent very slightly at either end and then slotted into holes in the fuselage.
That is the plan anyway!
The white will be airbrushed on tomorrow and then the opening handle will be fixed and shot with alclad lacquer.
Anyone who has considered using micro mask, I can recommend it as a terrific product. It coats on well (like a thin gel) dires ina a few hours and can then be trimmed or cut. pulling it off is as easy a using a toothpick or some adhesive tape to get an edge off before it comes off in one piece. The product is also water soluable!!!!
Look for another update soon, my camera doesn't like white items to be shot with the flash back... it will look better once the mask comes off
|
|
|
|
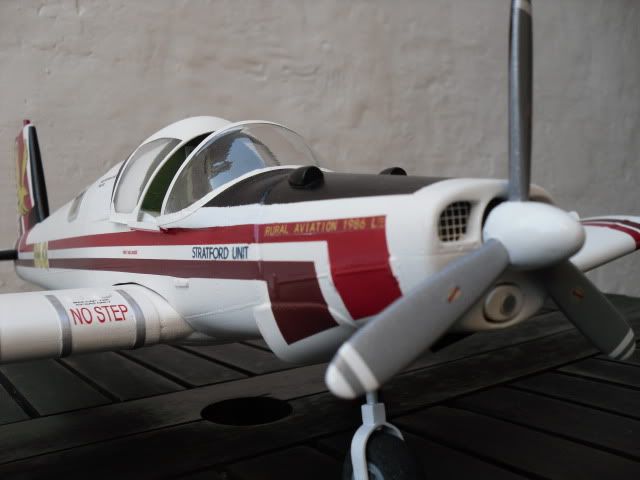
Post by mstokes on Nov 7, 2009 0:23:43 GMT 12
Some better pics of the canopy ;D Still no good with cameras   |
|


 albeit a tad larger!


