|
|
Post by ams888 on Mar 6, 2010 12:46:28 GMT 12
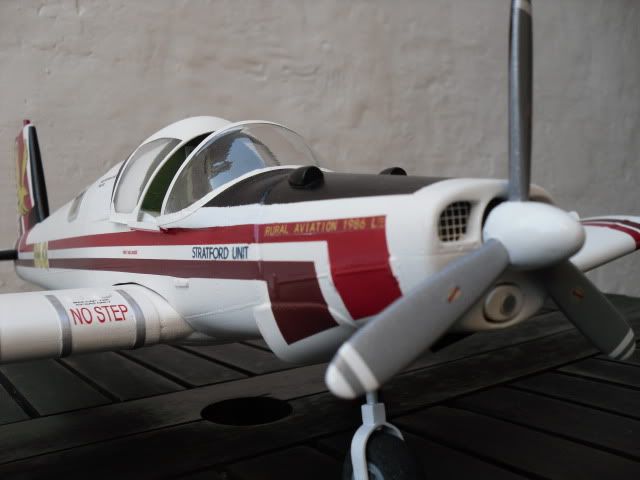
With my Airfix Heron, also came a beaver and ford tri-motor, so i thought I'd take a break from NAC Planes, and do a different NZ aircraft. So here is my Fieldair Beaver, ZK - BMF  ZK - BMF was used by Fieldair from 1961. It was used as a crop duster until it was converted to passenger configuration in 1992. In 1994 it was exported to Canada, but crashed on 20 September 2004, and was not recovered. (All this info on this plane was from kiwi beaver's website.) I'll put more photo's up in the next day or two... |
|
|
|
Post by flyjoe180 on Mar 6, 2010 20:46:13 GMT 12
Nice model, looks really good. Again, you made your own decals I presume? You have that down to a real art now.
|
|
|
|
Post by mstokes on Mar 7, 2010 10:03:17 GMT 12
Nice model, your decals have turned out very nice. I currently have four of the 1/48 scale Hobbycraft beavers in my stash which I also plan to convert to topdressers.
I like the base as well, really does make a model seem more in context. Could be BMF parked up at Napier on a windy day.
Nice work!
|
|
|
|
Post by ams888 on Mar 8, 2010 6:11:38 GMT 12
I used the decals from the kiwi-models DC3, which has a fieldair option, but the decals were too big, so i scaned them, and downsized them, and then reprinted them.
|
|
|
|
Post by Dave Homewood on Mar 8, 2010 11:01:33 GMT 12
Very nice job. Is that 1/72 scale or 1/48?
|
|
|
|
Post by Fletcher400 on Mar 8, 2010 11:49:07 GMT 12
Very nice job on the Beaver, and nice job with the decals too! What yellow did you use? Im thinking of doing a Fieldair Fletcher sometime and not sure bout the yellow
|
|
|
|
Post by ams888 on Mar 8, 2010 11:51:26 GMT 12
Its 1/72 scale, Dave. I'll check on the yellow Fletcher400, and post what its called tonight... it was just a tamyia accrylic, i just held it up to some of the pic's that kiwibeaver has on his website, and it looked about the right colour, so i used it... :-D
|
|
|
|
Post by Deane B on Mar 8, 2010 19:51:02 GMT 12
The Fieldair yellow is a really hard colour. Some pics it looks closer to a full yellow and others it has quite an orange tinge. I did a 1/72 Dak - Its still in a cupboard at my folks house after twenty something years !! What I remember though is toning down the yellow I used to make it paler and with a very small hint of orange.
I bet in real life the colour was never that consistent on all the fieldair aircraft over the years anyway!!
I love the decals and would like to know how you produce them?
|
|
|
|
Post by Freighter5910 on Mar 8, 2010 19:54:48 GMT 12
.
|
|
|
|
Post by ams888 on Mar 9, 2010 6:13:30 GMT 12
Making Decals is simple really. I have some decal paper that i got from the hobby shop a few years ago. You can still buy it, i saw some on my last trip there. Testors make it. Then you just go wild on the PC. I usually find all my pictures on the net, save them, and then import them into microsoft word. With the fieldair decals, i had a set for the DC3, but it was too big, so i scanned them, and then made them smaller, and typed up my own rego.
|
|
|
|
Post by Freighter5910 on Mar 9, 2010 18:09:56 GMT 12
.
|
|
|
|
Post by Deane B on Mar 9, 2010 18:09:58 GMT 12
So once done - do you print them with an inkjet or laser printer?
Are they fixed by soaking in warm water and applying or do they have an adhesive backing?
|
|
|
|
Post by Bruce on Mar 9, 2010 19:54:38 GMT 12
I use inkjet decals a lot, they are great!. You can buy decal film in either clear or white varieties, and just print them on a normal inkjet printer (on high quality photo setting). Once the ink is dry I spray mine with clear acrylic laquer to seal the ink into the film (otherwise it just runs when you did them in water) cut them out and apply using the water water soak just like any other decals.
They do have limitations though. Greys, yellows, browns and light colours where the ink density is light dont come out well. You really have to apply coloured decals over white background as they are quite transparent. You have to remember that clear decal film wont have white areas, and if using white film, you have to be able to accurately trim close to the edge (not a good idea generally as the ink runs on the edges where the cut has unsealed the lacquer coat). When making up the artwork, I generally make sure there are at least 3 copies of everything, in case you get ink runs etc. sometimes you have to layer several on top of each other to get a decent colour density. I brought mine online from acorn models - the brand name is "SuperCal", but be aware that it is pretty expensive!
|
|
|
|
Post by ams888 on Mar 10, 2010 7:09:00 GMT 12
I have made some roundels using the white sheets. I've found if you put a black ring around the roundel in Microsoft word, or paint, then it gives a very good guide when cutting them out. I too have found it very annoying that light colours are so hard to do... I have to find a way, as the NAC DC3 and Heron have grey decals over a red stripe, and with my Dragon Rapide i put grey decals on, and it blended right into the red... :-( Testors have two packs. I think the starter kit, which comes with the acrylic decal seal that Bruce mentioned, and a couple of sheets of clear and white decal paper and is about $30ish from Hobby City in Auckland. Then you can buy just the sheets of either clear or white for about $20is for 6 sheets. Each sheet is about A5 in size.
|
|
|
|
Post by Bruce on Mar 10, 2010 13:09:35 GMT 12
For the grey over the red stripes, try doing the stripes in decal film with any grey text or whatever as part of it, and apply the stripes over a white background (or print on white film). it may work, may need to try a test sample first.
|
|
|
|
Post by ams888 on Mar 11, 2010 6:01:39 GMT 12
I never thought of that. That sounds like a good idea. Thanks
|
|