|
|
Post by rholland on Jun 20, 2012 9:45:09 GMT 12
From Sharkit for 42 Euro, see www.sharkit.com. I have no connection with or knowledge of Sharkit, but hey, an Airtruk!  |
|
|
|
Post by mstokes on Sept 17, 2012 22:52:43 GMT 12
I have just ordered two of these through Hannants (Dad's was an aussie one and I couldn't decide whether to do that one or a Barr Brothers machine!) so I will let all know what they are like. The casting shots on Aussie Modeller International looked really good so here's hoping  |
|
|
|
Post by mstokes on Sept 29, 2012 14:42:56 GMT 12
After only 6 working days, the Airtruks arrived this week. Very nicely cast, you would almost swear it was injection moulded. The trailing edges are ridiculously to scale and the bottom wing is such a snug fit it was hard to get out once I placed it there to check the fit. I am looking forward to this as it should be a quick build and easy to squeeze in around my other projects. There will be some adjustments required to this as the basic design is based on images from the medevac config of the airtruk at Bankstown. Therefore the hopper wall between the rear cabin and the hopper is not included.Also the hopper outlet is not present which I would expect. The model is a late version of the Airtruk, therefore I will do one as my old mans' crash mount VH-JSO and the other as Hamish Ross' Rotorua machine from the late 80's. This is the kit breakdown below. Plan to clean up some flash now.  |
|
|
|
Post by mstokes on Oct 6, 2012 11:15:40 GMT 12
Been working on this one on the side and have now completed adding the fibreglass reinforcement in the bums of the Airtruks. This is a progress shot to show what I mean in a 'before and after' style. Really enjoying this one, it doesn't fight you which is wonderful (scratchbuilding seems to continually roll out new problems as you go!). The palsticard hopper inserts were my own and were probably the hardest thing to line up as I wanted to have minimal seam lines left when I close her up.  |
|
|
|
Post by ZacYates on Oct 6, 2012 16:58:53 GMT 12
What a lovely looking little kit! If not for the price I'd grab one immediately.
That said, surely, SURELY they would be keen to do a Fletcher?
|
|
ron
Squadron Leader

Posts: 110
|
Post by ron on Oct 6, 2012 20:50:15 GMT 12
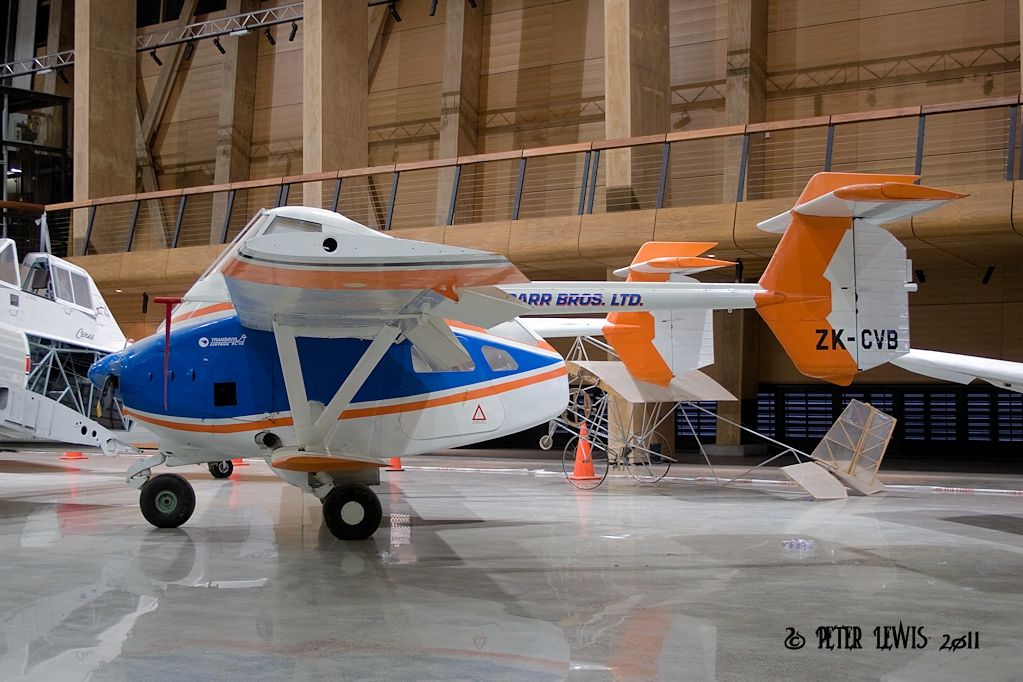
On the subject of Airtruk models, the Queensland Air Museum is currently doing one in 1:1 scale. It's the former ZK-CWX and we intend to paint it in the orange check colour scheme. Does anyone know the exact spec for the orange? Our friend "airtruk" has provided the relevant Transavia drawing but unfortunately it doesn't provide the colour spec.
Rgds
Ron
|
|
|
|
Post by JamesStokes on Oct 31, 2012 8:55:35 GMT 12
Am I right in thinking there is an Airtruk in that scheme at MOTAT?
|
|
|
|
Post by the.x.man on Oct 31, 2012 11:01:29 GMT 12
|
|
|
|
Post by Peter Lewis on Oct 31, 2012 17:30:34 GMT 12
|
|
|
|
Post by mstokes on Feb 11, 2013 22:28:45 GMT 12
A bit of an update on my two Airtruks. I am doing them side by side, one as VH-JSO (the ex ZK-DVN) that my old man flew and Hamish Ross' late model machine. Because the masters are based on a late model airtruk, I had to backdate one of them by changing the front of the cowl and the engine access panels to include the three small cooling vents. To do this I did another rough home-made etch. I have used some of the parts off the etch so it looks a bit chopped.  I thinned the access doors to a more scale width and added some etch to represent the inserts in the doors. Painted with floquil reefer white and washed with a flory wash.  This is the back of the airtruk, I scratch built the seat supports, the internal framing and added a small etched fire axe and some eduard seat belts.  Cockpit details were also added onto. The neatly cast instrument panel was painted and then added to with some tiny Mike Grant instrument decals. The rudder pedals were thinned and then detailed with copper wire. Hopper and flap levers were made from fuse wire and the throttle quadrant was made from my own etch. I added a small fire extinguisher and a radio set. The seat is the cast one painted and added to with eduard harnesses.   The production line, drying and awaiting their roofs.  The fuselage pods are not much bigger than my thumbs and look a bit roughly finished. The fletcher is still on the bench, just trying to get the second hood back to where it was in my last progress update. Cheers Mike |
|
|
|
Post by ZacYates on Feb 12, 2013 15:22:40 GMT 12
Lovely to see them both progressing so well!
Any chance you'd be keen to do PE for the Fletcher?
|
|
hobbes
Leading Aircraftman
Posts: 6 
|
Post by hobbes on Mar 26, 2013 23:33:56 GMT 12
|
|