|
|
Post by amitch on Apr 28, 2006 10:38:08 GMT 12
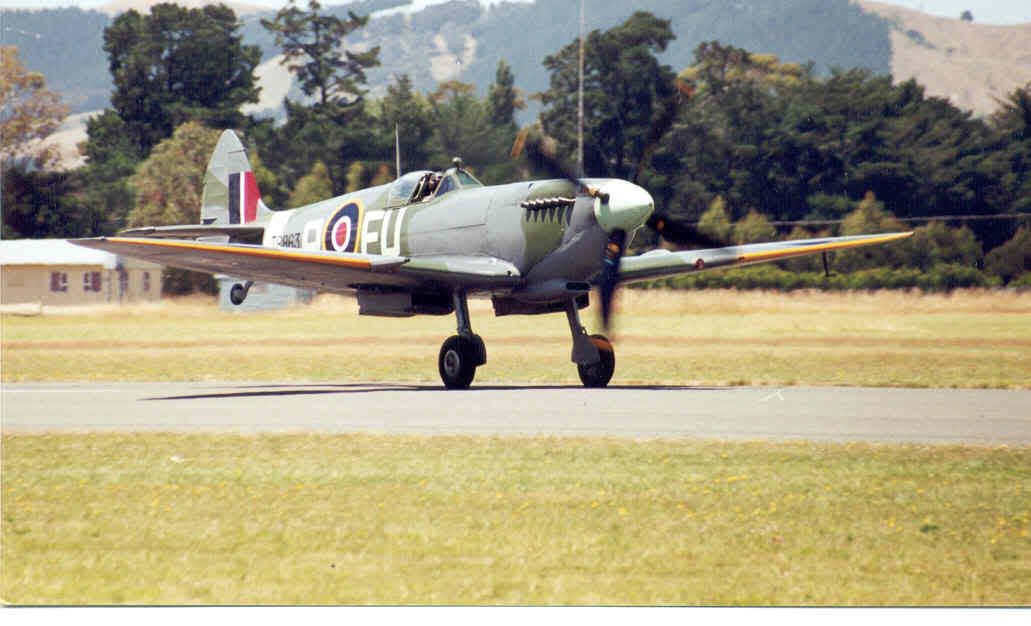
Turbonz sent me this photo which I downsized to 800 by 600 in photoshop.  This one was given some highlight adjustment, then I tried auto levels, which I then undid as it didn't work. I then made some levels adjustments to set the white and black points. Then I downsized to 800 by 600 and then did the sharpening (not the sharpen tool but unsharp mask) using a tool I got from www.fredmiranda.com/ as an add on to photoshop (I use CS1).  It took about 30 seconds, but as you can see the results make a big improvement to the photo. If you aren't using a good photo editing program (photoshop or elements) you need to think about getting one as its as important as your lens choice and in my opinion, as important as your choice of camera body. |
|
|
|
Post by turboNZ on Apr 28, 2006 10:35:03 GMT 12
Great stuff !!
Looks a lot sharper, guess my camera is a compromise, thats where photoshop comes in.
|
|
|
|
Post by amitch on Apr 28, 2006 11:30:40 GMT 12
Great stuff !! Looks a lot sharper, guess my camera is a compromise, thats where photoshop comes in. Myth number two. Any good camera is soft by default. This allows you to make adjustments and not the camera. This is why you should always turn off any in camera adjustments (sharpening, colour etc) and do them yourself later as each image will require different work to bring out the best in it. |
|
|
|
Post by turboNZ on Apr 28, 2006 12:22:30 GMT 12
Thanks for that. I think I do that anyway.
I do my pics on 1600 x 1200. Should I go to the highest size (I don't think that one is) ?
|
|
|
|
Post by Dave Homewood on Apr 28, 2006 12:34:24 GMT 12
Wow, that's impressive. I could probably improve on a lot of my photos, which looked great in the camera's little screen, and great when i put the card into Mum's widescreen TV to view, but rubbish when I downsized them in Paint Shop Pro. I shall have to get Photoshop. I've been saying it for years, but...
|
|
|
|
Post by turboNZ on Apr 28, 2006 12:43:39 GMT 12
I got quite a good one on CD when I bought my camera.
Would you like me to send the CD up to you do you can download it?
|
|
|
|
Post by Dave Homewood on Apr 28, 2006 12:48:07 GMT 12
Yes please, that'd be cool. Will PM you.
|
|
|
|
Post by turboNZ on Apr 28, 2006 13:42:55 GMT 12
You're welcome !!  |
|
|
|
Post by phil on Apr 28, 2006 17:03:30 GMT 12
You might want to watch your selection boundries, the only real comment I can make is that the image looks altered. Note the 'halos' around the tails of the aircraft, the trees in the background etc.
You've certainly got the right idea darkening the sky and the mountains, but I feel it is a little over done since it shows a bit too clearly.
The idea is to do it without it being obvious. One way is to use layers in Photoshop. It's a bit more complicated than I can easily discribe in a short post, but basically you work with two (or more) layers, one being for your high lights, and one being for your shadows. Depending on the image you may have other elements on seperate layers.
You would make one layer for the sky and the mountains and then blend it into the background layer of the aircraft. The easiest way to do this is to ctrl-a then ctrl-c and then ctrl-v, this will select everything then cut and paste a new and identical layer directly over the top of the original.
The trick is in the boundry between the sky and the tail. Using different layers gives you much more control than just a simple selection and levels adjustment on one layer. You can erase part of one layer, either by hand (probably easiest in this case) or make a very accurate selection by using paths, around the tail area. Then you adjust what remains in that level (ie the sky and mountains) using the levels tool. Don't be afraid to experiment with the history brush either, set to a low opacity it is very handy to paint areas back in again gradually to get the desired result.
I suggest you read up on 'Quick mask' as well. Very handy.
You can also do your levels adjustments using adjustment layers. Go 'Layer' - 'New Adjustment layer', then select the adjustment you want (normally levels). You then make your adjustments on this adjustment level. This allows you to go back to the adjustment layer later and change it if you want, without having to go back through the history and lose everything else you have done since. It really is very useful since you can go back to that adjustment layer at any time to alter it.
Photoshop is pretty complicated, but once you master the basics of layers it suddenly becomes so much more powerful. I've been using since PS for a few years and I'm still learning new things. It is a bit hard to pick up initially, since it's not very intuitive, but keep trying new things and you soon figure it out.
Remember, Layers are your friend!
|
|
|
|
Post by turboNZ on Apr 29, 2006 10:37:18 GMT 12
Thanks Phil,
Any advice is good. I'm still learning about effective photoshopping, all of this is great.
Cheers
TNZ
|
|
|
|
Post by amitch on Apr 30, 2006 9:40:23 GMT 12
Yes good advice but also very advanced stuff.
If you look at the original image you can see the halo around the P-40s tail (caused by some in camera sharpening) and the mountains were in fact that dark as the conditions were not great.
For an 800 by 600 jpg saved for the web I wouldn't bother to spend that much time on the file. If I was printing it, then yes it would be worth spending the time.
Turbonz, 1600 by 1200 pixels is a 2 meg camera. Yours should do a size of 2272x1704. Set it to the largest photo size and to the fine setting ie: largest file size and if you can turn off any in camera adjustments. This may stop the halo effect you see on the tail of the P-40 and will allow you more lee way in adjusting the photos.
|
|
|
|
Post by turboNZ on Apr 30, 2006 10:19:18 GMT 12
Alrighties, I've now set the camera to 2272X1704 - quality Super Fine - and sharpness Soft.
I'll see what results I can get with that.
Cheers
|
|
|
|
Post by phil on Apr 30, 2006 11:26:29 GMT 12
It's pretty basic layer work really, and using adjustment layers rather than simply applying the levels tool to the background layer is good practice. Leaving your background layer intact and making your adjustments on other layers is one of the first things you learn about photoshop. If you simply do a levels adjustment and you need to go back and change that levels adustment, you will have to re-do everything you've done since. If you've done so much since that the adjustment no longer features on your history, you can't change it at all!
Having said that, if all you are doing is applying a little tweak to the lightening or darkening of the whole image, then just do it on the background. It only becomes an issue when manipulating different parts of the image differently.
The halo I refered to is not the in camera sharpenning, it is the difference in tonal value that extends around the top of the tail. It's not visible in the first image, it is in the second where the mountains and sky have been darkened, but not darkened as much near the border with the tail.
What kind of selection did you use?
|
|
|
|
Post by amitch on Apr 30, 2006 12:55:35 GMT 12
It's pretty basic layer work really, and using adjustment layers rather than simply applying the levels tool to the background layer is good practice. Rather than go on about this one image that was done quickly to show what can be done, why not post one of yours as untouched and then step every one one though what you do to make your images so good. Most people here wouldn't know the first thing about layers I'm guessing. The halo I referred to is not the in camera sharpening, it is the difference in tonal value that extends around the top of the tail. It's not visible in the first image, it is in the second where the mountains and sky have been darkened, but not darkened as much near the border with the tail. I'm sorry I posted an image with a halo in it. Why this has offended you so much I don't understand. In future I won't bother! |
|
|
|
Post by corsair67 on Apr 30, 2006 13:18:00 GMT 12
Phil, I hadn't even notice a halo until you pointed it out: Christ, I didn't even know what a halo was until you bought it up! ;D I don't think Alex was trying to create a masterpiece for the next edition of Pacific Wings or Australian Aviation: he was simply showing us a small amount of what kind of things can be done to enhance a photgraph with Photoshop. Layering may be a very good way to go, but it may also be something you can teach us all about a little down the track? I haven't moved my camera settings off Auto yet, so they may give you an idea of the skillbase you are dealing with so far. I want to be able to walk before I can run.  Phil, please don't take offence to this, as you and Alex have both given excellent tips to make us all very happy! Cheers.  |
|
|
|
Post by phil on Apr 30, 2006 17:06:10 GMT 12
I'm sorry I posted an image with a halo in it. Why this has offended you so much I don't understand. In future I won't bother! Oh don't be so bloody melodramatic! It hasn't offended me at all. I only elaborated on it in my second post because you didn't seem to understand what I was refering to. It wasn't some kind of personal attack. Nor is it some kind of pissing contest. I was simply offering you (and everyone else) a few leads on techniques you might like to look into, and as I said in my first post you had the right ideas - I was simply suggesting a few technical ways to realise them. |
|
|
|
Post by phil82 on Apr 30, 2006 17:18:05 GMT 12
Gentlemen, it's really a matter of semantics and the failings of only seeing the written word and not the expression! If it's any consolation, I would love to produce photos of that quality, but have always bought cameras which are sufficiently idiot-proof to do so!
|
|
|
|
Post by Dave Homewood on Apr 30, 2006 18:59:12 GMT 12
Hey come on chaps, there is no need for any argie bargie on either side. All of the tips here are valid and they're also very much appreciated. Alex, please don't give up on sharing your knowledge, we do appreciate it mate.
Let's just all calm down a bit please.
Phil, I know what you're talking about with the layers. I too have trained on Photoshop, I just do not have a copy of it at home, yet and use the heaper version, Paint Shop Pro 7, which is good but lacks many features of Photoshop.
It can be a complicated area for the novice, but definately worthwhile. I think Alex's suggustion of a step-by-step tutorial might be a good one actually, if you're willing. I'm sure many people will be interested in it.
I used to actually be a reasonably good photographer with my old film camera (sadly not so much on the aviation front) but digital is very new to me, and I find it a little different. The tips I've learned here in the past few days have certainly cleared up some issues for me, and I am glad that both of you have kindly shared your knowledge. I hope you will both continue to help the rest of us when we need it, and move on from any unnessecary squabbling please.
|
|