|
|
Post by ZacYates on Apr 15, 2009 7:41:48 GMT 12
I wonder why one would wish to do this particular machine?  |
|
|
|
Post by Fletcher400 on Apr 15, 2009 7:44:26 GMT 12
well, WAW does have a cool paintjob  .... |
|
|
|
Post by Fletcher400 on Apr 15, 2009 7:50:06 GMT 12
Anthony, you wont need to do too much in the way of alterations for doing the fletcher shown above. Ive decided to do the aileron endplate version so you can do the 950M. adding that cresco type tailfin mod wont be a problem just a case of cut one and stick it on. The only thing different is the photo is a fletcher 954, This is the later version of the fletcher, the only real significant difference is the cowling which was more streamlined. My cowl is the 950 version which came out in the 1970s, I am planning on doing a 954 cowl in the future if the market is there for it  Cheers. |
|
|
|
Post by agalbraith on Apr 15, 2009 8:03:04 GMT 12
Thank you so very much!!!!!! Even my wife liked this machine........would loved to have seen them display it.
Well, looks like I have found the subject for my one, thanks again.
Would anyone like me to add the photos to Zacs walkaround later?
Cheers
Anthony
|
|
|
|
Post by Fletcher400 on Apr 15, 2009 8:26:12 GMT 12
My g/f is quite fond of them aswell haha, well she should be she's seen enough of them!
Id be keen to see the photos added.
Talking of photos, more will be added tonight or tomorrow on the wing and bulkhead mounting
|
|
|
|
Post by ZacYates on Apr 15, 2009 17:13:05 GMT 12
Anthony, I have some detail shots of ZK-EGK to post if you like? Mostly cockpit....I fully intend to detail the hell out of my kit!
|
|
|
|
Post by ZacYates on Apr 15, 2009 18:06:17 GMT 12
Done |
|
|
|
Post by Fletcher400 on Apr 16, 2009 7:52:30 GMT 12
Ok, here we go with the next step in construction... First of all we need to cut out the bulkhead shapes, I will be providing a plan to copy these onto with some carbon tracing paper. Ive used 2mm and 3mm liteply for the wood I have gone ahead and pre painted them and also added the instrument panel for abit of detail. Im not going to go full out with the detail here on this one but you get the idea. This being a fibreglass model the thickness of the glass varies, dont be afraid to sand to fit F1 is the nosewheel mount (unpainted) F2 instrument panel F3 Rear cockpit bulkhead F4 Rear wing side re inforcement (unpainted)  Ok, so now we have all the bulkhead parts ready to go. First of all fit F3 as shown in the picture with some small drops of cyno glue to the backside. Set the bulkhead back a little from the edge by about 2mm   Now we move on to fitting F2 This is done the same way   Then Fitting of F4 Make sure this sits flush with the edge of the fibreglass  And finally F1 is fitted Notice how it is a little smaller than it should be, this is because I am going to fill it in with some epoxy in a little bit to provide a very strong joint for the nosewheel, there is a little weight going to be sitting on this area  Now pop in the wing, its a tight fit but patience is a virtue, dont be afraid to sand a little to make it fit if needed. Make sure its all the way in and matches up nicely  Now its time to fill in the small gap along the wing to fuse join. I would recommend using epoxy thickened with microballoons for this. Mix up a nice thick batch (about the consistancy of toothpaste) and use a small stick aswell as fingers to push it in along the join. Wipe off excess with abit of tissue. Wear latex gloves when doing this!    Dont forget to wipe off the excess on the inside which will push through  Remember how I left the nosewheel mount slightly undersize? Here it is filled in with the same epoxy/microballoon mix  Now go have a beer and let this dry for 24 hours, tomorrow I'll come back and sand it in Thanks for looking Cheers. |
|
|
|
Post by mstokes on Apr 16, 2009 9:07:23 GMT 12
Nice work mate!
I will be doing up some transparencies to fill my instrument panel, so will be keen to get a master done so I can share this.
Good news on the 300hp, the wheels I was able to get from Bay Hobbies in Tauranga, almost perfect in even hub detail. Apologies for anyone wishing to buy a tailwheel from there, I have cleaned them up.
Right, off to Super Air for some shots and to get some decal details.
|
|
|
|
Post by agalbraith on Apr 16, 2009 10:05:02 GMT 12
You guys are awesome!
Thanks for sharing your work
Cheers
Anthony
|
|
|
|
Post by Fletcher400 on Apr 16, 2009 14:58:41 GMT 12
I'll have some more pics in a day or so, next is the wheel struts and putting on the cowl, just making some up at the moment.
Bay Hobbies.... I spent alot of time, and money there over the years!
|
|
|
|
Post by Dave Homewood on Apr 16, 2009 15:50:46 GMT 12
This model is superb and will look great when it's completed. I'm enjoying this thread.
|
|
|
|
Post by Fletcher400 on Apr 17, 2009 15:03:35 GMT 12
Have done a little work on it today, Sanded in the filling I did yesterday and added in cockpit horizontal runners and made up the hopper top panel.  and a sneak peek of whats coming next....  Just working out a few things here   Cheers. Alan |
|
|
|
Post by agalbraith on Apr 17, 2009 15:58:38 GMT 12
Ooooh nice!! She is really taking shape now
Cheers
Anthony
|
|
|
|
Post by Fletcher400 on Apr 19, 2009 12:51:51 GMT 12
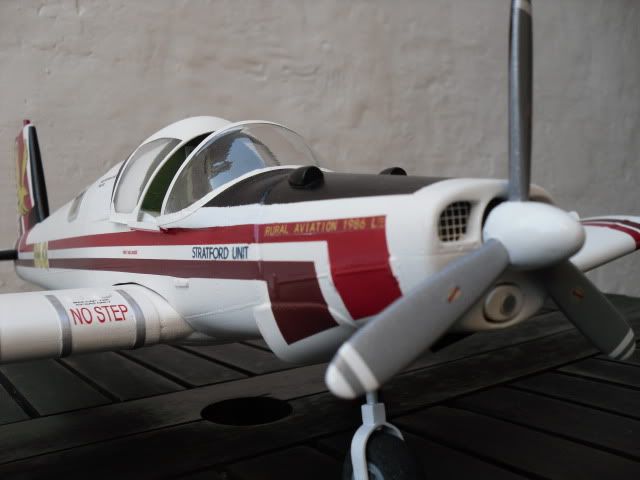
I did a vac form canopy earlier with the new frame incorporated, here it is masked off for painting, Im quite pleased with the results  Usually before I go and start gluing I like to do a dry fit to see what its going to be like, I find its good to do this during assembling. I thought Id share with you what the actual plane is going to look like with all the kit parts I provide. Tomorrow I'll glue in the struts and put the cowl on     And one for Zac  top view with ailerons  Almost ready for the paintshop |
|
|
|
Post by mstokes on Apr 19, 2009 13:01:57 GMT 12
Looking unbelievably-fantastically-gobsmackingly-freakin beautiful...
Oh my, I don't know what to say... I am speechless... well done, bravo, running out of accolades!!!!!!!!!!!!!!!!!!!!!!!!
|
|
|
|
Post by Fletcher400 on Apr 19, 2009 13:03:19 GMT 12
thanks Mike, Im quite pleased with it so far, quite enjoying putting this together actually! Might change the wheels to an off the shelf item though as Ive had problems with molding them with air bubbles causing a hole on one side. She's propped up on the tail end as needs some weight up front Cheers. Alan |
|
|
|
Post by mstokes on Apr 19, 2009 13:07:54 GMT 12
Am uploading some pics now of the few topdressers I saw... and only the solitary one 400...
CHAMPION!!!
I was going to do some more work on my control surfaces, now my wheels have turned up. Hopefully I can share back a development soon!
|
|
|
|
Post by Fletcher400 on Apr 19, 2009 13:12:08 GMT 12
Awesome Mike, Look forward to seeing the pics aswell as some more on the BOF build. I just have to cap off the aileron ends, going to mold them tomorrow
|
|
|
|
Post by ZacYates on Apr 19, 2009 13:58:52 GMT 12
Looks superb Alan! I too have run out of accolades!
|
|


 ....
....


