|
|
Post by Bruce on Nov 3, 2011 22:52:39 GMT 12
Great catching up with you guys and thanks for showing me your projects. Both are really very sound airframes so I think you'll really enjoy working through them. Although I have had some time working with Austers in the past, seeing one in bits demonstrated to me how similar they are to the Taylorcraft BC-12 D (Which I have recently helped restore). Not surprising as both types (and the Piper Cub) share a common ancestor in the Taylor J2. Its great to spend time with other enthusiasts of classic light aircraft - New generations of people are owning and rebuilding these types, which will go on flying forever. I admit they arent everyones cup of tea, but you come across all sorts of people with stories about adventures flying these things and you realise just how practical they are, and how important they are to NZs flying heritage. Great to see I'm not the only one who gets excited over identifying some obscure piece of bent metal!
|
|
|
|
Post by shorty on Nov 9, 2011 12:20:59 GMT 12
Hey Baz good stuff, My daughter lives in Redwood, Farquhar st, will be up at christmas, be good to meet you, have a beer and a look at the old girl. Do the auster have "an" bolts or bsf like the tiger. Wood is easy to fix, just glue more on and trim the excess off. Yes that would be good and the Auster has BA and I presume bsf although AN hardware can be used I understand. The old hardware can still be had but I'm not going to be upset if I have to replace something with AN, I want safety where it counts. ;D Baz, could I suggest that if you have to use AN hardware (traitor!) that You think about marking them with a dab of paint or something so that in years to come you don't mistake one system for the other? Could be a real bummer tring to screw a 8/32 nut on to a bolt only to find out that the bolt was BA. Or worse still to find a nut screws on but lets go under stress. |
|
|
|
Post by baz62 on Nov 9, 2011 13:07:47 GMT 12
Funnily enough I was thinking about the possibility of getting something wrong in the mix of hardware types! That's a good idea though. I will try and keep the original spec hardware, I think Anthony told me there is a chap in Aussie who has a whole truckload of BA hardware so might not be too hard to keep it original.
The one thing that is going to be interesting is putting things together as although there is a parts manual for the Auster its not one with "exploded" drawings, just a list of part numbers and their description. I don't have a copy of it anyway but the Instruction manual (For the Operation and Maintenance of the Auster J5F Aiglet Trainer) does show some detail drawings.
For example the front landing gear bolt has a little arrow pointing at if with a bubble and the details: A 25 and 29 G. Is this an Auster part number or is it BA?
|
|
|
|
Post by curtiss on Nov 9, 2011 19:36:19 GMT 12
Baz, Have a look at this catalogue. It will help you identify the correct AGS hardware for your aircraft. www.chilton-aircraft.co.uk/Images/brown%20brothers.pdfWhilst many people use AN hardware to replace AGS items, I have never seen any approved technical data that allows this to occur. Would be interested to know if there is anything though. |
|
|
|
Post by baz62 on Nov 9, 2011 20:31:06 GMT 12
Thanks for that Curtiss. Yes I'm not sure about the "approval" side of things but I do recall putting new bolts in the landing gear of my old Auster and they were AN, but I can't recall if it was because that's what was already there or not.
I will see what my aircraft engineering buddies say. ;D
|
|
|
|
Post by baz62 on Nov 18, 2011 13:16:54 GMT 12
Another item I need is a compass and I have just won an auction on the UK EBay site for a P12. Its used but would need an overhaul anyway and it comes with the all important mirror (as its mounted upside down in the roof of the cockpit) and comes in its original wooden box.
That's one thing to tick off the list! ;D
|
|
|
|
Post by skyhawkdon on Nov 18, 2011 18:03:04 GMT 12
Well done Baz! Make sure they pack it well for shipping.
|
|
|
|
Post by joesmith on Nov 18, 2011 19:54:01 GMT 12
Funnily enough I was thinking about the possibility of getting something wrong in the mix of hardware types! That's a good idea though. I will try and keep the original spec hardware, I think Anthony told me there is a chap in Aussie who has a whole truckload of BA hardware so might not be too hard to keep it original. The one thing that is going to be interesting is putting things together as although there is a parts manual for the Auster its not one with "exploded" drawings, just a list of part numbers and their description. I don't have a copy of it anyway but the Instruction manual (For the Operation and Maintenance of the Auster J5F Aiglet Trainer) does show some detail drawings. For example the front landing gear bolt has a little arrow pointing at if with a bubble and the details: A 25 and 29 G. Is this an Auster part number or is it BA? Hi Baz, Welcome to the wonder full world of AGS hardware. You will be stuck between a rock and a hard place with the AGS hardware thing. I have no mechanical knowledge of the Auster so have no real idea of what common AGS items were used but have plenty of experience with AGS. Changing to AN hardware may seem like the easy option to start with,but you may find that you will have to stick with the AGS options in some areas. If you can, stick with the original spec. There are some AGS items that there is no AN or MS equivalent replacement. The countersunk screw and rivet angles differ as well. The down side of AGS hardware is the difficulty in finding all the items you require. You will get there in the end. Identification between AN and AGS hardware is not that difficult as there is a difference in the way the hardware is marked and of course with bolt heads and nuts the dimensions across the flats differ (= two sets of tools required) Your A25/29G translates to A25 = standard high tensile steel BA or BSF bolt. 29 = length of bolt grip in tenths of an inch, ie 2.9 inches. G = common identification for 5/16 BSF. as in 5/16 inch diameter. Good luck with your mission  |
|
|
|
Post by baz62 on Nov 19, 2011 9:18:04 GMT 12
Thanks joesmith. Yep think I will try and stay with all AGS besides I'm enjoying the hunting for bits part of the rebuild. I have found a source of AGS hardware in Aussie and the US and of course there is always sunny old England.
And don't worry Don that compass should be packaged within an inch of its life! ;D
|
|
|
|
Post by ZacYates on Nov 20, 2011 21:02:30 GMT 12
Great to hear about your P12 score, Baz! That will be an interesting before-and-after.
This is a wonderful thread and, as I edge closer to beginning my own resto, both educational and inspirational.
|
|
|
|
Post by baz62 on Nov 21, 2011 21:17:57 GMT 12
Glad to hear that Zac (or rather read that) hoping this will inspire someone to leap into their own project! And for those who don't want they can enjoy the ride with me! ;D
|
|
|
|
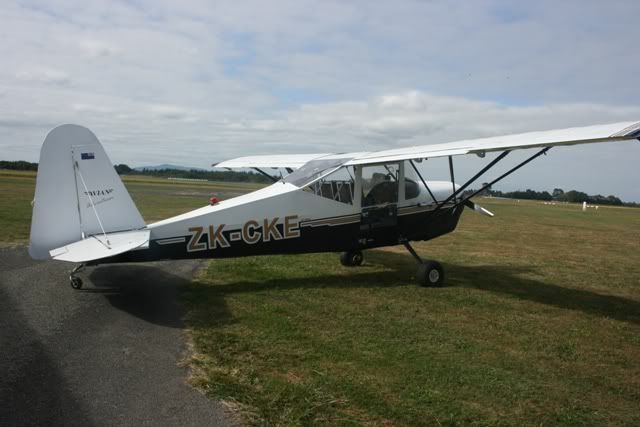
Post by baz62 on Nov 28, 2011 16:53:47 GMT 12
Well Sunday morning marked the day I actually turned a spanner on the Auster! (Yeah about time, only bought it in August!!) First job on the fuselage is to strip everything off that Bob bolted on. Reason for this is it was mostly put in place for the 75th Anniversary of the Canterbury Aero Club. Here she is in their hangar in 2003. Photo credit Canterbury Aero Club via Ron Ark.  So some items are held on by bolts that probably came from Mitre 10 and some are just got nuts on and no split pins etc etc. As I mentioned before a bit of corrosion is evident on some items so best to get it all off (apart from the wood work) inspect it all, repair as needed then put it back on in the approved manner. So I decided to start from the front and take the control column and the "arch" that they attach to. Here it is in the cockpit:  I took a few close up shots so that I could see what went where. Pretty simple though.    This is the port side bearing for the arch. First close up photo shows the starboard side which has the elevator cables attachments visible.  Remove the cables, undo 4 nuts, wiggle the bearing caps off and hey presto she is out.  On the bench with the brass shims providing the bearing surface along with a bit of grease.   The idea of the small brass washers you can see is (I think) so that when you tighten up the retaining nuts on the bearing cap it doesn't squeeze the brass shim too tightly onto the arch bearing surface. If it did it would be difficult to move. I would say a bit of trial and error goes on here with a different number (and probably thickness) of shims to get the "fit" right. Feels ok though so will put the shims in a safe little bag for safety! Although these castings bolted on the frame look ok I'll take them off to make sure there is nothing nasty going on where they mate against the fuselage frame. And check the bolts as well.   The actual "arch" itself looks in very good condition and may actually have been stripped down and put back together. The bolts that hold the columns on for example look new. Bit undecided about the colour though as the frame is a nice light grey and we have a black control column setup. However the rudder pedals are also black and the (probably un-restored) flap lever mechanism is also black. And I have been told some did come from the factory like that.  There you go, that should keep you happy for a while. ;D |
|
|
|
Post by ZacYates on Nov 29, 2011 19:21:18 GMT 12
Darn you and your covered storage/workspace relatively near your home! I'm suffering such severe withdrawals that I'm actually making a model of my Fletcher from scratch!
Great to see these and your FB updates, please continue to keep a log as they'll be great to look back upon. Have you contemplated occasional video diaries also? The team restoring the B-26K in Texas have a resident videographer recording their work and it's a cool, "almost like I'm there" way of showing progress. I'm contemplating such a thing when I eventually start CBG.
|
|
|
|
Post by baronbeeza on Dec 2, 2011 21:14:04 GMT 12
 Not so sure about a project..... I did dick about with this for a while today. If it is not fixed within four days I will get distracted and be on to the next one. Perhaps I need a target, - like beating an Auster into the air. |
|
|
|
Post by ZacYates on Dec 2, 2011 22:03:09 GMT 12
Now now, there's no need to show off - we all know the Fletcher is bigger than both of your planes :-P
|
|
|
|
Post by baz62 on Dec 5, 2011 20:02:42 GMT 12
Not so sure about a project..... I did dick about with this for a while today. If it is not fixed within four days I will get distracted and be on to the next one. Perhaps I need a target, - like beating an Auster into the air. More competition! So its an ex RAAF aircraft? What is it? I've stripped some more bits off the Auster and she is looking a bit bare up front now. With the control arch and columns out I removed the "dashboard" which basically fills in the gap between the instrument panel and the windscreen and started removing the panel and the instruments.   One of the instruments had the rego BLZ which according to a list of NZ Austers Shane Glassey gave me was a J5P Autocar and the CAA website states its registered to a Mr N C Jones of Christchurch. Wonder if its flying?   My new shelves setup and start filling up with parts as I take them off. Loose parts like pins and bolts etc go in a wee plastic bag with a note so i know whence they came!   This is a shot from underneath the cockpit showing the brake and rudder pedal setup. I'm taking a lot of photos so I can refer back to them when I start putting her back together.  Bit of surface rust on the brake pedal shafts.  Here is a close up shot of one of the bearings for the rudder pedals. Like the control arch its a grease and brass shim arrangement.  The rudder pedals and instrument panels are gone now.  I had a nice new air compressor to sort out so after a bit of assembly and a test run I decided to put some more air in the tyres and take BBZ out into the sunshine.   That's all for now. I will be seeing Anthony Galbraith tomorrow as I'm off to get my eyes checked and sort out some new glasses as the ones I've got don't cut the mustard anymore. As a fellow Auster nut we will have lots to discuss! My next update will probably see just a bare frame (with the wood still on)and then I can start moving forwards! ;D |
|
|
|
Post by agalbraith on Dec 5, 2011 21:47:16 GMT 12
Hey Baz
Yours is looking more and more like mine every day! Great job on the disassembly mate. It will all be worth it.
See you tomorrow to get those eyes sorted! I aint flyin with a blind man!
Cheers
Anthony
|
|
|
|
Post by baz62 on Dec 11, 2011 11:23:54 GMT 12
Went out to the hangar yesterday and Anthony came along too. (Yep didn't take long and he was looking in boxes for Auster treasure ;D)
We wheeled the wings on their loaned wing stand outside and used the air compressor to blow some of the dust and crap off them, then back inside and covered them with a tarp.
We wheeled the fuselage outside too and got stuck in with rags to wipe off about 10 years of dust off her. The woodwork looks a lot better now where its been varnished and the paint on the frame is still shiny.
After Anthony went home I carried on removing bits and pieces until she just has the trim control in the roof and the flap handle and mechanism to remove. And the rear floorboards.
Then I can look at whats come off and see what needs restoring/repairing/overhauling/replacing before returning to the fuselage!
I will post some photos shortly but I have misplaced my flash drive. Basically I can't upload onto my PC as I haven't got a card reader so I was putting them on Teresa's laptop (which has a reader) then grabbing them on the network onto mine.
Then (probably due to some fiddling I did to the router to try and get the game Battlefield 3 to play better online) i found I couldn't get into Teresa's laptop on the network anymore.So used the flash drive to transfer them...........................and now I can't do that! Flash drives, they need a beacon like aircraft for when they go missing!
|
|
|
|
Post by nuuumannn on Dec 11, 2011 13:35:21 GMT 12
Great stuff, Baz, following with interest!
|
|
|
|
Post by baz62 on Dec 11, 2011 15:13:36 GMT 12
Thanks Nuuuuuman. Well if you look at these photos you can see she is looking a bit different! August 2011  September 2011  10th December (ie: yesterday!)    Here are the wings on their stand (on wheels which is very handy)  Not much up front now!  This slightly out of focus shots shows the lower part of the seat frame. You are looking at the seats from the front looking rearwards. The seat backs (which fold forwards to access the back) go on the tube at the back.  Rudder pedals etc and parts in bags waiting to be inspected. The rusty item in the right foreground is one of the foot steps, and while Anthony was nosing around he spied a third one in one of my boxes!  Well thats all for now might be a wee while til the next update so try to hold on til then!! ;D |
|