Just a week out from Anzac Day, an Auckland couple who did their bit in for the Allied cause in codebreaking and Bomber Command have died only days apart, after more than 70 years of marriage.
Margaret 'Peggy' Miller (nee Hyland), served as a Navy Wren at the famous Bletchley Park codebeaking facility in Milton Keynes. She was 93 when she died on April 18, three days after her husband James 'Drum' Miller, 94, a Lancaster pilot with 75 (NZ) Squadron, RAF.
Rob Miller, the third of their five sons, remembered his parents as "stoic people"
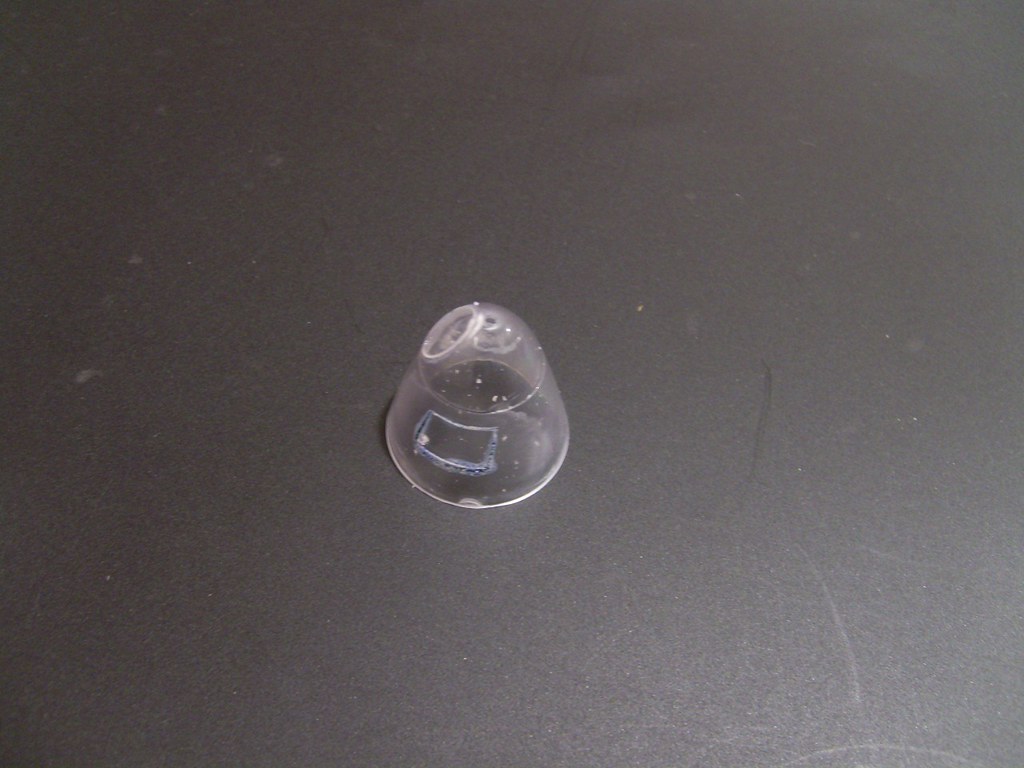
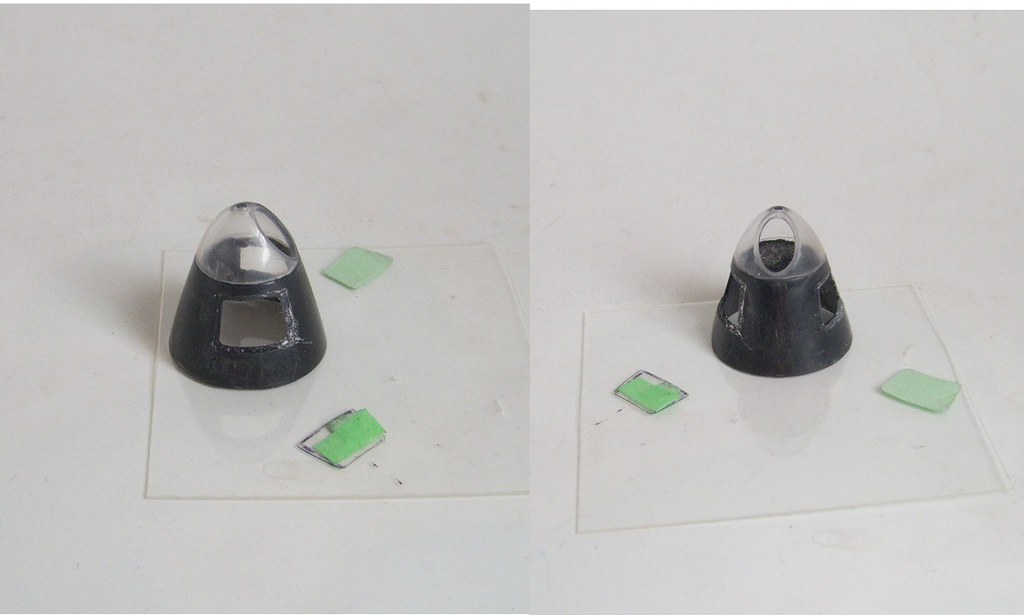
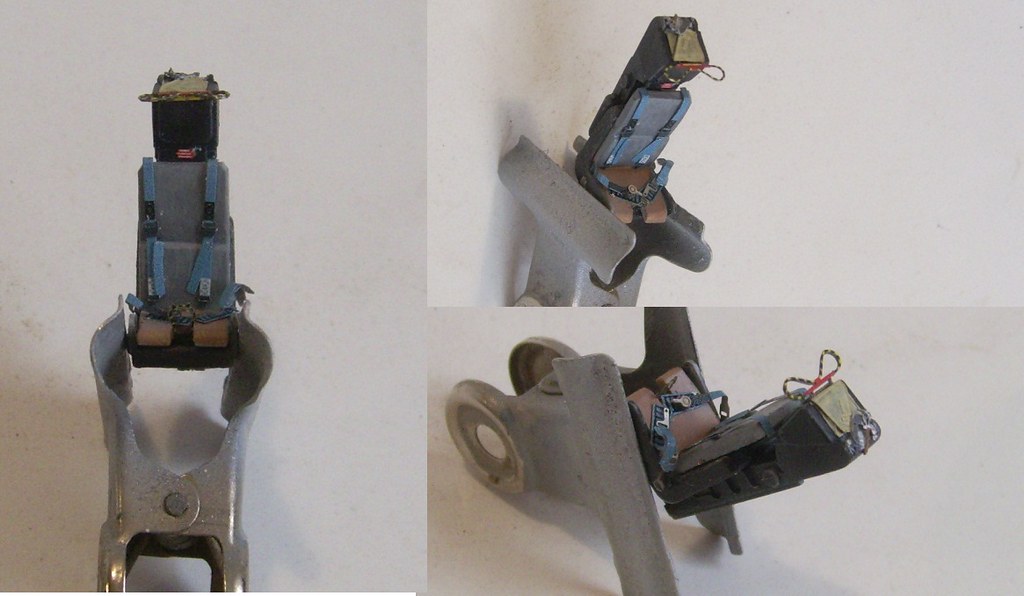
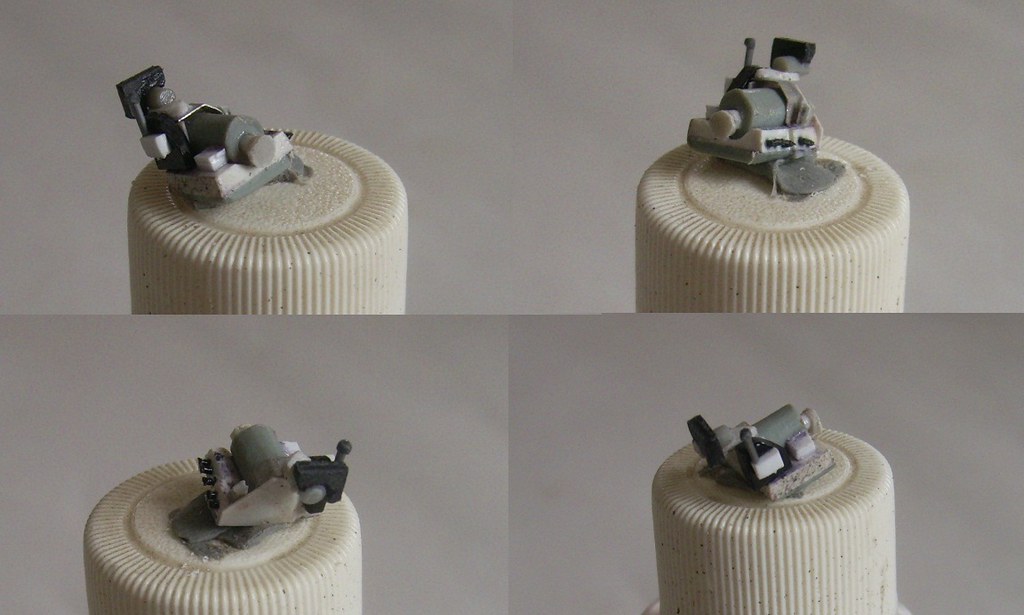
Not long ago I had found a pdf showing details of the deck aft of the pilot's seat, then promptly lost the screen-caps. It was a B&W shot that seemed to show installation of the ejection seat.
Would anybody have an idea of the rollover structure behind the seat, please?
Outside this morning (Friday) I heard and saw two sexy, low-wing, dark turbo-props transitting southbound, south end of Lk Taupo. Can't have been over 1,500 ft.
Air activity over the manor is mainly rescue choppers and light GA stuff on weekends. Or the rare StrikeEx (on the power station) by visitors during air shows. So the growling hum of turbo-props stands out. Had the inevitable "Wha' . . ?" moment, followed immediately by "Oohh . . . of course."
Maybe a X-country NavEx? This is the first time I've heard them i ntheir natural elementy.
Regards
Rossky
Last Edit: Aug 26, 2017 1:54:55 GMT 12 by general: typo
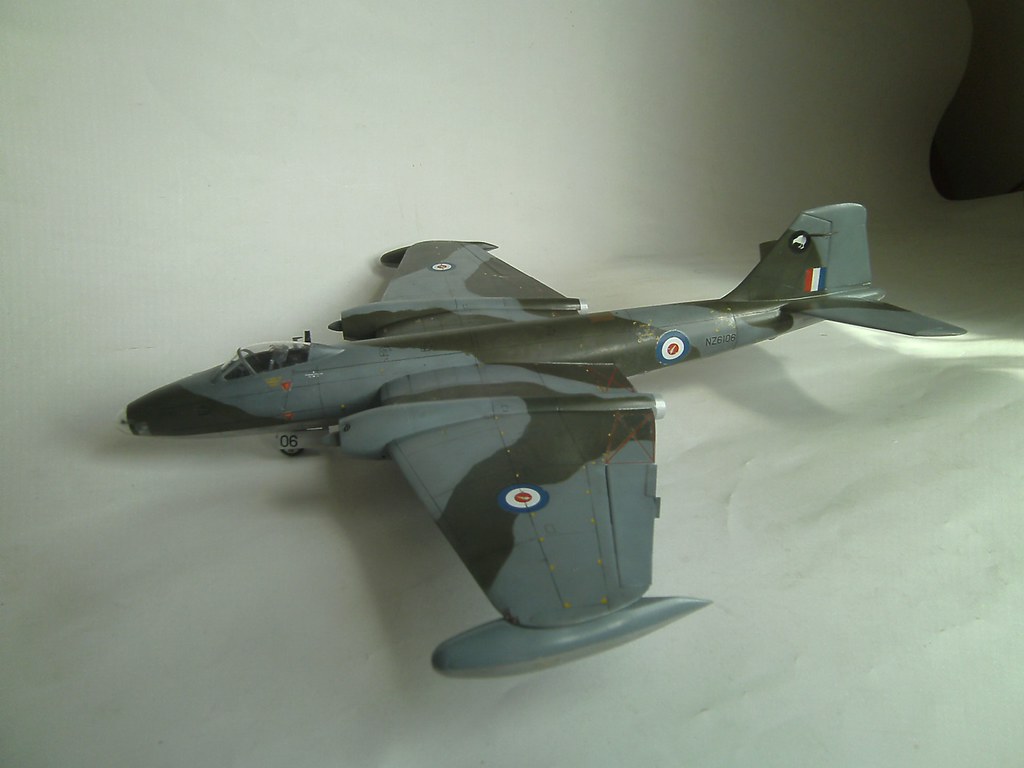
Roger that, Shorty. I had tunnel vision with the tail antennae. Winding it up with the clear coat I only then noticed some pics that showed a patent lack of them on NZ a/c. Nertz. Doesn't worry Kevin.
Some pics did show the towel rail, some didn't. So Ieft it out. Next time I'll add it. And the pylons.
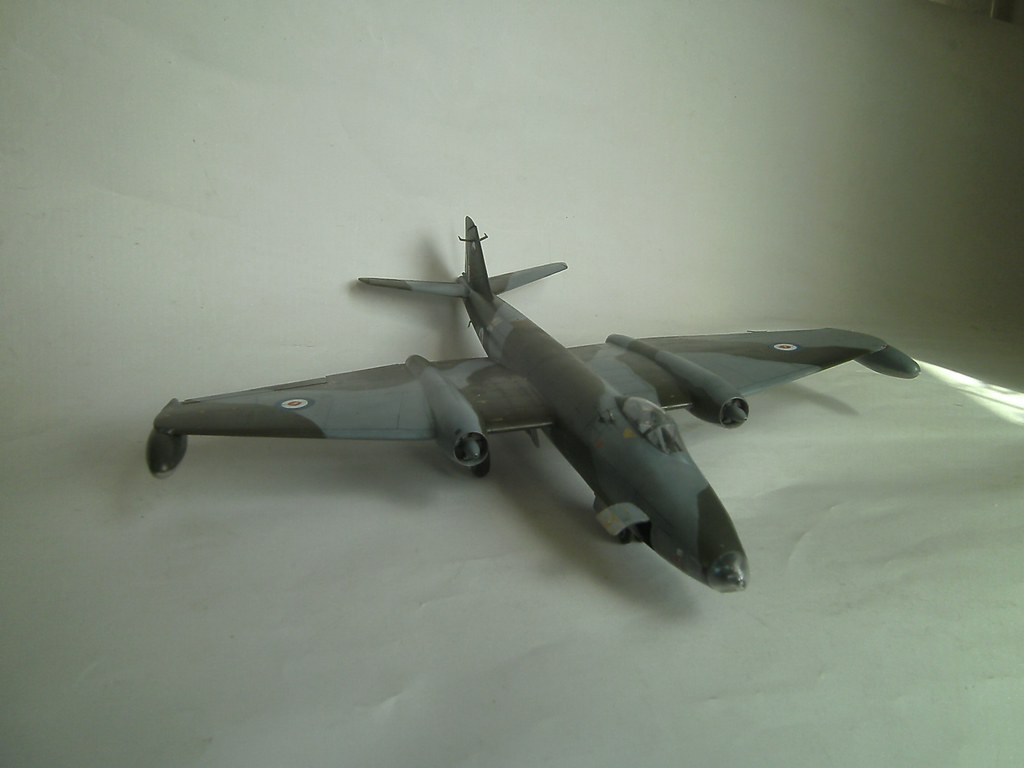
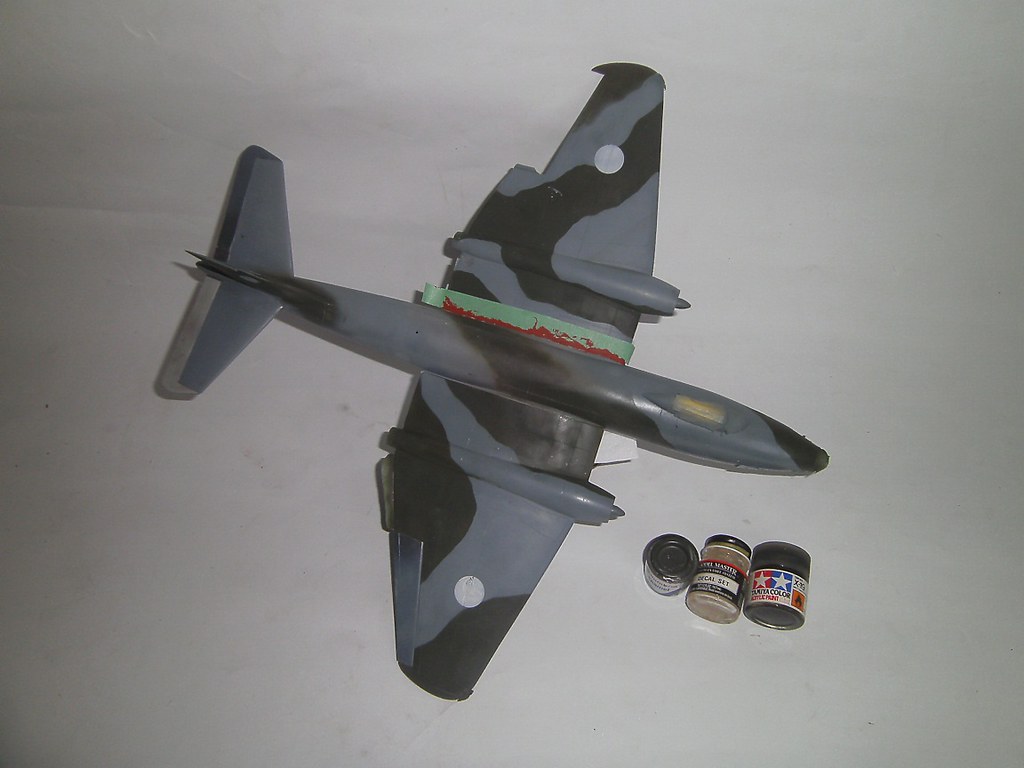
There’s colour in Canberra. Looking more like the real thing now.
I masked and painted fuselage and wings separate. Well, most of the fuz. I’ve left the rest of the paint til I’ve done the wing root seams. Dealt to the seams on the major components while still apart. It’s far easier considering how big she is together. It’s also a lot easier masking/painting the engine nacelle demarcations off the fuselage, without manipulating all that mass.
Though I’d picked up a new tin of Humbrol 116 I thought I’d try an old tin of Hu 75, mixed with Hu 226 to lighten a little. The 75 is old and I didn’t realize how much crud and dried paint ended up on the bottom. Took a bit of work to stop spattering, double-straining and futtering about with viscosity.
Broke out the Hu 116 for giggles and, stone me, barely any difference to the custom. Things that make you go ‘Hmmm.’ OG is courtesy of some Revell 57 I picked up in Oz. Incidentally, Humbrol 5 Gloss grey is also suggested on colour charts as close to OG. Diluted some with white for comparison. Good idea for the next one. It’ll save a gloss coat for decalling.
I like Humbrol’s Polished Aluminium for NMF. Cheap and cheerful and I dilute with white to reduce the metal flake. I shoot a coat of semi-gloss clear to knock off the sheen. Works well for a scale Hi-Speed Silver.
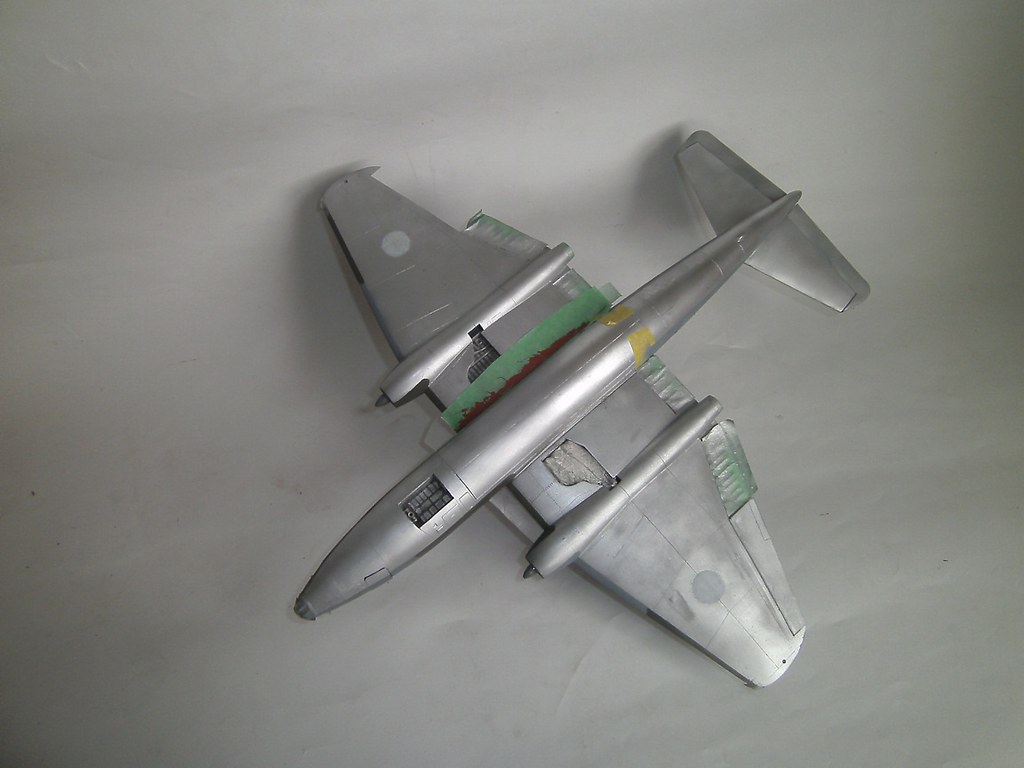
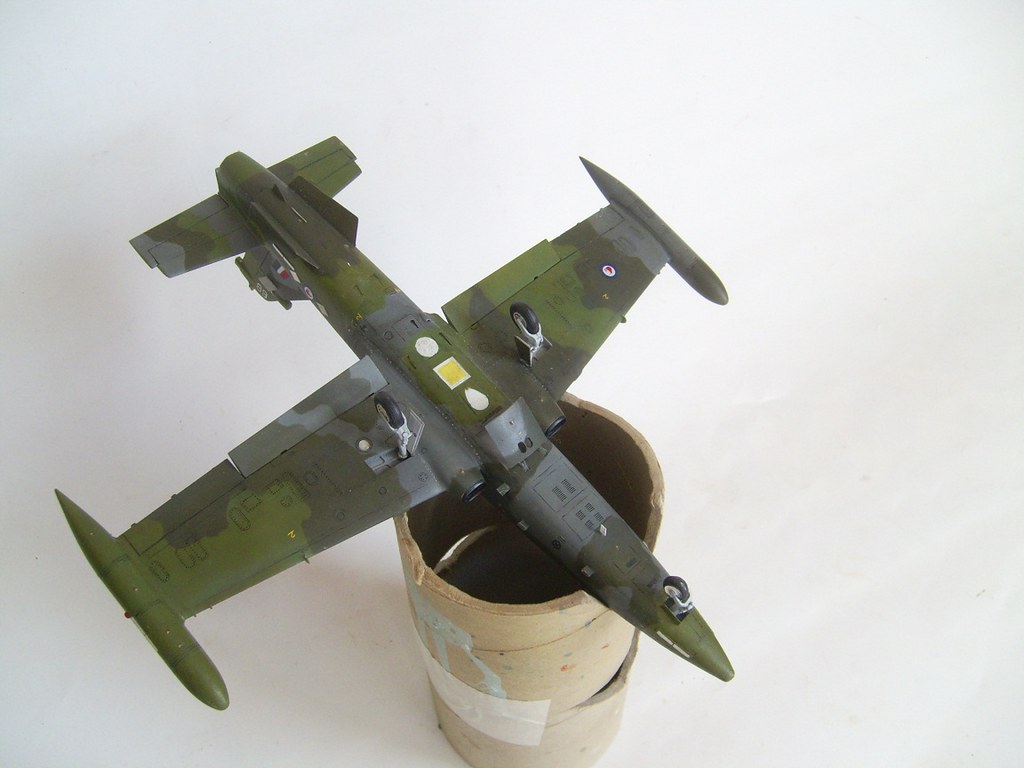
With the wings on I plonked it on the scales for research purposes. In this config she pegs out a biscuit over 340 gm. That’s one big bird. Safe to say she’s the heaviest thing across my bench by far.
Masked and painted white for the main markings. Word on the street is Airfix’ markings aren’t quite as opaque as expected. With masks off I whacked it with semi-glass clear. Once dry I cut the edges with 1200-grit. That means the gloss clear for decalling will be smooth.
Gone are the Halcyon days of prime/mask/paint/clear/decals. Half the work of my painting is now fine-grit wet-sanding between coats, to maintain smoothness. I do like a seamless finish. Used to be, I watched ‘Master Classes’ on vid and thought to myself, “What a lot of work. Why bother?”
Now I happily plug away, years later, doing the same thing. The irony.
Gentlemen. This has been rather a protracted absence, hasn't it? Much of the distraction has, to no surprise, been fill/sand/repeat. Duelling with ghost seams, scribing scars and untidy panel lines is my Sisyphean task.
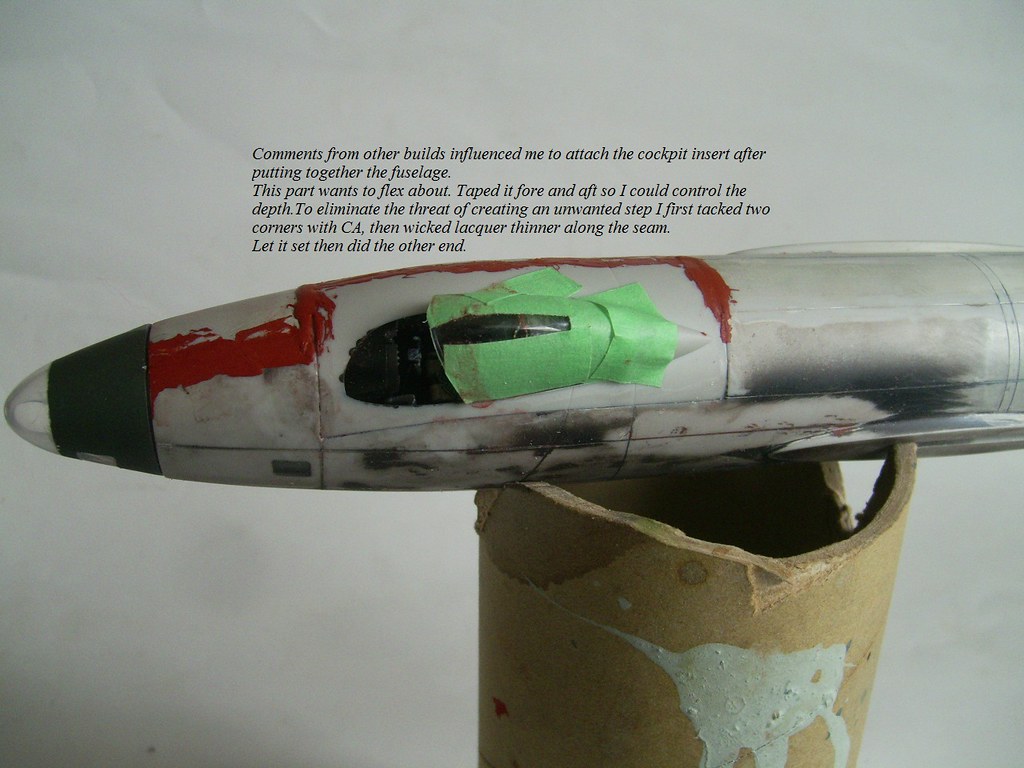
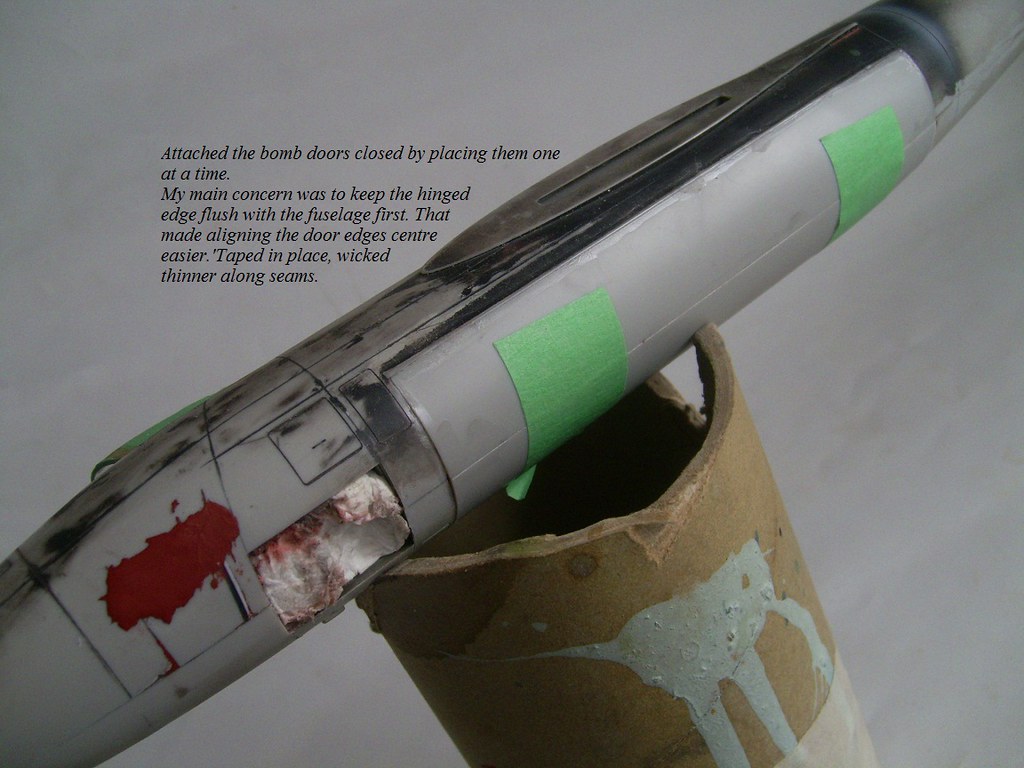
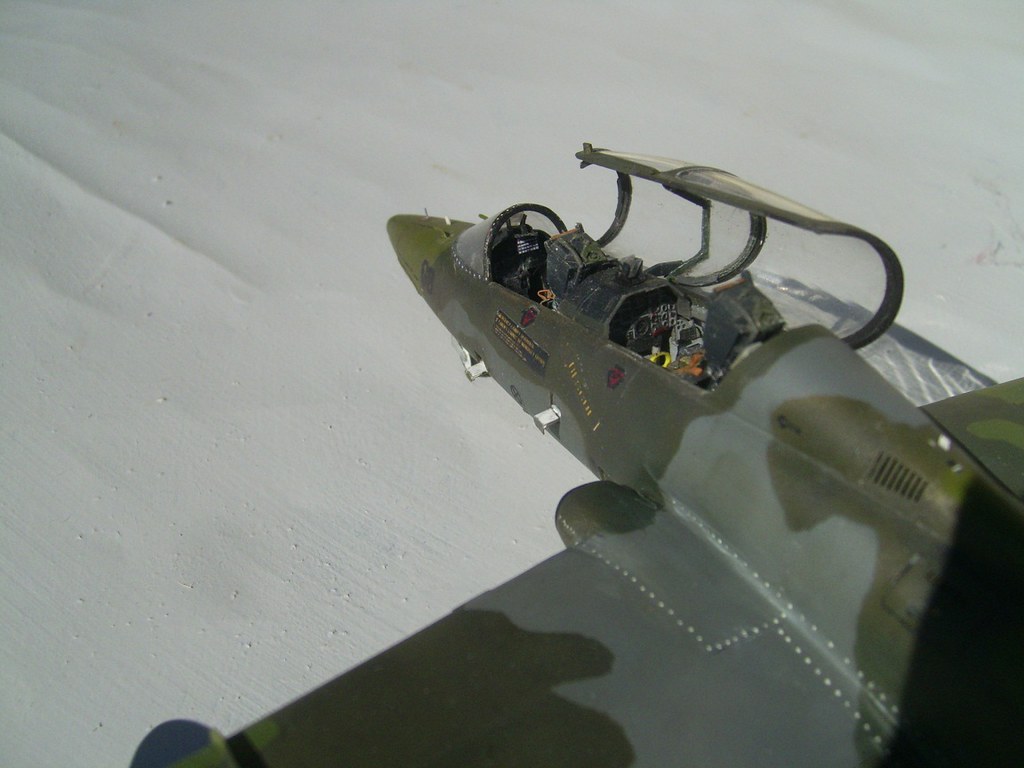
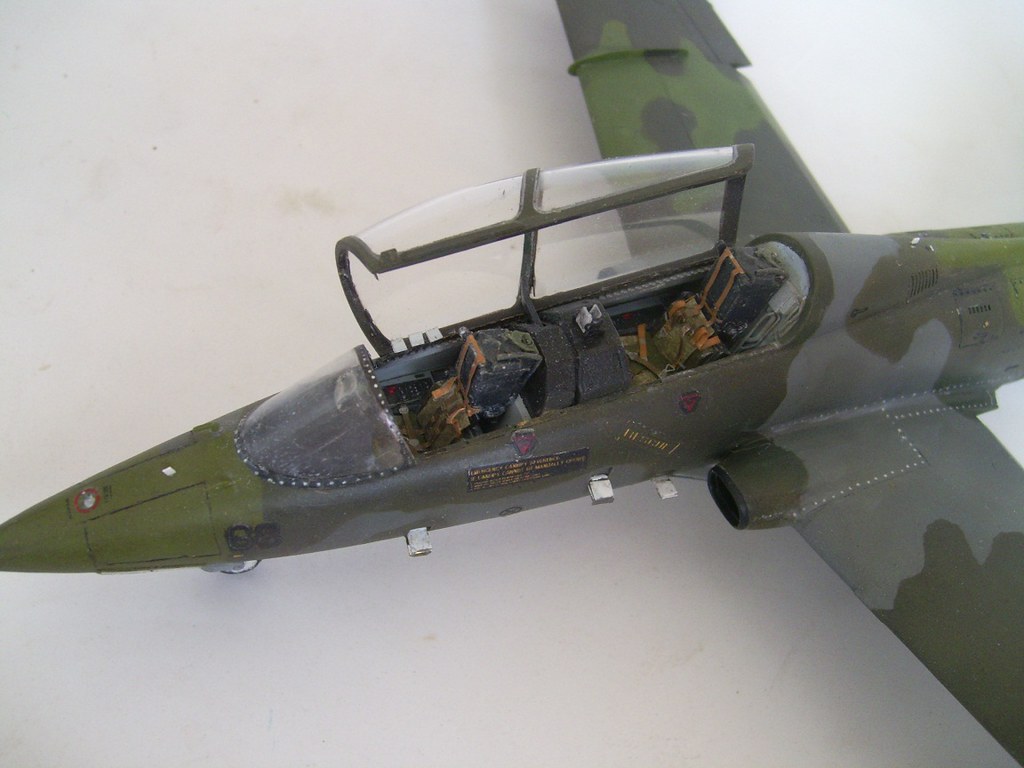
All that filler around the cockpit looked rather messy. But the final seams were quite snug and left minimal gap. It still takes care to mount it flush with the fuselage, and avoid the hazard of pushing it in to far. I did, unfortunately, on the left/rear corner. Next time I'll eliminate the step with styrene.
Canopy's now Futured and ready to attach. Nose is on and I'm beating the seam into submission. I'm dealing to the fuz and wings as separate components, for convenience's sake. When I'm happy the acreage of surface passes muster I'll put wings on. A little Academy P-51B is tagging along, too. While I wait for stuff to dry.
What a nostalgic sight. I mustered for Taupo's dawm parade. Big turnout, at least 3,000 I 'd estimate. It's encouraging to see youth involvement. As long as we continue teaching the past it will not be forgotten.
We had rather a diverse national flavour. The national anthems of NZ, Australia, Britain and France received honours. A contingent of French 'parachutistes' from Noumea gave the Marsellaise a good airing. The British Army rugby team is touring currently. Some big lads! McD's put their coffee cart outside the RSA for free coffee. I had ot wait for the wall of Brits to dissipate, to get in.
Interesting chat with a trainee RNZAF pilot, currently on the Texans. Got more gouge on the transport wing updates, too. A Brigadier from Cambridge, Lt Col from Waiouru and Lt Commander, Navy. (Devonport?).
I was reminded this is the 100th anniversary of the Somme. Heard some time ago the 20th century is so far the bloodiest century in history. Casualties and killed outnumber all previous centuries combined.
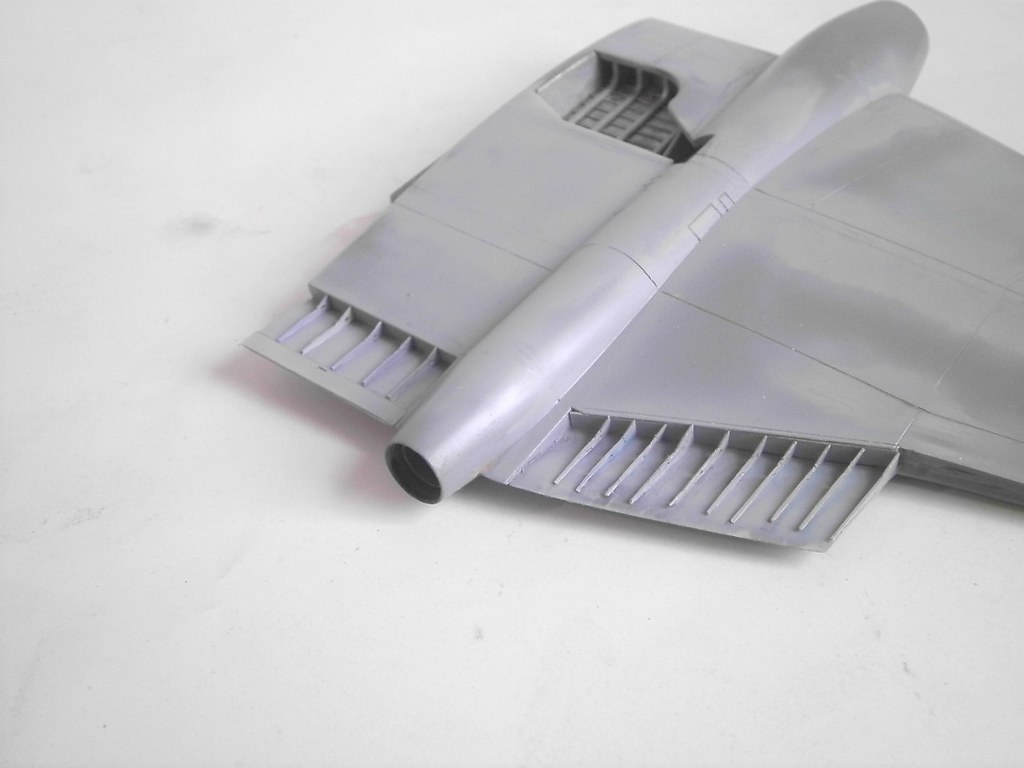
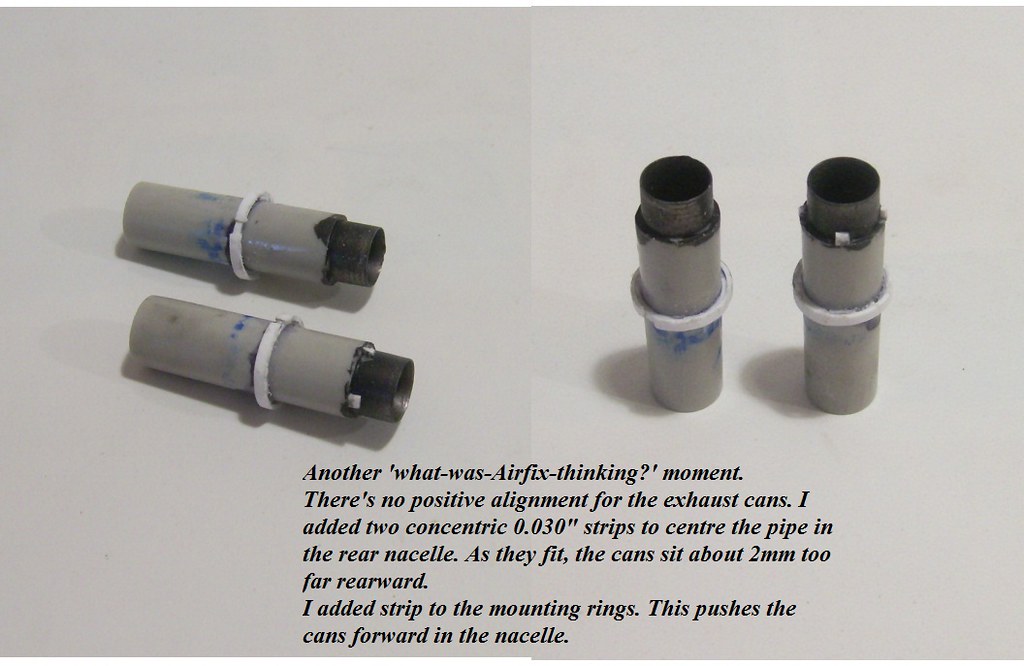
Pardon the delay. I know, I know, you’re all waiting for the paint bay. Patience isn’t a virtue of many kit-bashers, is it? So, this is what the exhausts look like.
I was a little ambitious/optimistic filling the incorrect window trenches , in the nose. Sodding sprue goo scarred the clear plastic. Whoopsie. Time to employ my usual fix, the tricky task of drilling/filing out the window and rebating some clear inserts. I brush-painted the interior grey/black, rather than the normal way of spraying the interior colour under the external. A better effect, when viewed through the clear.
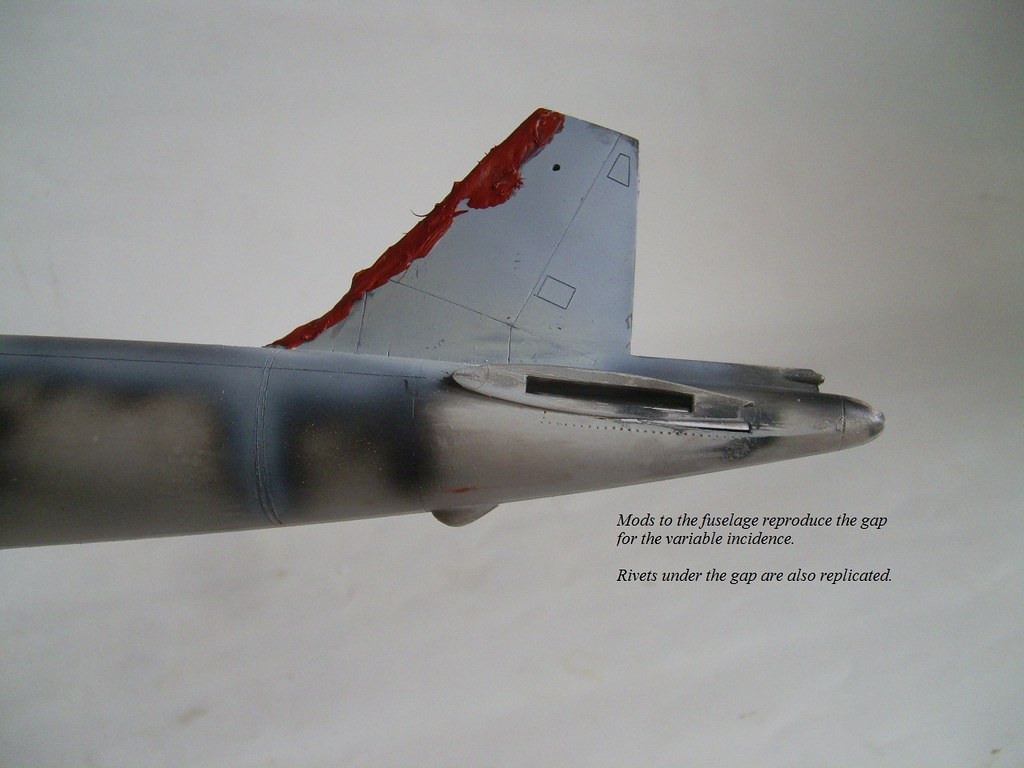
Here’s a look at the mods to the elevator profile. Filed on top, original in blue. The kit has a fillet full-length of the hori-stab, when the elevator sits flush with the fuselage. I removed the fillet rear of the hori-stab, and the black styrene extension fills the gap.
Since Airfix skimped on nose details, with a weird pole the only thing sticking up behind the nose glazing, I scratched something from styrene/litho based on pics of a B (I) 8 bombsight. Might be a bit big.
Gentlemen. What a relief to break the finishing tape on this one. Bashed on the past four days, getting the last niggly things done, on Kevin’s MB339 He chucked me a message last week he’d be in the manor. That was motivation enough. Time to extract digit. This is another for his shelf. My 'Macchi is sulking in the stash. I'm fair itching to crack it after the 14 Sqn theme, since Kevin's Canberra's on the bench now.
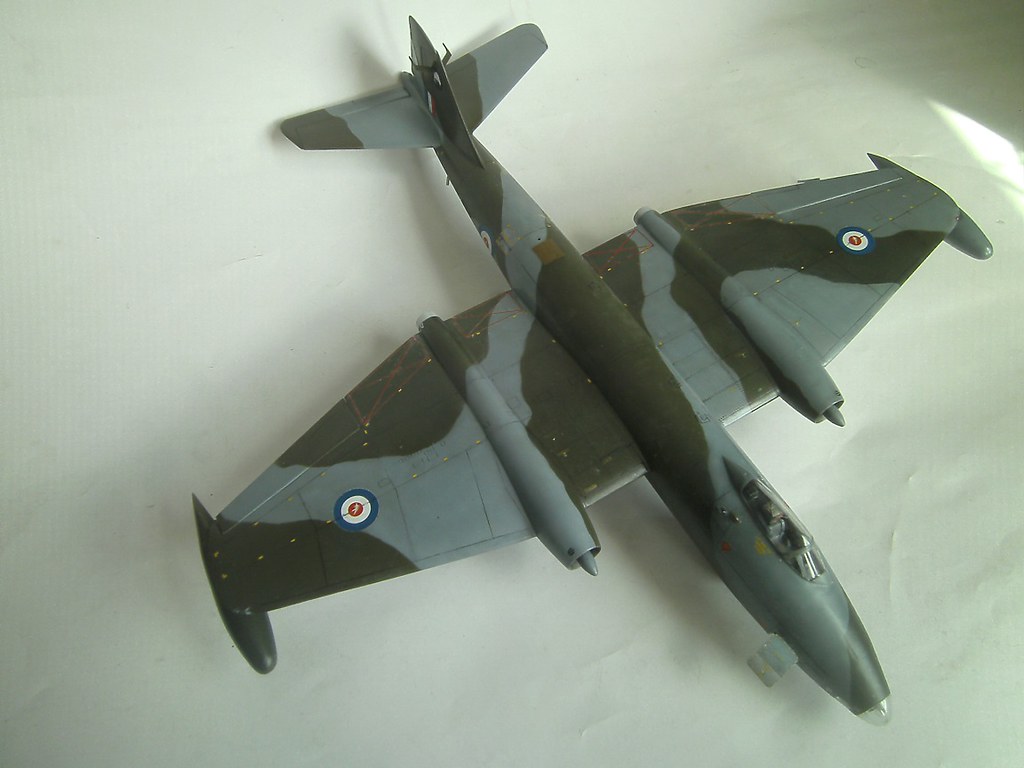
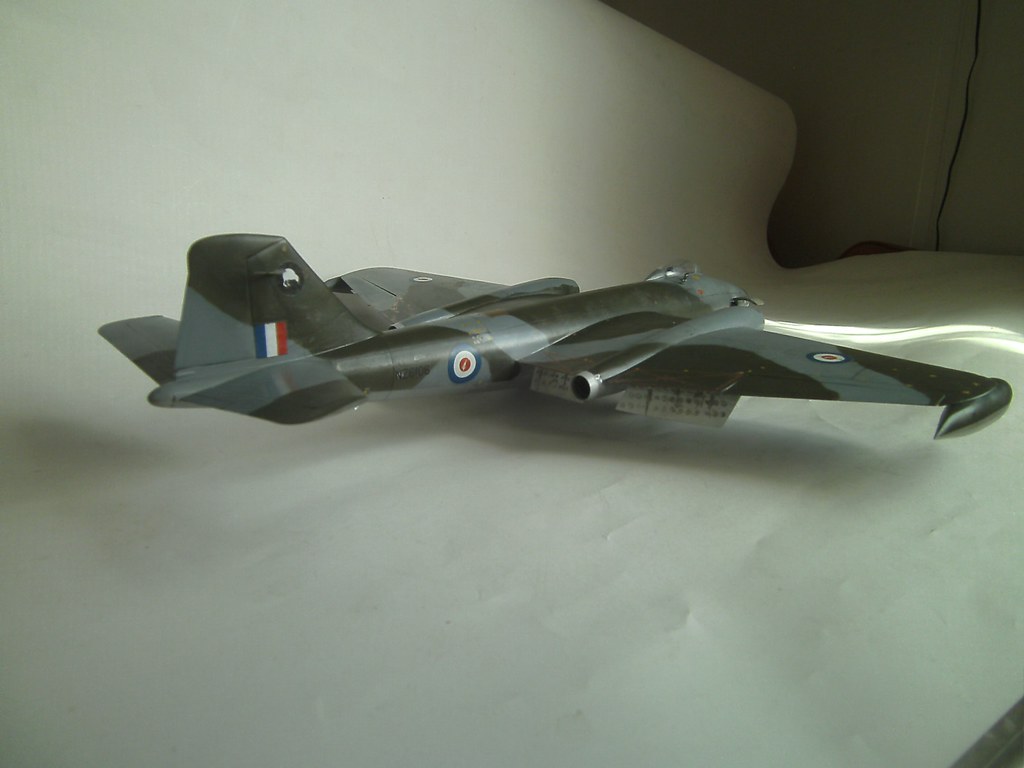
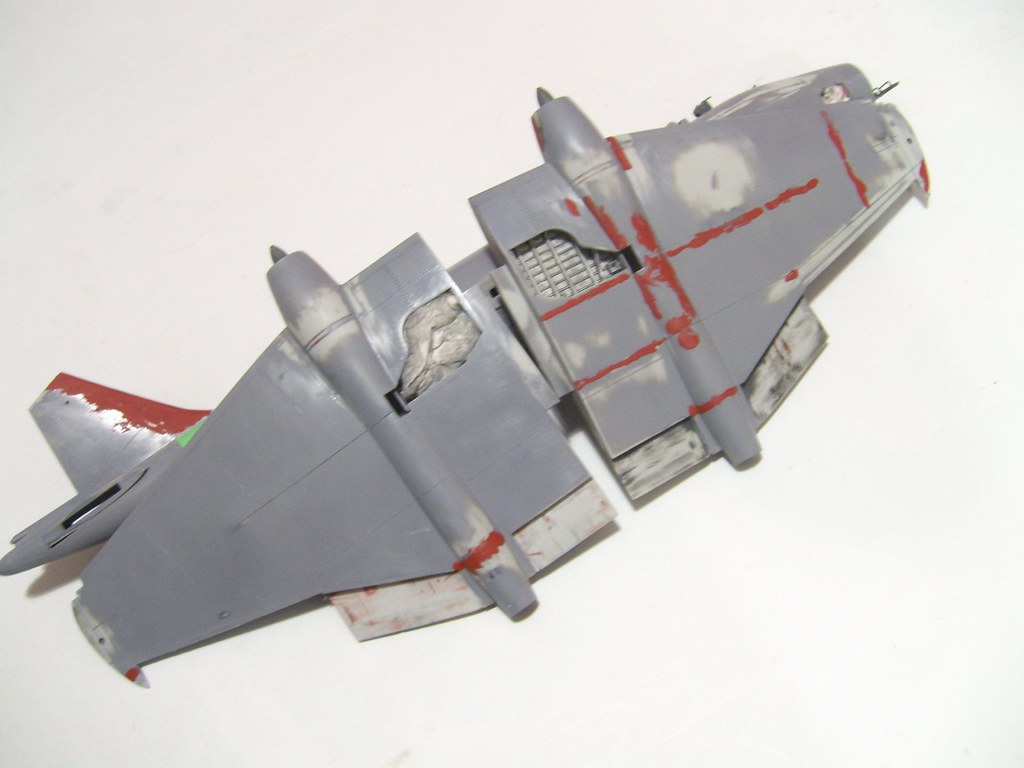
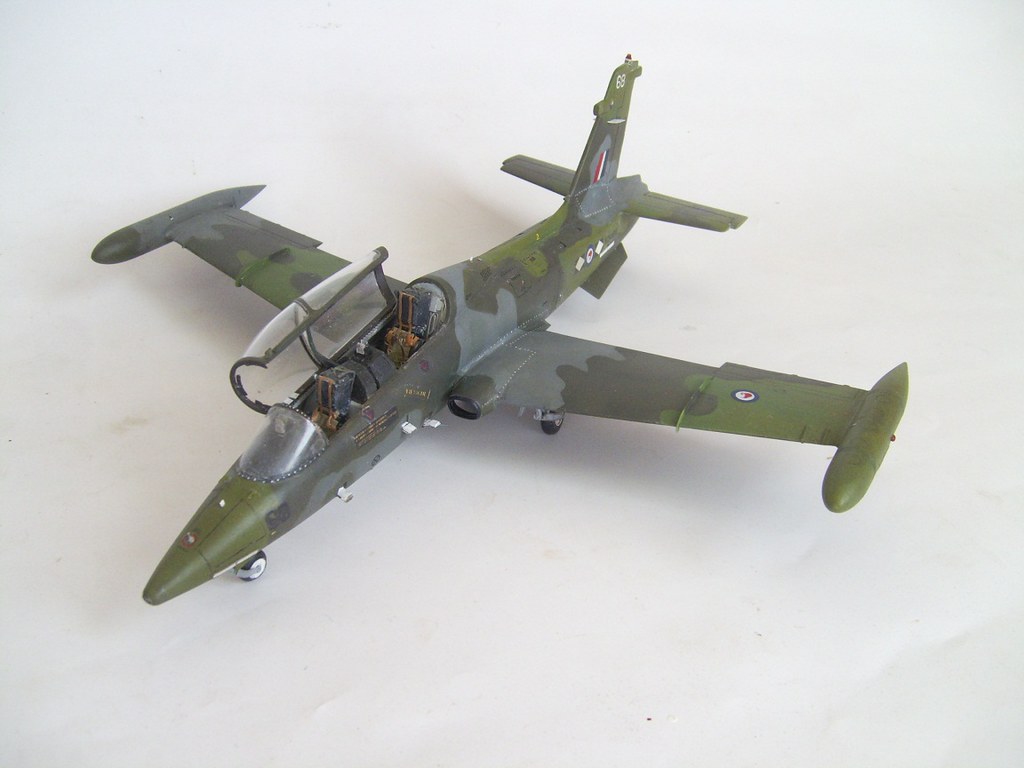
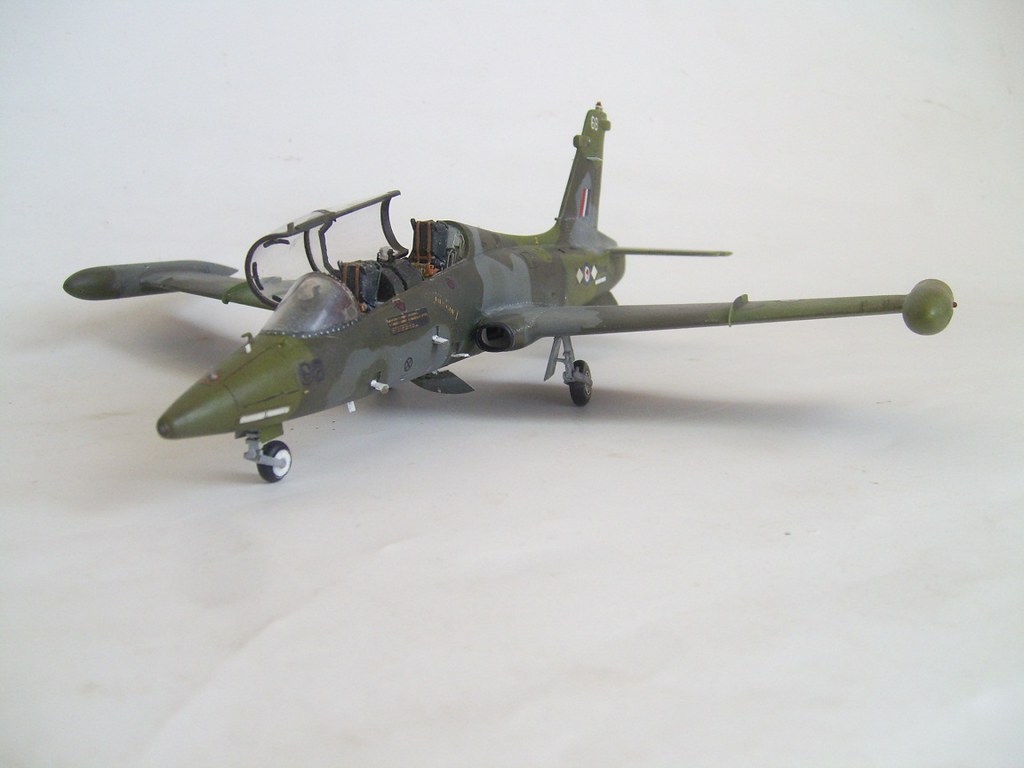
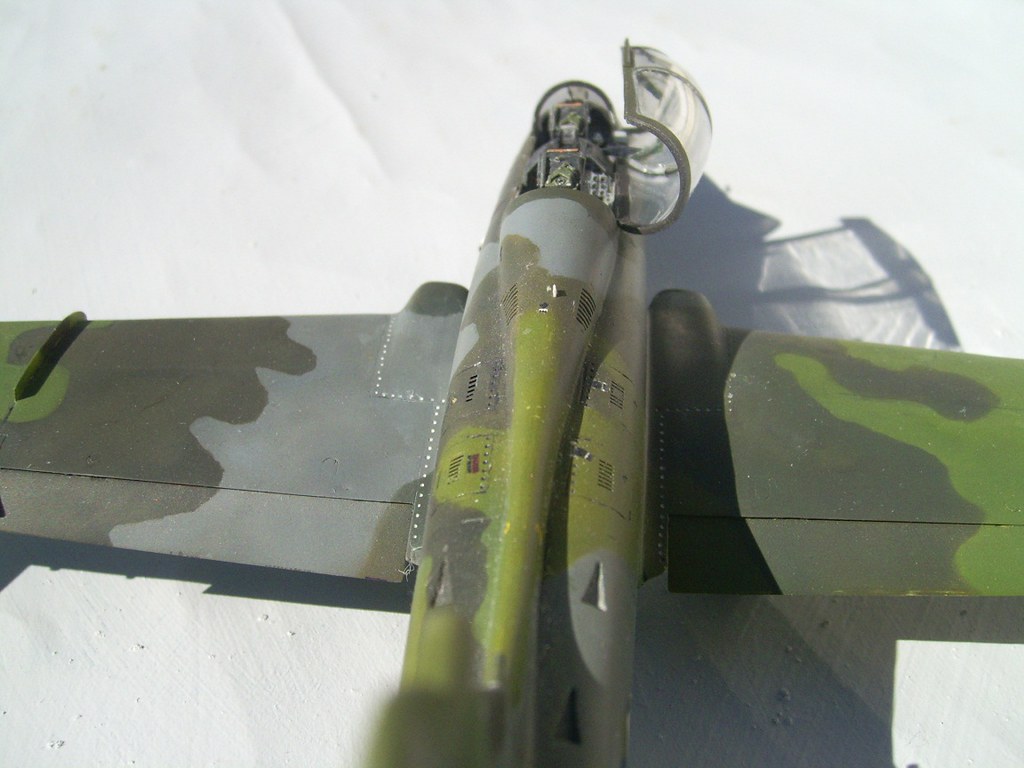
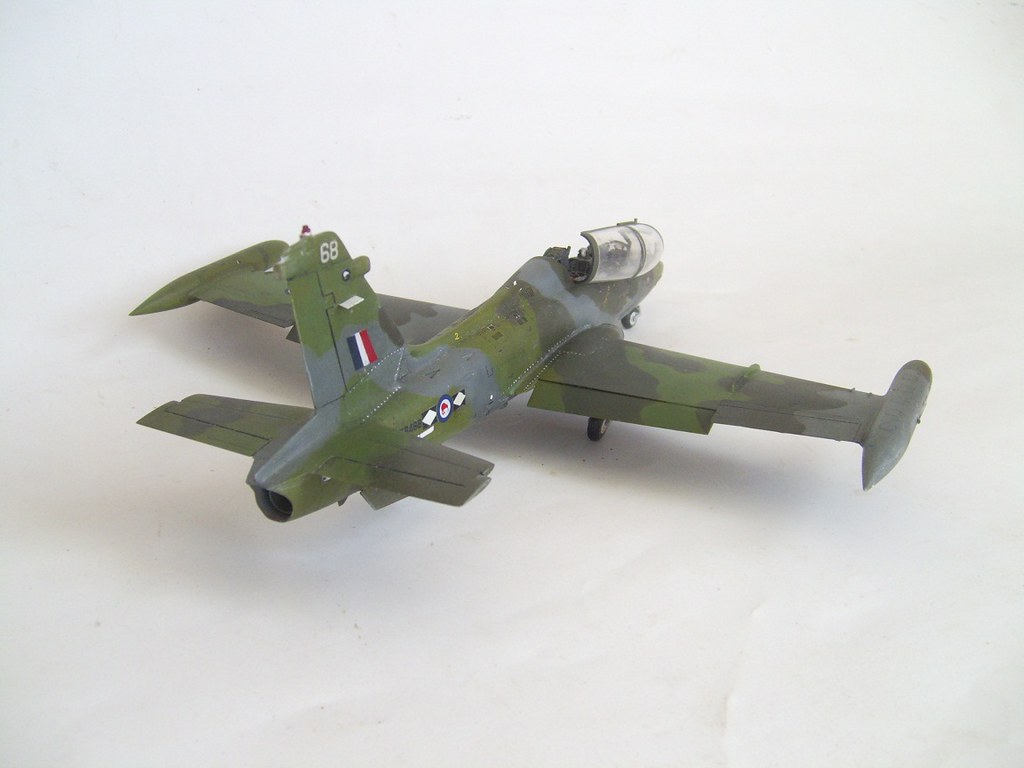
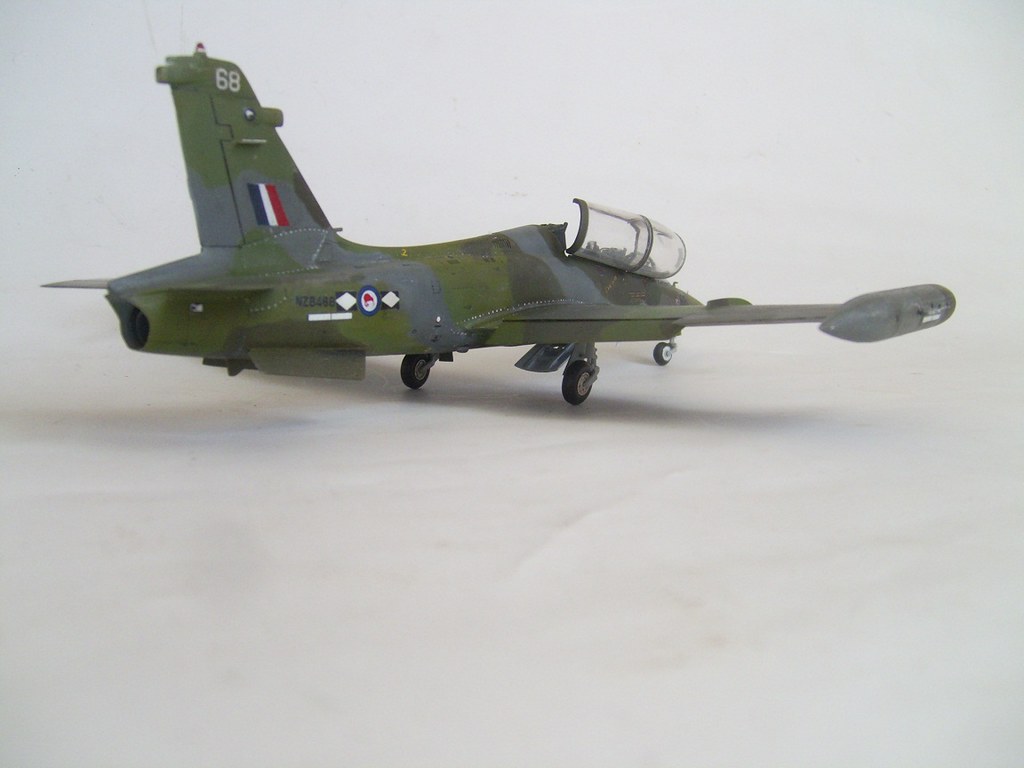
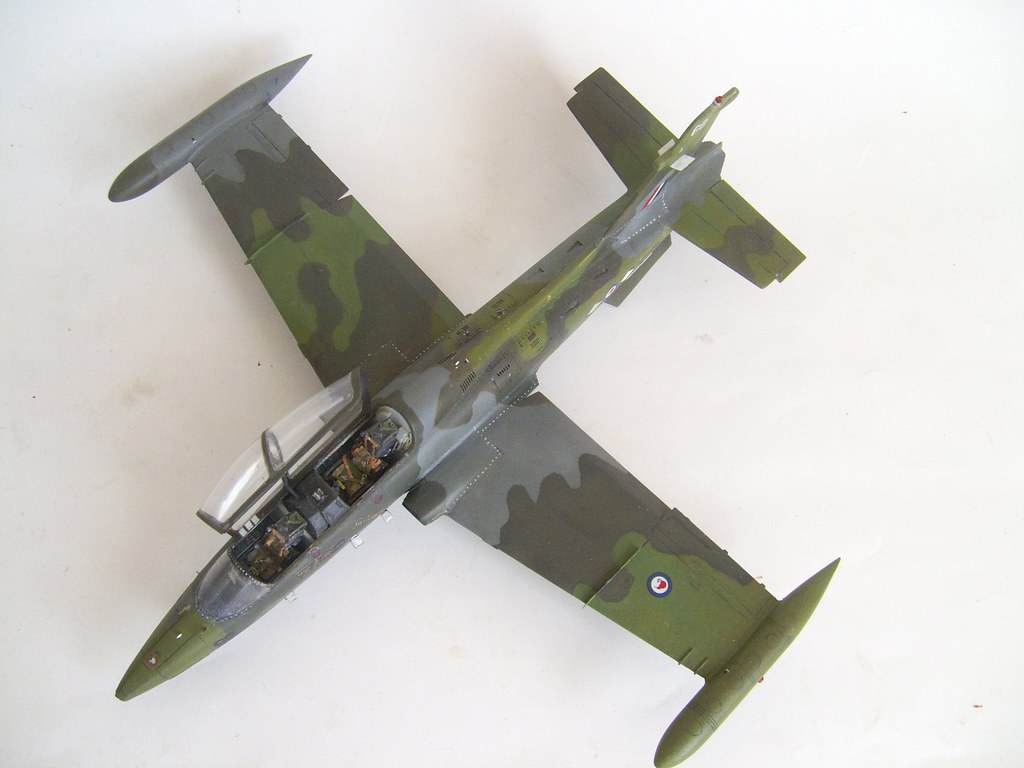
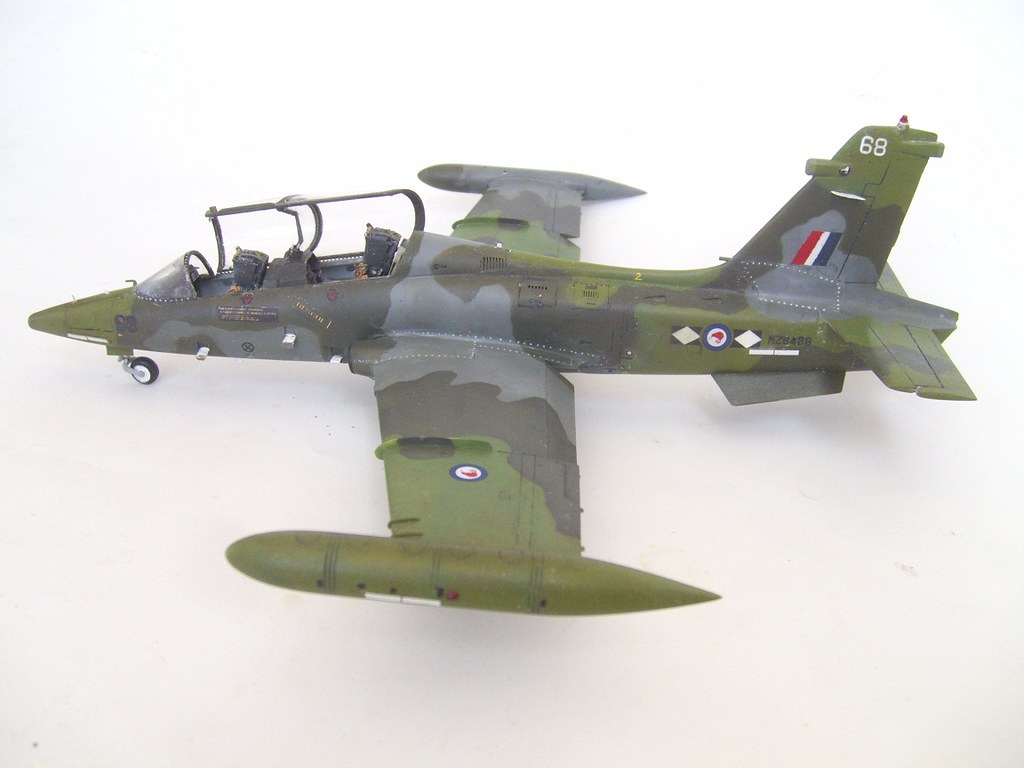
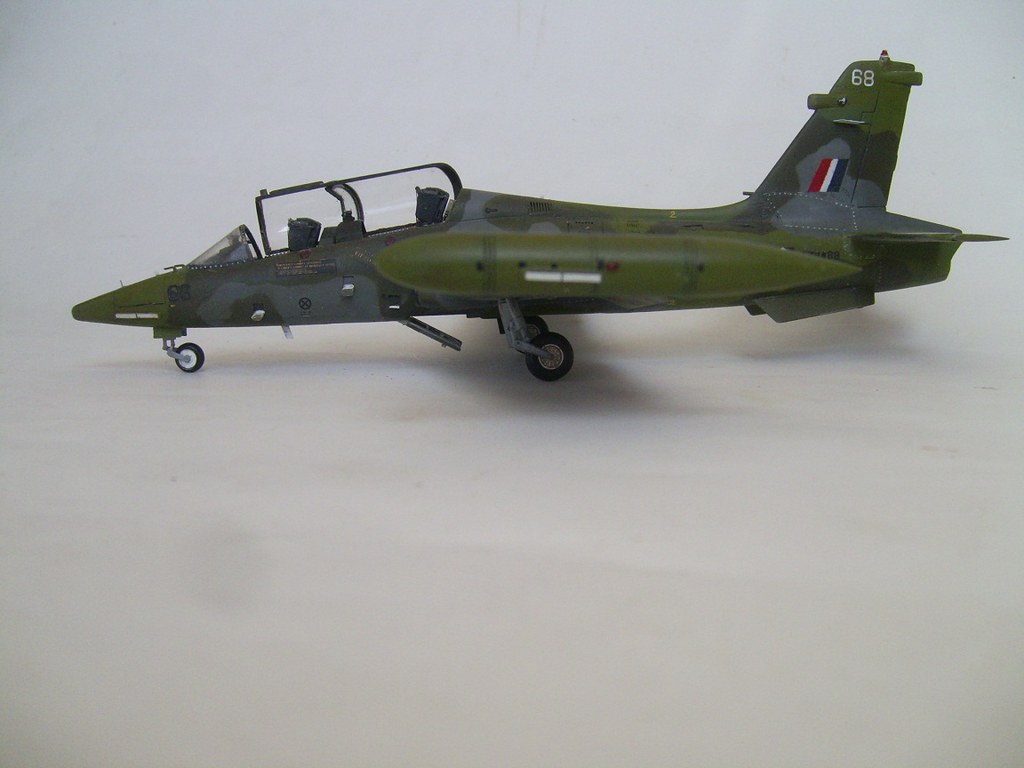
Mods: fill all panel lines and overdone fasteners, re-scribe/re-rivet, rhinoplasty, tail fin antennae, fin nav light, canopy partition with riveted thin aluminium strip frame, Eduard PE interior and panels, litho ali wing fences, decals – A/M, Old Models Decals, kit and masked/painted (diamonds). Paint; Tamiya D/G, til it went off, then Humbrol Authentic Colour, til it ran out (siiighhh), then a 20-plus year old tin of Humbrol 75 mixed with some MM Marine OD. Light green is Hu 30 + Hu 226. Grey is MM Euro 1 Grey lightened 20% with white. Certainly looks a LOT better with PE panels and no b-----y great ditches. FreMs’ parts are delicate on this one. Gnashing of teeth and blue air was a regular addition, trying to recover PE and dinky stuff that launched into the ether. HUDs are kit parts mod-ed with copper wire because kit instructions show something quite perplexing, compared to actual pics.
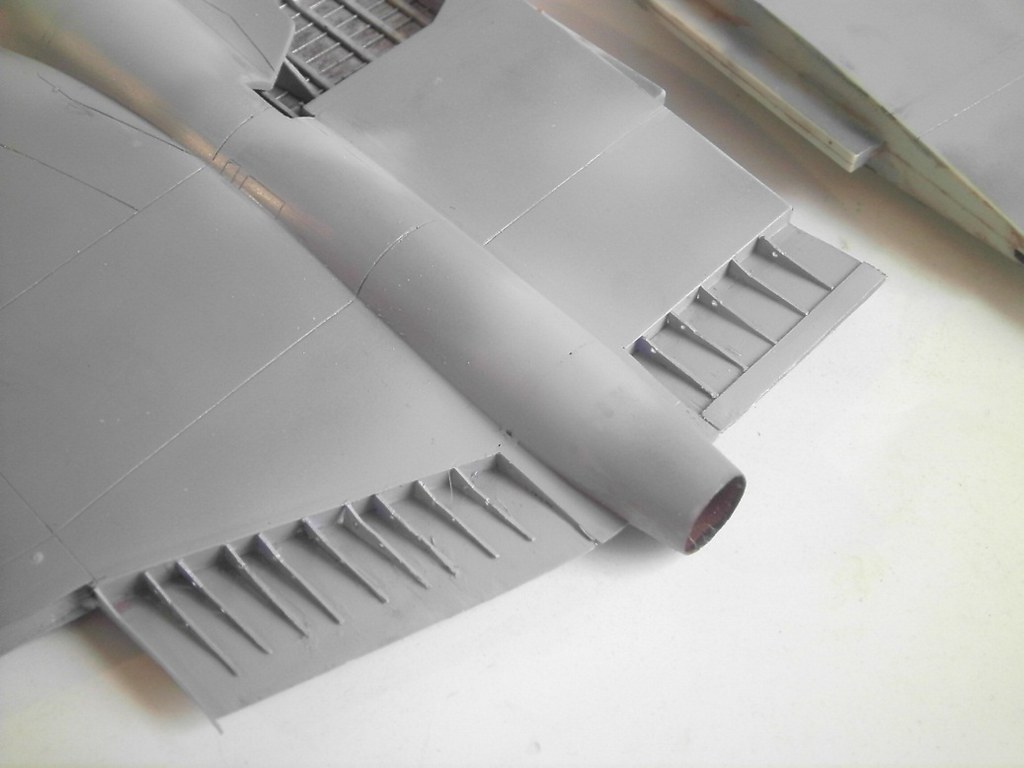
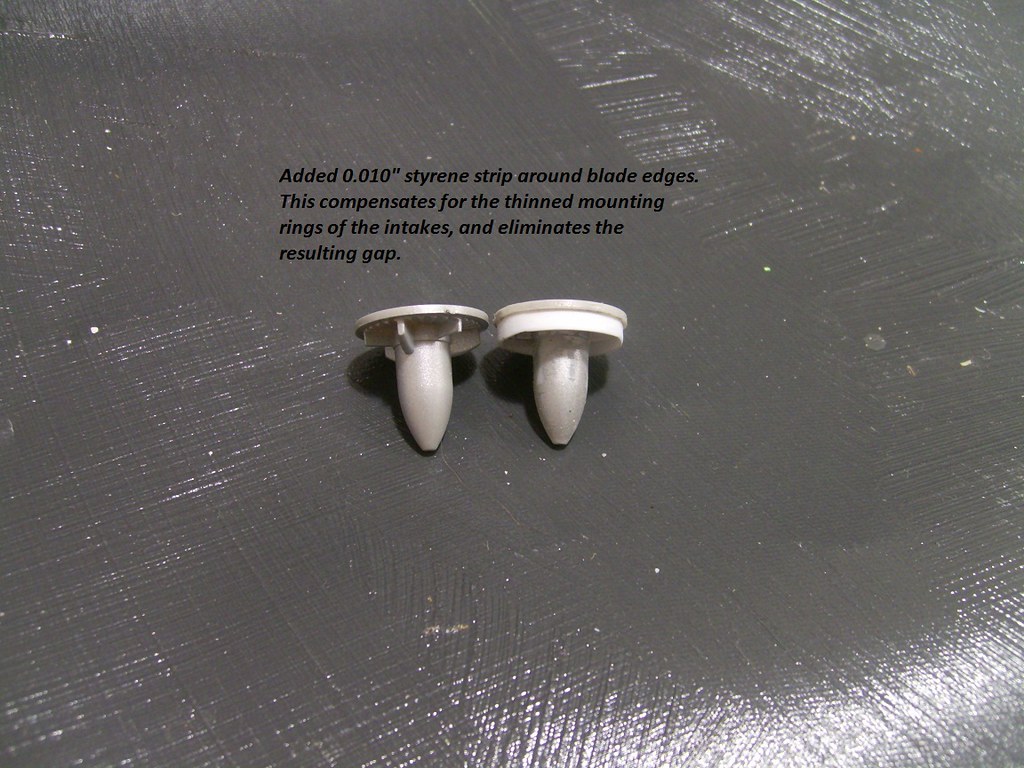
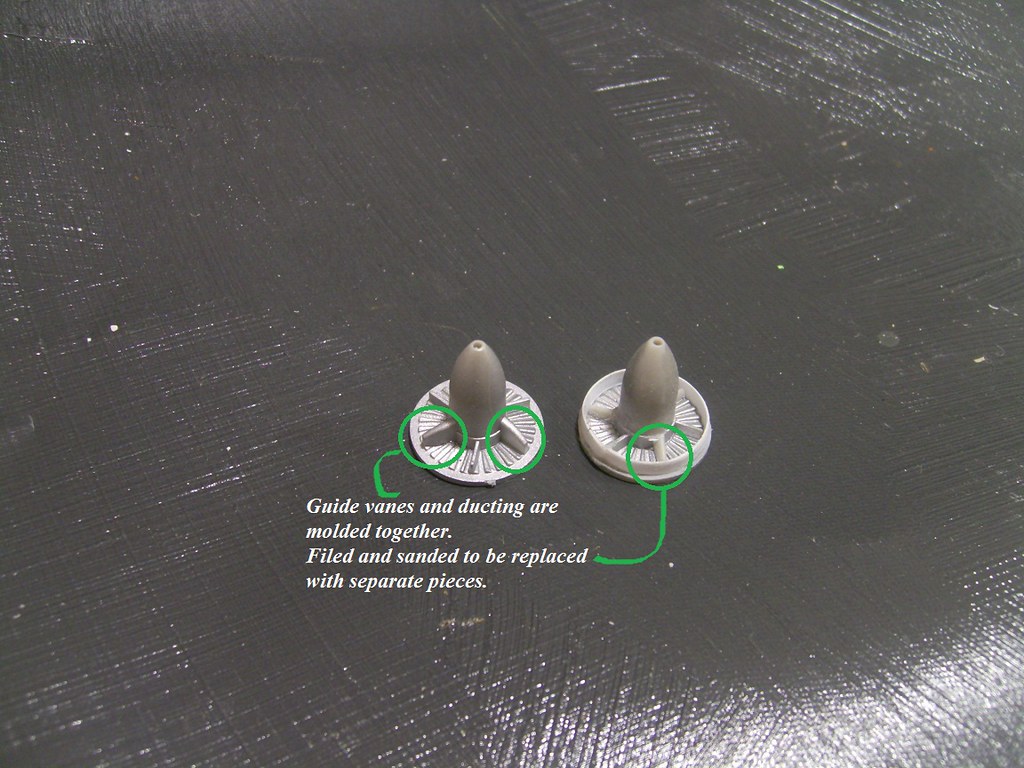
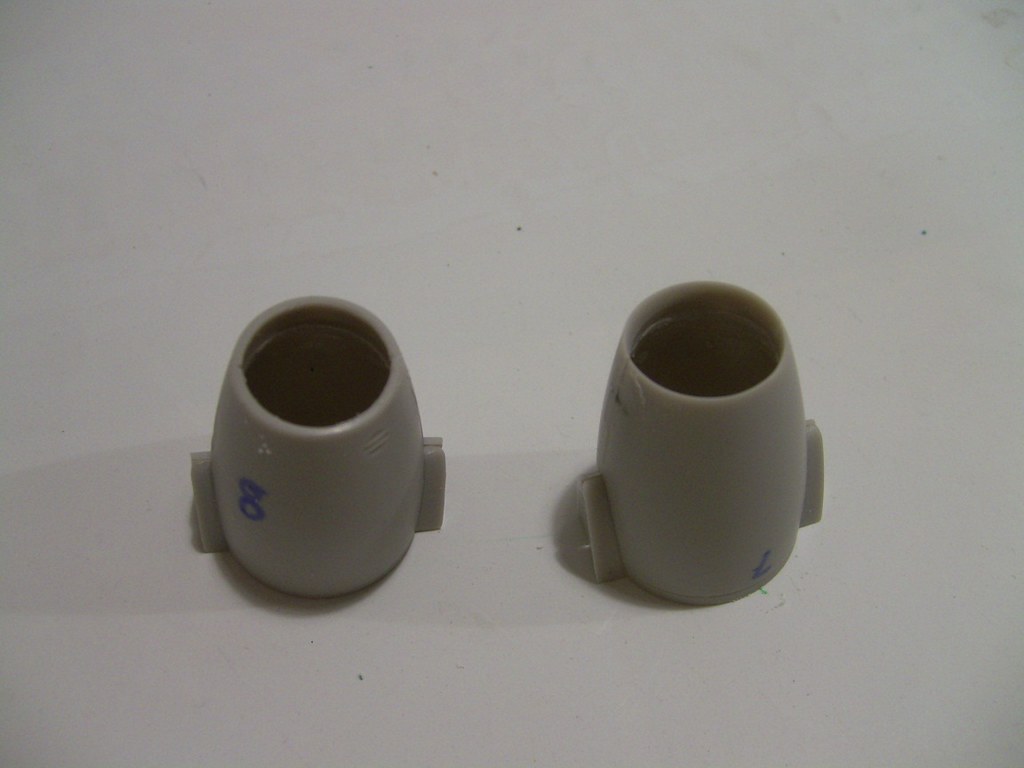
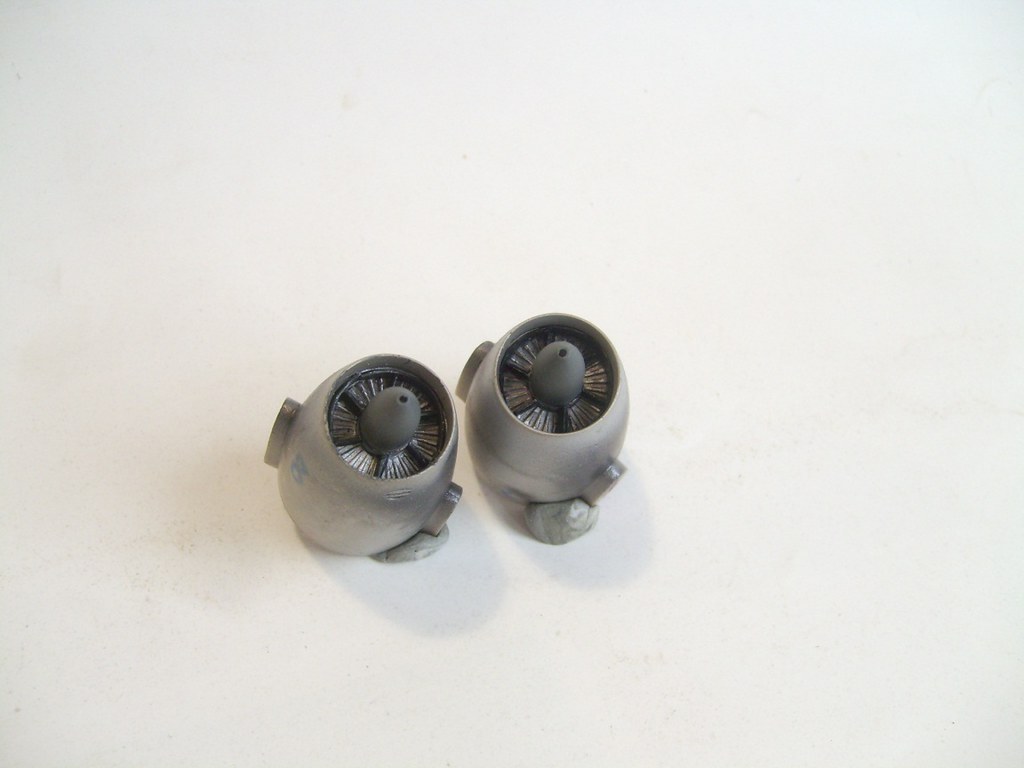
Mentioned this in o/p so I'd better explain. You can probably see the thicker vanes on the engine face. Airfix molded the ducting and vanes in one. Also, I've read notes saying there are either two or three of these "ducts", depending on engine version. Threw a coin and settled on three. Meanwhile, construction would have you fit the engine face between the nacelle halves. Sod off, I say, that'll make seam-fixing a PITA. Instead, I chopped off the rear mounting 'rib', and shaved down the front one. Now I could attend seams without interference and mount the engine part later. Thinning the rib left a gap between the nacelle and engine face. Wrapped 0.030" strip and sanded thin.
The nacelle halves have no positive location. "Don't tell me, it's Airfix!" Carefully aligned holes, drilled and pinned with 0.50mm copper. Now able to sand the chunky nacelle lip to scale oontour, and fix inside seams.
Now added ducting, with shaped sprue struts. I carefully filed the ends, test-fitting until they snug-fit. Once located in line with the vanes it took a smear of CA to secure them