|
|
Post by emron on Nov 10, 2023 10:44:09 GMT 12
Any significance to the new rego? Or does this one sum up our sentiments:
Brendon’s--- Hot(as)‘ell---‘Tang (Oohh!!).
|
|
|
|
Post by emron on Nov 5, 2023 20:31:05 GMT 12
Denys, you have the air dryer bracket in the correct position. Here’s a pic of 4115’s cockpit, forward of the dryer, that might help you to identify more parts. I’ve found that Air Force Museum’s photo MUS19100 has the best detail of this area and has already been most useful when trying to fill in the remaining gaps in MOTAT’s one. I’m sure you will enjoy the other ones in the series too, MUS19102 and MUS19103.  cockpit_port_side cockpit_port_side by Ron Wilson, on Flickr |
|
|
|
Post by emron on Oct 30, 2023 16:46:01 GMT 12
Things got off to a subdued and late start yesterday, but I returned a couple of items to the Sunderland for a test fit. The fuel jettison panel is now back in place in the cockpit, although still waiting for final adjustments before all the screw holes will line up. The bridle cable was then secured on the bow and tied to the lower shackle until we can budge its rusted pin. Afterwards I resumed my search for parts in the store shelves, especially looking for more of the small UV lamps that illuminate the instrument panel. The sole remaining example in the cockpit is shown in the previous photo above. I’ve located parts of 3 or 4 others but need more reflectors for them. The Stores Ref for this type is 5C/2454 and its common to the Hastings as well. Earlier in the week I’d been looking at an old photo of a Sunderland cockpit and recognised another assembly that I’d often passed by in the store but not realised it was S25. This is the filter and air dryer that’s installed in the pressure line between the compressor on No. 2 engine and the servomotors for auto flying controls. It's mounted on the cockpit wall alongside the left-hand seat. Once we’ve refreshed the paint it can be connected back into the circuit.  air_dryer air_dryer by Ron Wilson, on Flickr |
|
|
|
Post by emron on Oct 26, 2023 12:59:56 GMT 12
The elevator hinge now repaired and bearing cleaned. I found no chain inside the elevator, but we may be able to get a pull cord around the sprocket and draw the chain through with that.  elevator_hinge elevator_hinge by Ron Wilson, on Flickr The mooring bridle has been overhauled and restrung with fresh binding over the wire strands. The existing shackle on the bow is stuck fast in place and we’ll have to get the pin out, that’s proving defiant, before we can attach this cable properly. 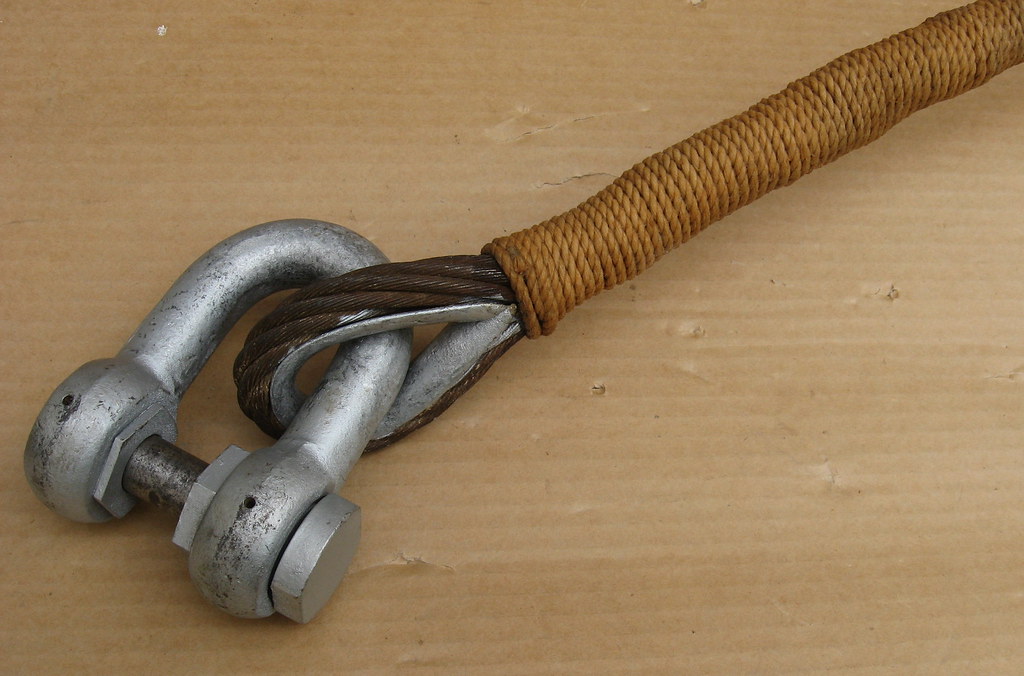 mooring_bridle mooring_bridle by Ron Wilson, on Flickr While checking out how to re-attach the shield over the instrument panel, I remembered that the wedge plate for the camera control had been inadvertently mounted upside down. So yesterday, I swapped it back, connected the plugs and slid the controller down into position on the wedge.  camera _controller camera _controller by Ron Wilson, on Flickr |
|
|
|
Post by emron on Oct 24, 2023 16:39:10 GMT 12
The elevator bearing assembly has now been paint stripped, the exfoliating corrosion on both halves of the bar has been removed with a grinding burr and the hollows filled. Tomorrow, the pieces can be primed, the halves joined together, followed by final paint. Before I return them to the tail, I’ll open up the two holes in the end of the elevator where the drive chain passed through and see if there is any remaining chain inside that we can reconnect to.
|
|
|
|
Post by emron on Oct 18, 2023 15:00:09 GMT 12
Rex got the fabric covering on both trim tabs today, so they are now ready for painting. I managed to wrestle the elevator torque tube out from the tail, and this is what the bearing bar looks like in daylight, not too pretty.  elevator_ torque_tube elevator_ torque_tube by Ron Wilson, on Flickr Anyway, the assembly came apart fairly easily. The bearing bar was made in two halves so once I take out a couple of rivets they will split. The two NOS spares that I found earlier are for other locations in the tailplane and are a different shape, so we’ll need to make the best of the original one.  elevator_bearing elevator_bearing by Ron Wilson, on Flickr Making a second search for another spare bar was unsuccessful, but instead, look what I found in the shed! They were almost as happy to see me as I was to find them, after all this time: the anti-glare shield for the Sunderland’s instrument panel and the fixed mooring bridle that is shackled to the towing eye on the bow.  shield_and_bridle shield_and_bridle by Ron Wilson, on Flickr |
|
|
|
Post by emron on Oct 15, 2023 14:57:35 GMT 12
|
|
|
|
Post by emron on Oct 10, 2023 20:27:53 GMT 12
A week later...
Press, 10 February 1967.
YACHT
SEEN
Chichester
Waves
(N.Z. Press Association)
Auckland, Feb. 9.
An Air Force Orion aircraft sighted the lone British yachtsman, Sir Francis Chichester, 150 miles north of New Zealand during a routine patrol late today.
A message received at the Hobsonville base of the Maritime Surveillance Wing tonight said that the aircraft circled overhead for several minutes to identify and photograph the yacht, Gipsy Moth IV. Sir Francis Chichester appeared on deck and waved to the airmen.
The sighting was at 5.30 p.m. The report from the aircraft said the yacht was making about five knots in moderate seas on a south-easterly heading. Visibility was down to one mile and the cloud base was at 300ft.
|
|
|
|
Post by emron on Oct 10, 2023 17:26:46 GMT 12
So was April 1967 the month they actually began operational flying? The first news account I can find of off-shore activity: Press, 2 February 1967. Cyclone Will Not Hit N.Z. (NZ Press Association) WELLINGTON Feb.1 Cyclone Dinah was gradually dissolving and almost stationary about 450 miles north-west of Auckland, the Meteorological Office said tonight.... This afternoon the Air Force sent an Orion reconnaissance aircraft and a Canberra bomber into the storm area to collect data. The crews reported that the cyclone had no clearly defined area. They pinpointed the breakaway depression at 500 miles west of Auckland about 3 p.m. |
|
|
|
Post by emron on Oct 9, 2023 10:44:16 GMT 12
Having to duck under this assembly each time going to and from the rear turret position, last time I decided to stop and check out its condition. That’s where all the Sunderland’s rudder and elevator control cables converge and are attached to the levers and torque tubes that they operate. Here’s the joint between the port elevator and the central torque tube.  port_elevator_joint port_elevator_joint by Ron Wilson, on Flickr There’s some bad corrosion between them and I suspect the hinge bearing is seized, so it’s best to remove the torque tube to gain access. Yesterday I brought down the external control locks from storage, rebuilt the port elevator one and fitted it. Now I can withdraw the torque tube without the elevator drooping. I’ve still to complete the lock for the other side but that will be installed next time. Once the rudder and elevators are bolted back on the torque tubes and moving freely, then we need to look at the trim tabs and their control runs in the tail. Both elevator tabs need finishing before they can be refitted. This is one array of sprockets, mounts and chains that move the various trim tabs and crisscross the compartment. Much of the small chain is rusted or missing so replacing that might be left for later.  trim_tab_sprocket trim_tab_sprocket by Ron Wilson, on Flickr |
|
|
|
Post by emron on Sept 22, 2023 17:26:23 GMT 12
Down back of the Sunderland we’ve been making ready to mount the rear turret. I’ve checked out the row of anchor nuts around the rim where the turret is bolted down on, replaced missing ones and cleared threads on the others, I did the same for the row around the outside where the cover strip later seals the gap. Here are the other three fairings that enclose the top and sides of the turret when in place.  turret_fairings turret_fairings by Ron Wilson, on Flickr This cover closes an access port in the hull below the turret, the two arms clamp it in place from the inside. The rubber seal that it seats into has perished, so as soon as that has been replaced this assembly will be put back before the turret is lowered in.  access_cover access_cover by Ron Wilson, on Flickr We previously left off the back half of the cupola for a better view of the interior, but I’ve now bolted it back on and will shortly rivet the door hinges on too. That will leave just the seals for the gun slots to be finished, before the turret will be ready.  turret_doors3 turret_doors3 by Ron Wilson, on Flickr |
|
|
|
Post by emron on Sept 20, 2023 17:33:24 GMT 12
|
|
|
|
Post by emron on Sept 11, 2023 20:34:21 GMT 12
The Vildebeest fuselage plus a large quantity of parts were provided to the RNZAF by MOTAT in late 1982 and initially on loan. They may have been held at Whenuapai for a while before being ferried to storage at Weedons. 1986 sounds about right for when that loan was converted to a gift. In return the Air Force Museum offered to rebuild the Mosquito wing. MOTAT took up that offer in August 1989 when the pieces of wing were consigned to Wigram. The P-47 wasn’t part of that deal, it was a later gift and dispatched in 1992.
|
|
|
|
Post by emron on Aug 13, 2023 16:13:14 GMT 12
|
|
|
|
Post by emron on Aug 3, 2023 12:31:51 GMT 12
He flew eastwards during the solo circumnavigation in the JetRanger (following the prevailing winds) and then later (1995) he was first to fly a helicopter around the globe the other way, accompanied by his wife, Pip, in this Sikorsky.
|
|
|
|
Post by emron on Aug 3, 2023 11:30:57 GMT 12
Well that is a great new addition to the MOTAT collection. But I am puzzled, I watched the TV series Dick Smith made where he flew the helicopter around the world and I am pretty sure his helicopter was a Bell Jet Ranger? Did he circumnavigate the globe twice, in two different choppers? Dick Smith completed the first solo circumnavigation of the World in a rotary wing aircraft, aboard Bell 206B JetRanger III, VH-DIK, during 1982/3. VH-DIK is now preserved in the Powerhouse Museum, Sydney. |
|
|
|
Post by emron on Aug 2, 2023 20:05:29 GMT 12
Northland Emergency Services Trust Rescue Helicopter, Helimed 1, Sikorsky S-76A, ZK-ISJ “Juliet.” Former operators include Royal Jordanian Air Force, Round the World record holder, Dick Smith (first east-west circumnavigation as VH-CFH, 1995) and Order of St John’s Auckland rescue helicopter service 1997-2000.
|
|
|
|
Post by emron on Aug 2, 2023 16:49:07 GMT 12
Denys, the wooden guns illustrated above will not fit either the Frazer-Nash or the Boulton Paul turret without some modification. However they do have both front and rear brackets that would slot straight into the Mosquito mount. Here are details of the front Boulton Paul mount from MOTAT’s turret.  bp_front_mount bp_front_mount by Ron Wilson, on Flickr During installation on this mount, the pin is withdrawn from the square block and then the front of the receiver is lowered down over the block. the pin is inserted back through holes in the side plate of the receiver that line up with centre hole in the block. Next the rear bracket beneath the receiver is lowered into the rear mount and that pin pushed through the aligned holes.  bp_rear_mount bp_rear_mount by Ron Wilson, on Flickr To select a suitable version of replica you would need to ensure that it has the correct gap under the front of the receiver to accept the square block and that holes have been drilled in the side plates in line with it, so that the gun sits parallel in the mounting. |
|
|
|
Post by emron on Jul 27, 2023 11:52:44 GMT 12
Last time I looked it didn’t have an ejection seat. But you’re right, we should call time on those erroneous stencils. That standing joke has gone on for long enough. What may have started out as a bit of fun for painting apprentices at the TTS before WR202 was donated to MOTAT, has raised more than a laugh or two in the years since. We’re aware of other things that should be done to improve the FB.9’s appearance too, but let’s leave it to the Collections team to decide when and how to carry out the re-vamp as it were.
|
|
|
|
Post by emron on Jul 25, 2023 14:12:50 GMT 12
Next instalment on the captivating topic of Sunderland floorboards. Now that the wooden ones for the rear compartment are painted, they needed some minor trimming before they fitted. That’s been done to the first four and they are in the process of being secured in place. I decided to re-work the fifth one as that was the only original left, but the light wood was split and broken on the ends, so I’ve glued and patched them to return some strength. This board is the final one that butts up to the bulkhead forward of the rear turret. There are some panels missing from that area which I may need to re-create before everything will connect. I’m still not sure if a step was there too, as it’s quite a climb into the turret from up the back.
|
|


